<?xml version="1.0" encoding="utf-8"?><feed xmlns="http://www.w3.org/2005/Atom" ><generator uri="https://jekyllrb.com/" version="4.4.1">Jekyll</generator><link href="https://pedrokroger.net/feed.xml" rel="self" type="application/atom+xml" /><link href="https://pedrokroger.net/" rel="alternate" type="text/html" /><updated>2026-08-05T12:00:22-03:00</updated><id>https://pedrokroger.net/feed.xml</id><title type="html">Pedro Kroger</title><subtitle>Write an awesome description for your new site here. You can edit this line in _config.yml. It will appear in your document head meta (for Google search results) and in your feed.xml site description.</subtitle><entry><title type="html">PyCharm as the Ultimate Python Debugger</title><link href="https://pedrokroger.net/programming/pycharm/python/2015/03/05/python-debugger.html" rel="alternate" type="text/html" title="PyCharm as the Ultimate Python Debugger" /><published>2015-03-05T12:07:44-03:00</published><updated>2015-03-05T12:07:44-03:00</updated><id>https://pedrokroger.net/programming/pycharm/python/2015/03/05/python-debugger</id><content type="html" xml:base="https://pedrokroger.net/programming/pycharm/python/2015/03/05/python-debugger.html"><![CDATA[<p>Many people use the standard Python debugger (<a href="https://docs.python.org/2/library/pdb.html">pdb</a> or <a href="https://pypi.python.org/pypi/ipdb">ipdb</a>) because it works
well and can be used as a standalone tool or with your favorite editor. I’ve used it for
years, but today I’m more productive using the PyCharm debugger. It can debug Python,
JavaScript, and Django and Jinja Templates (making the debugging process seamless in web
applications). Also, I don’t have to worry about leaving <code class="language-plaintext highlighter-rouge">pdb.set_trace</code> calls around
anymore.</p>

<p>Since the process to run and debug code in PyCharm is similar, we will look how to run
code first (jump to the debugging section if you already know how to run code in PyCharm).</p>

<p>In this article shortcuts are written with the first letter of keyboard modifiers
followed by the actual keys in lower case. The keys are presented for both OS X and
Windows/Linux in the format (mac, win). For example, the shortcut (⌘-S-⌥-t, S-A-C-t)
means to press the keys ⌘, Shift, Option, and t at the same time on the Mac, and Shift,
Alt, Control, and t on Windows and Linux. When only one shortcut is presented, it will be
the same on all operating systems.</p>

<h2 id="running-python-code">Running Python Code</h2>

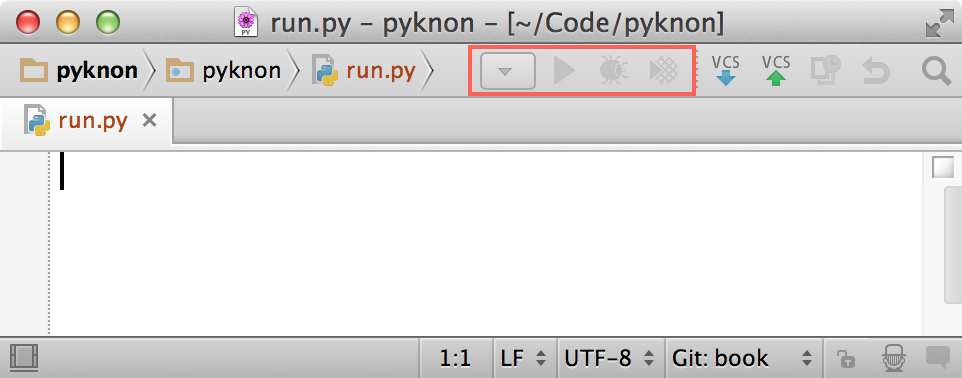
<p>If we haven’t run any code in our project before, the icons to run and debug will be
disabled:</p>

<p><img src="/img/2015-03/run-disabled.png" alt="" width="80%" /></p>

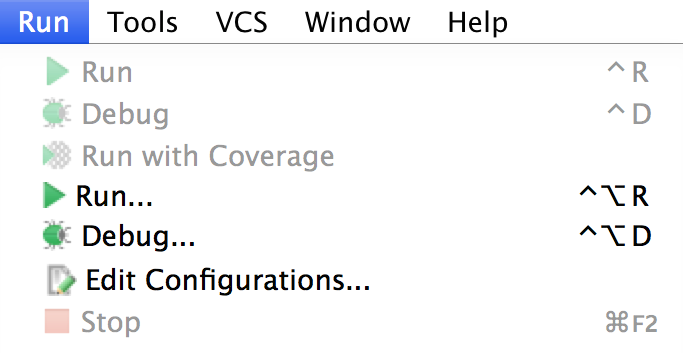
<p>Some items will be disabled in the <em>Run</em> menu as well:</p>

<p><img src="/img/2015-03/run-menu.png" alt="" width="80%" /></p>

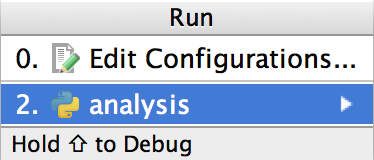
<p>To run a script for the first time, we need to either create a configuration (<em>Run→Edit
Configurations…</em>) or ask PyCharm to run the current file by going to
<em>Run→Run… (⌥-C-r, A-C-r)</em>, where PyCharm will automatically offer to run the
current file. In the following example I’m editing a file named <code class="language-plaintext highlighter-rouge">analysis.py</code>. Notice how
PyCharm creates a new configuration named <code class="language-plaintext highlighter-rouge">analysis</code>:</p>

<p><img src="/img/2015-03/run-dialog.png" alt="" width="80%" /></p>

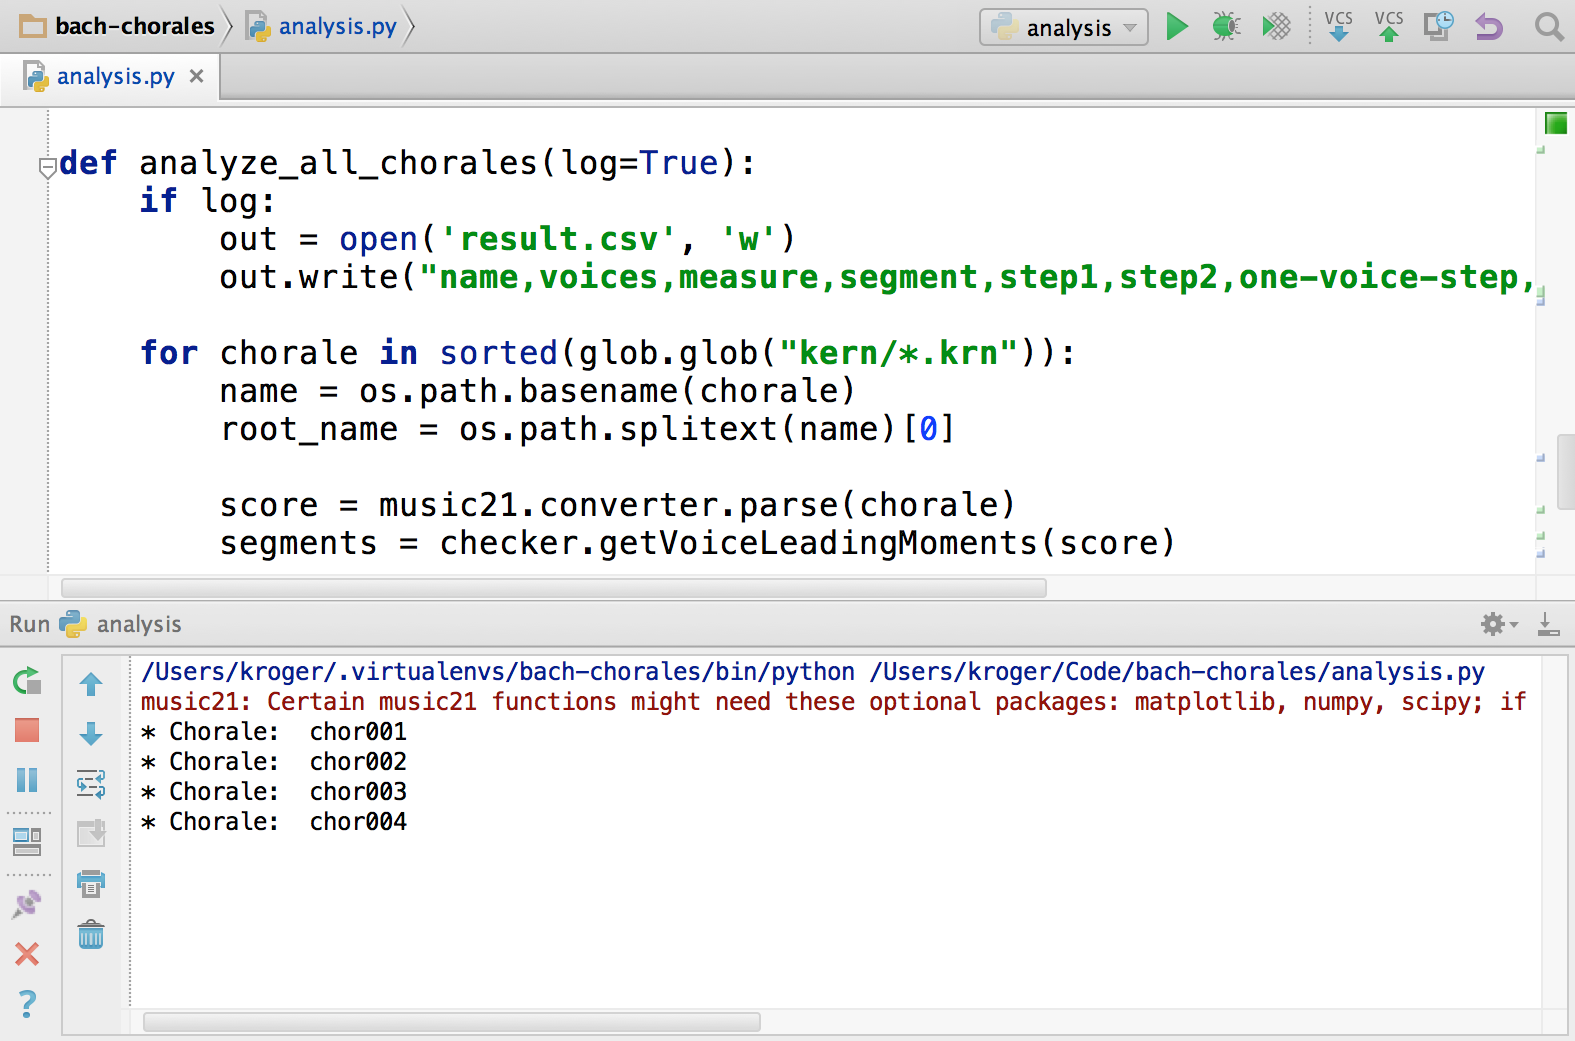
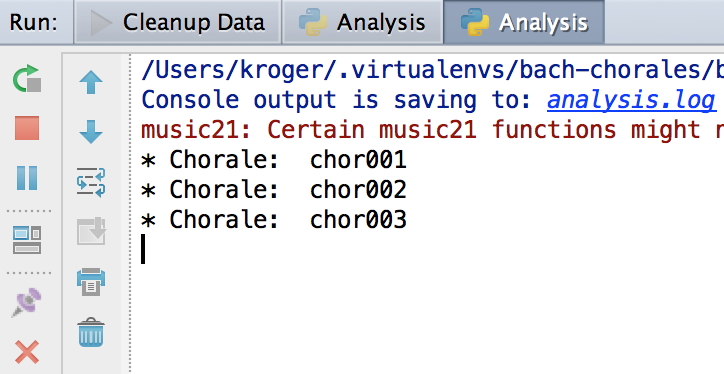
<p>PyCharm will run the file and show a tool window with the results, if any.</p>

<p><img src="/img/2015-03/run-running.png" alt="" width="80%" /></p>

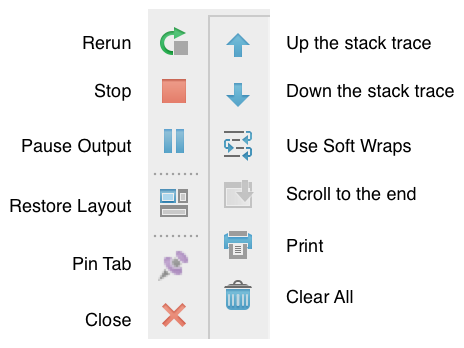
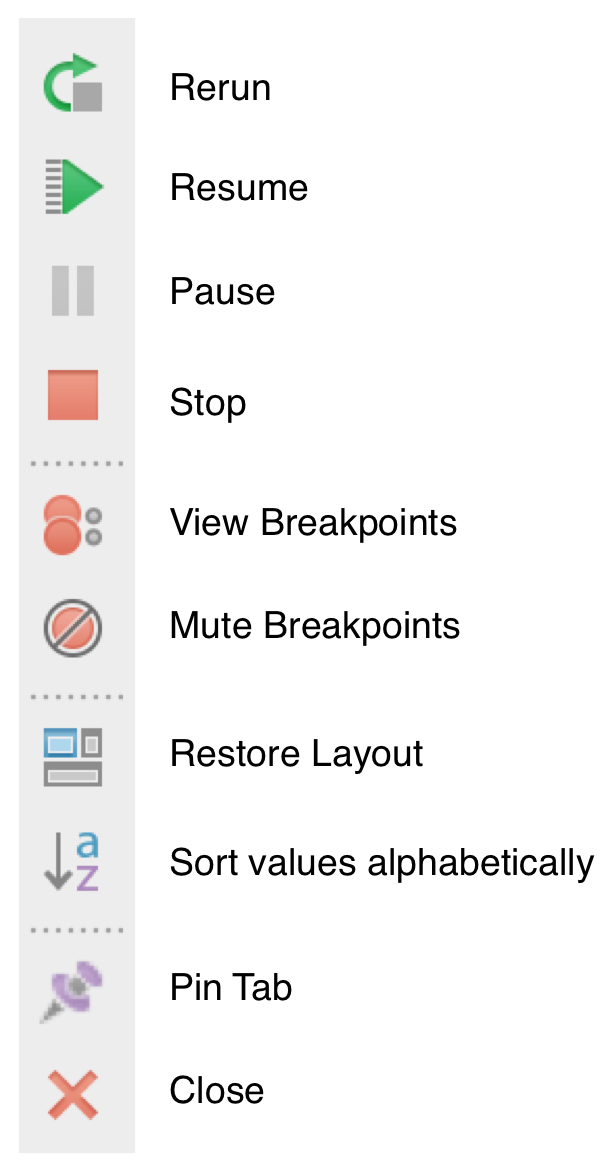
<p>The Run tool window has many buttons to help us deal with the running script. We can do
things like pause, stop, and rerun the script and move up and down the stack trace.</p>

<p><img src="/img/2015-03/run-icons-legend.png" alt="" width="80%" /></p>

<p>The following table summarizes the main actions. The <a href="http://www.jetbrains.com/pycharm/webhelp/run-tool-window.html">manual</a> has
a complete description.</p>

<table class="docutils" border="1">
  <colgroup> <col width="25%" /> <col width="28%" /> <col width="47%" /> </colgroup> <tr class="row-odd">
    <th class="head">
      Name
    </th>

    <th class="head">
      Shortcut
    </th>

    <th class="head">
      Description
    </th>
  </tr>

  <tr class="row-even">
    <td>
      Rerun
    </td>

    <td>
      `(⌘-r, C-F5)`
    </td>

    <td>
      Stop the current process and run it again
    </td>
  </tr>

  <tr class="row-odd">
    <td>
      Stop
    </td>

    <td>
      `(⌘-F2, C-F2)`
    </td>

    <td>
      Stop the current process
    </td>
  </tr>

  <tr class="row-even">
    <td>
      Pause Output
    </td>

    <td>
    </td>

    <td>
      Keep running the process but don’t show its output
    </td>
  </tr>

  <tr class="row-odd">
    <td>
      Restore Layout
    </td>

    <td>
    </td>

    <td>
      Restore the default window layout, discarding the current one
    </td>
  </tr>

  <tr class="row-even">
    <td>
      Pin Tab
    </td>

    <td>
    </td>

    <td>
      Run code on a new tab
    </td>
  </tr>

  <tr class="row-odd">
    <td>
      Close
    </td>

    <td>
      `(⌘-w, S-C-F4)`
    </td>

    <td>
      Closes the current tab and terminate the process
    </td>
  </tr>

  <tr class="row-even">
    <td>
      Up the stack trace
    </td>

    <td>
      `(⌘-⌥-↑, A-C-↑)`
    </td>

    <td>
      Navigate up the stack trace
    </td>
  </tr>

  <tr class="row-odd">
    <td>
      Down the stack trace
    </td>

    <td>
      `(⌘-⌥-↓, A-C-↓)`
    </td>

    <td>
      Navigate down the stack trace
    </td>
  </tr>

  <tr class="row-even">
    <td>
      Use Soft Wraps
    </td>

    <td>
    </td>

    <td>
      Enable word wrap for long lines
    </td>
  </tr>

  <tr class="row-odd">
    <td>
      Clear All
    </td>

    <td>
    </td>

    <td>
      Remove all text in the console
    </td>
  </tr>
</table>

<p>We can hide the Run tool window with <em>(⌘-4, A-4)</em>.</p>

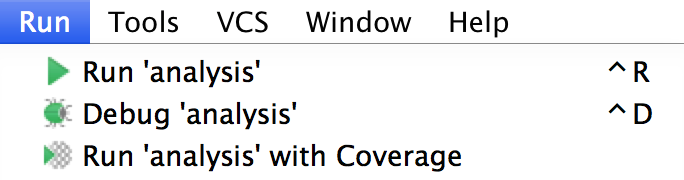
<p>Once a script is run for the first time, it becomes available in the <code class="language-plaintext highlighter-rouge">Run</code> menu. PyCharm
will show the most recently run command in <code class="language-plaintext highlighter-rouge">Run→Run '&lt;script name&gt;' (C-r, S-F10)</code>, where
<code class="language-plaintext highlighter-rouge">&lt;script name&gt;</code> is the name of the Python file without the extension (<code class="language-plaintext highlighter-rouge">analysis</code>, in our
previous example).</p>

<p>This command will run the original file even if we are working on a different one. In our
example, if we are editing a different file (say <code class="language-plaintext highlighter-rouge">chorales.py</code>) and type <code class="language-plaintext highlighter-rouge">C-r </code>on the Mac
or <code class="language-plaintext highlighter-rouge">S-F10</code> on Windows or Linux, PyCharm will run the file <code class="language-plaintext highlighter-rouge">analysis.py</code>, since this is
the last file we ran. This is useful when we have a master script and are making
modifications to a sub-module, for instance.</p>

<p><img src="/img/2015-03/run-menu-analysis.png" alt="" width="80%" /></p>

<p>After we run the script for the first time, the related commands in the menubar will be
available, and we can choose the script to run there:</p>

<p><img src="/img/2015-03/run-analysis-menubar.png" alt="" width="80%" /></p>

<p>PyCharm will create a new tab every time we run a script. If we don’t close the previous
tab we may end up with many different tabs, so make sure you close each tab after
running, and are, in fact, on the right tab.</p>

<p><img src="/img/2015-03/run-tabs.png" alt="" width="80%" /></p>

<h3 id="new-configuration">New Configuration</h3>

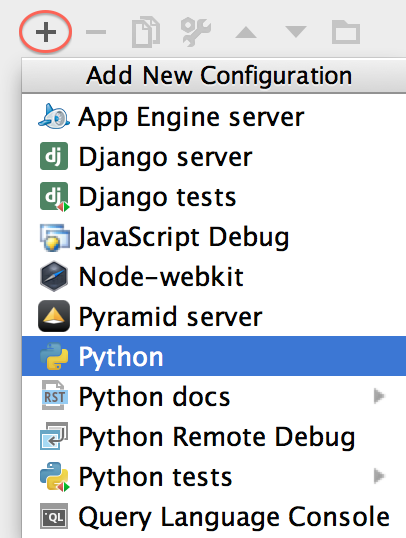
<p>When we want to run things with more control we need to create a configuration by going
to <em>Run→Edit Configurations…</em> and clicking on the + button <em>(⌘-n, A-Insert)</em>.
PyCharm will ask what type of configuration we want (that is, if we want to run a Python
script, a Django or Pyramid server, and so on) and will show the appropriate options for
each type.</p>

<p><img src="/img/2015-03/run-new-configuration.png" alt="" width="80%" /></p>

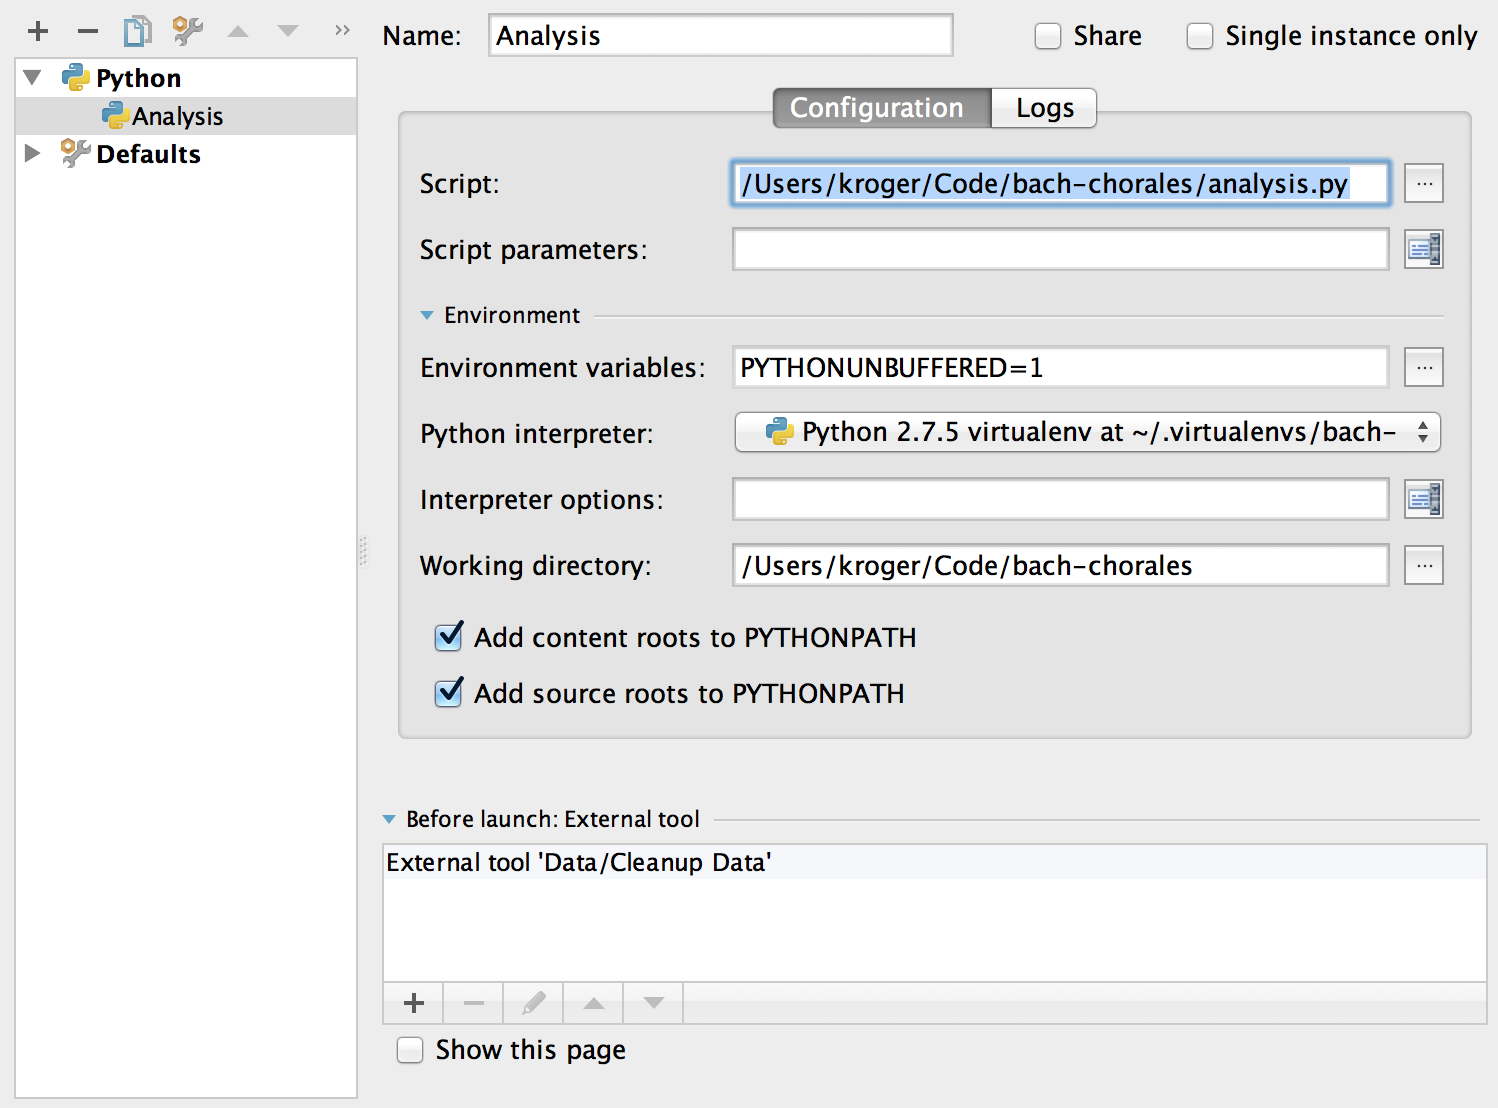
<p>We can choose the script to run, passing parameters if necessary, the Python interpreter,
and the working directory. We can also launch an external tool before running the script,
which is great if we need to do things like data pre-processing.</p>

<p><img src="/img/2015-03/run-new-configuration-setup.png" alt="" width="80%" /></p>

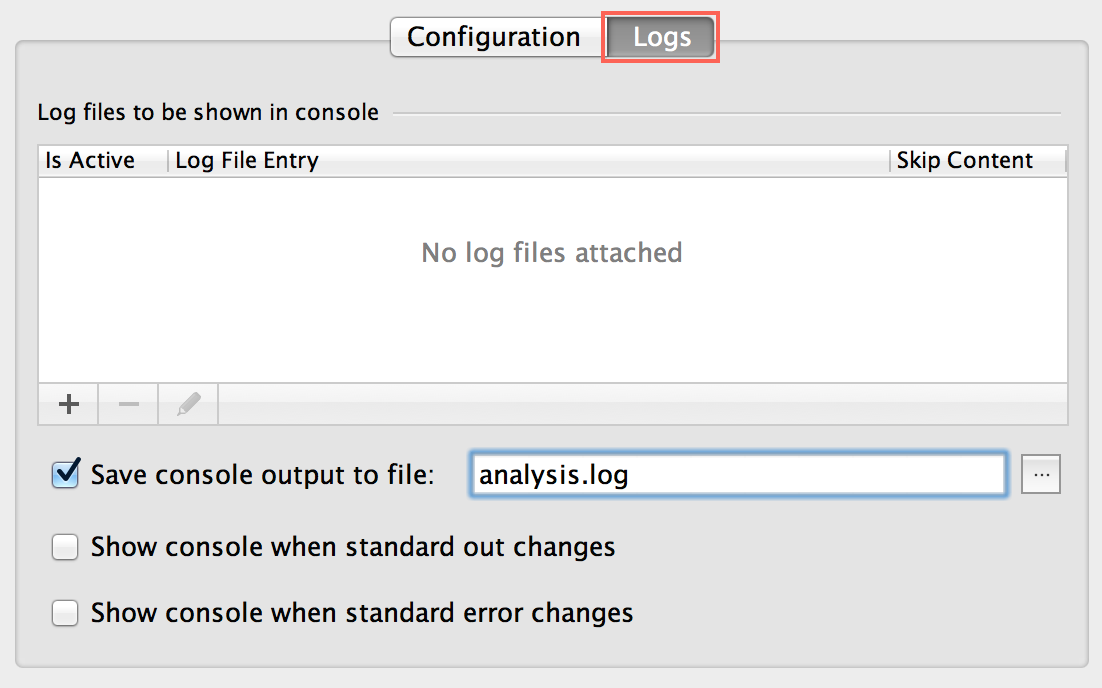
<p>In the Logs tab we can add log files to be shown in PyCharm’s console during the script
execution or save the console output to a file.</p>

<p><img src="/img/2015-03/run-with-log.png" alt="" width="80%" /></p>

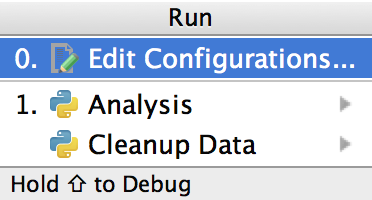
<p>Naturally, we can have multiple configurations; we can switch between them by going to
<em>Run→Run… (⌥-C-r, A-C-r)</em> and picking the one we want.</p>

<p><img src="/img/2015-03/run-separate-files.png" alt="" width="80%" /></p>

<h2 id="the-python-debugger">The Python Debugger</h2>

<p>To debug code in PyCharm, we need to create a new configuration in <em>Run→Edit
Configurations…</em> or debug an existing script by going to <em>Run→Debug…
(⌥-C-d, S-A-F9)</em>. After that it will be available in
<code class="language-plaintext highlighter-rouge">Run→Debug '&lt;script name&gt;' (C-d, S-F9)</code>, where <code class="language-plaintext highlighter-rouge">&lt;script name&gt;</code> is the name of the Python
file without the extension (<code class="language-plaintext highlighter-rouge">analysis</code>, in our example). As you can see, it works just
like running code.</p>

<p><img src="/img/2015-03/run-menu-analysis.png" alt="" width="80%" /></p>

<p>Similarly to the <code class="language-plaintext highlighter-rouge">Run</code> command, the menubar will now be enabled and we can choose the
script to debug by clicking on the insect icon.</p>

<p><img src="/img/2015-03/debug-toolbar.png" alt="" width="80%" /></p>

<p>One of the main differences between running and debugging a script is that in debugging
we want to define breakpoints. In PyCharm, a breakpoint must be on a line with working
code; it can’t be on a line that is blank or starts with a comment. We create breakpoints
by clicking on the gutter on the left.</p>

<p><img src="/img/2015-03/debug-breakpoint.png" alt="" width="80%" /></p>

<p>We can also create a temporary breakpoint by Alt-clicking on the gutter. As the name
suggests, a temporary breakpoint will be removed after being hit. Notice that the
temporary breakpoint icon is different from the regular one. Check the <a href="http://www.jetbrains.com/pycharm/webhelp/breakpoints-icons-and-statuses.html">manual</a> for
more information about breakpoint icons.</p>

<p><img src="/img/2015-03/debug-temp-breakpoint.png" alt="" width="80%" /></p>

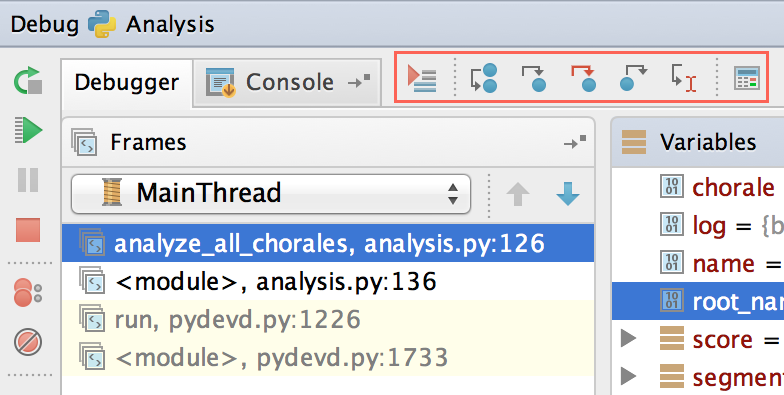
<p>PyCharm’s debug tool window has everything we expect in a graphical debugger. From here
we can navigate the call stack and inspect the data available in each stack frame. We can
keep an eye on some variables by adding them to the watch list.</p>

<p><img src="/img/2015-03/debug-view.png" alt="" width="80%" /></p>

<p>The debug tool window has many of the buttons we have seen in the Run tool window,
allowing us to pause, stop, and rerun the script. In addition, we can view the
breakpoints—also available in <em>Run→View Breakpoints… (⌘-S-F8, S-C-F8)</em>—and mute
(that is, disable) all breakpoints.</p>

<p><img src="/img/2015-03/debug-icons-legend.png" alt="" width="80%" /></p>

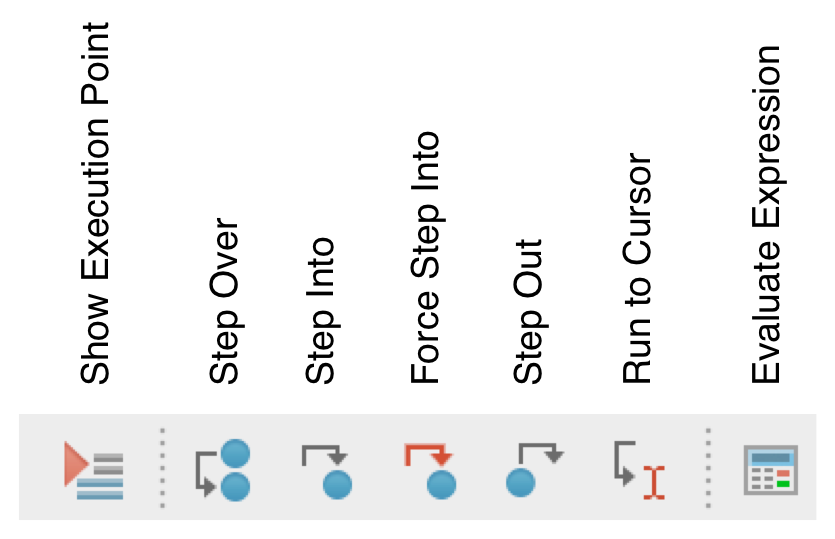
<p>The icons in the top right corner, allowing us to step in and out of the program, are the
ones we will use the most:</p>

<p><img src="/img/2015-03/debug-step-icons.png" alt="" width="80%" /></p>

<p>In the following image, we can see each icon with its name. The table below shows the
name, shortcut, and description for each icon.</p>

<p><img src="/img/2015-03/step-icons-legend.png" alt="" width="80%" /></p>

<table class="docutils" border="1">
  <colgroup> <col width="25%" /> <col width="28%" /> <col width="47%" /> </colgroup> <tr class="row-odd">
    <th class="head">
      Name
    </th>

    <th class="head">
      Shortcut
    </th>

    <th class="head">
      Description
    </th>
  </tr>

  <tr class="row-even">
    <td>
      Show Execution Point
    </td>

    <td>
      `(⌥-F10, A-F10)`
    </td>

    <td>
      Go back to the execution point. Useful if we visit other files and want to go back
    </td>
  </tr>

  <tr class="row-odd">
    <td>
      Step Over
    </td>

    <td>
      `(F8)`
    </td>

    <td>
      Step to the next line
    </td>
  </tr>

  <tr class="row-even">
    <td>
      Step Into
    </td>

    <td>
      `(F7)`
    </td>

    <td>
      Descend into a method or function call on the next line
    </td>
  </tr>

  <tr class="row-odd">
    <td>
      Force Step Into
    </td>

    <td>
      `(S-⌥-F7, S-A-F7)`
    </td>

    <td>
      Descend into the method even if it’s to be skipped
    </td>
  </tr>

  <tr class="row-even">
    <td>
      Step Out
    </td>

    <td>
      `(S-F8)`
    </td>

    <td>
      Return to the line where the current function was called
    </td>
  </tr>

  <tr class="row-odd">
    <td>
      Run to Cursor
    </td>

    <td>
      `(⌥-F9, A-F9)`
    </td>

    <td>
      Run the code where the caret is located. Useful to skip stepping over uninteresting code
    </td>
  </tr>

  <tr class="row-even">
    <td>
      Evaluate Expression
    </td>

    <td>
      `(⌥-F8, A-F8)`
    </td>

    <td>
      Evaluate an expression or code fragment
    </td>
  </tr>
</table>

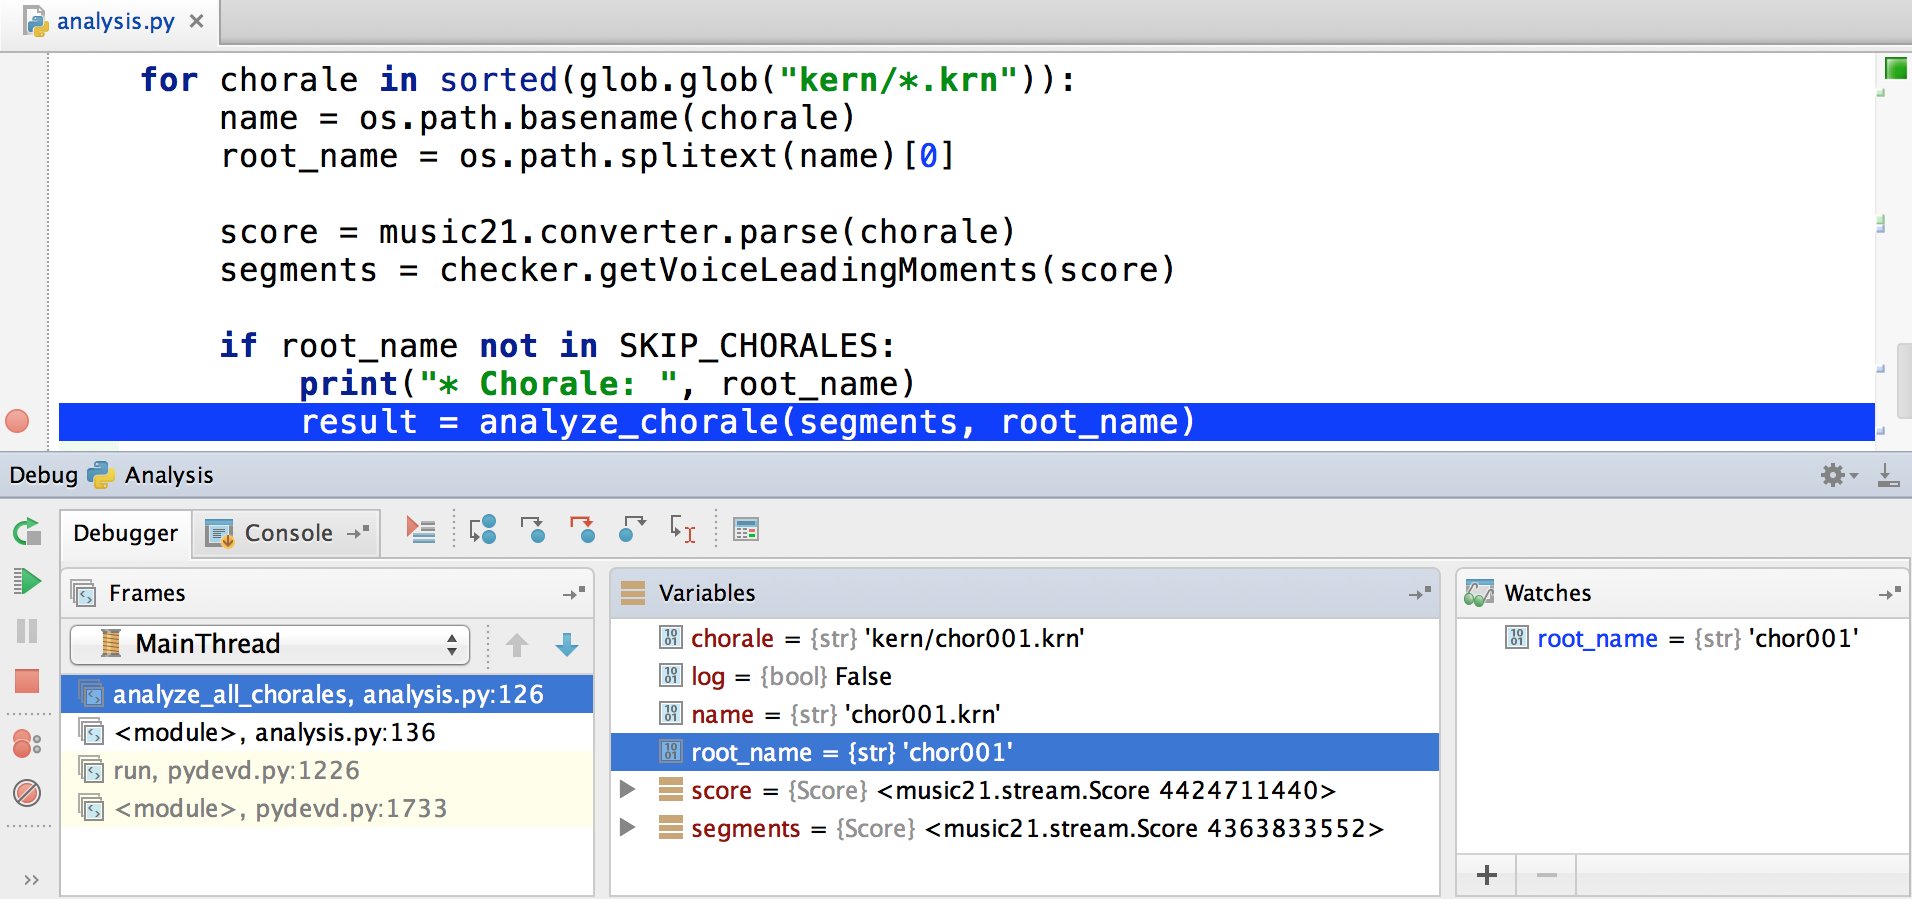
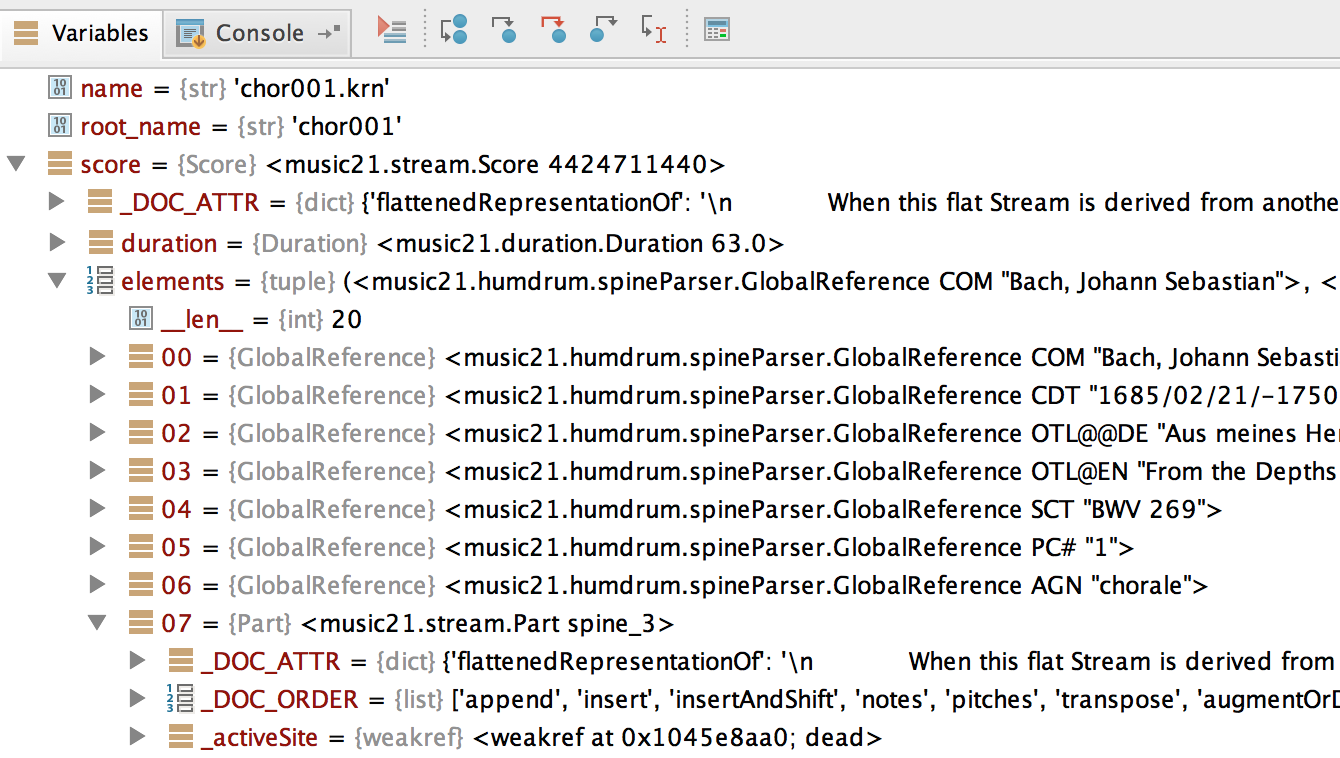
<p>The variables pane is a great way to explore complex data. It was invaluable when I was
learning Django and getting acquainted with the <code class="language-plaintext highlighter-rouge">HttpRequest </code>object, for instance. In
the following example, we can see some <a href="http://web.mit.edu/music21/">music21</a> data, especially the complex <code class="language-plaintext highlighter-rouge">Score</code>
class. The Variables pane helps me to inspect attributes such as <code class="language-plaintext highlighter-rouge">duration</code> and
<code class="language-plaintext highlighter-rouge">elements</code>.</p>

<p><img src="/img/2015-03/debug-complex-data.png" alt="" width="80%" /></p>

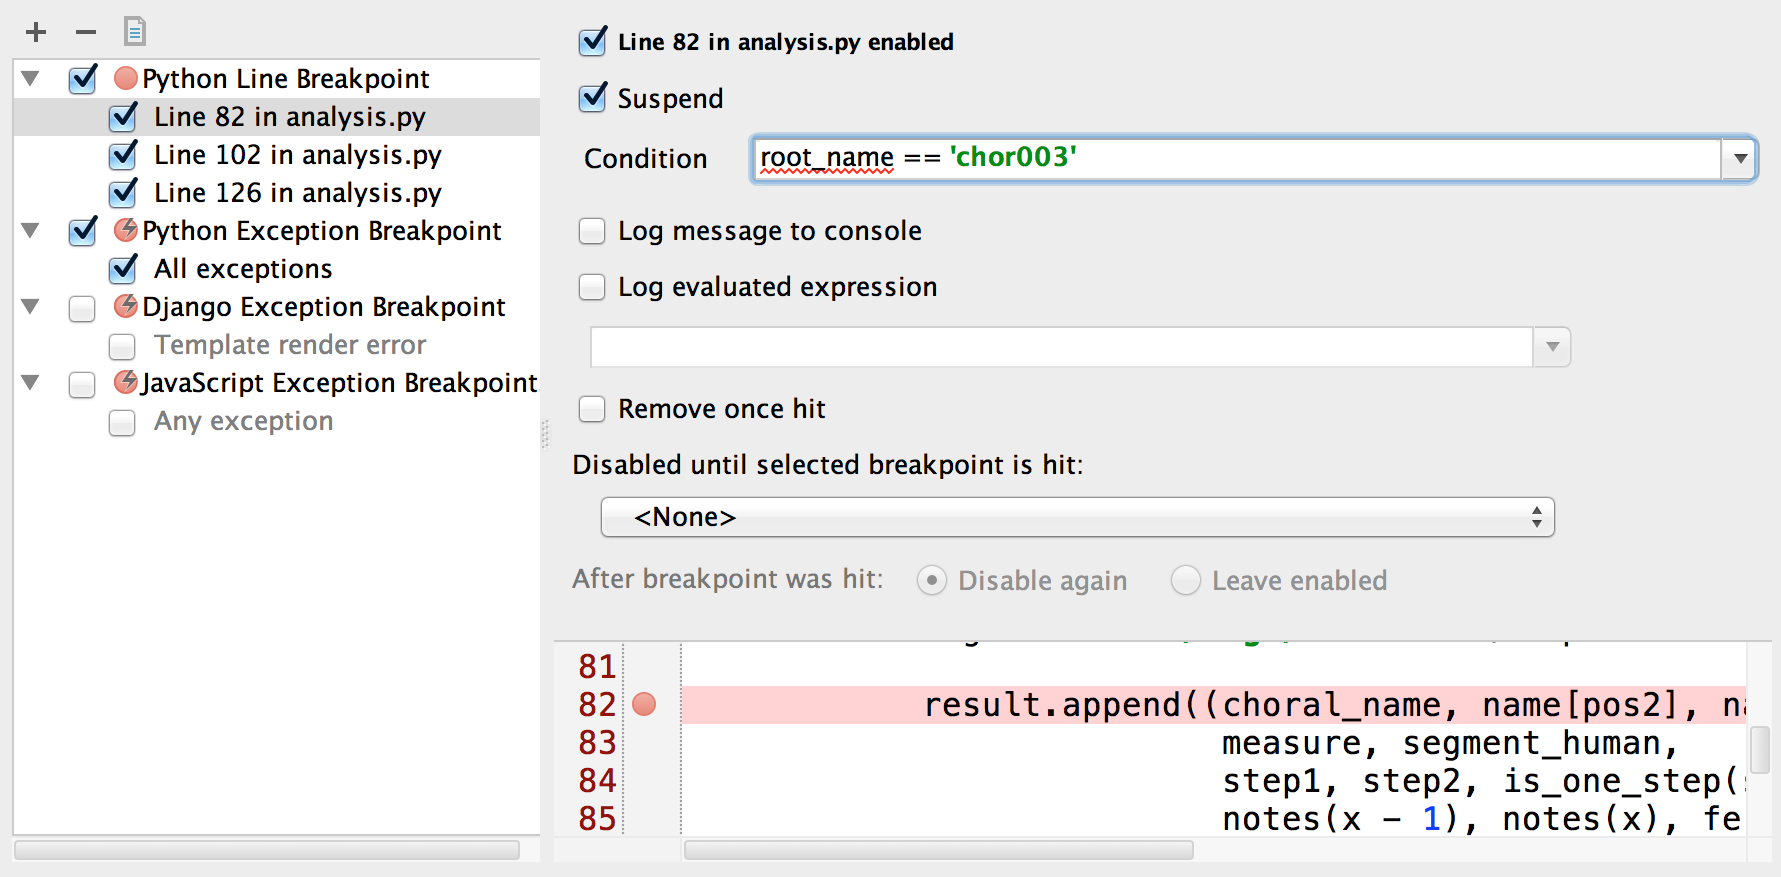
<p>We can see all breakpoints in <em>Run→View Breakpoints… (⌘-S-F8, S-C-F8)</em>. From here
we can add, remove, or edit breakpoints; and set conditional breakpoints and log messages
or expressions.</p>

<p><img src="/img/2015-03/debug-list-breakpoints.png" alt="" width="80%" /></p>

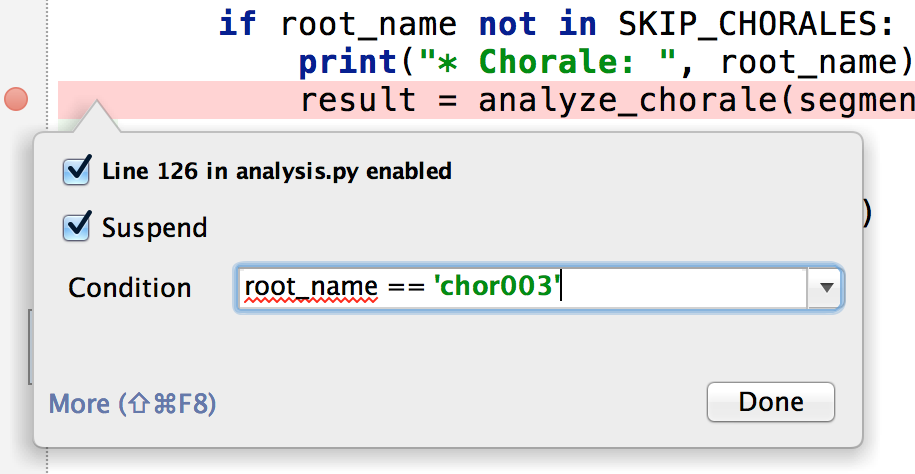
<p>One way to quickly edit a breakpoint is to right-click on the breakpoint on the gutter. A
popup will allow us to enable the breakpoint and add a condition.</p>

<p><img src="/img/2015-03/debug-condition.png" alt="" width="80%" /></p>

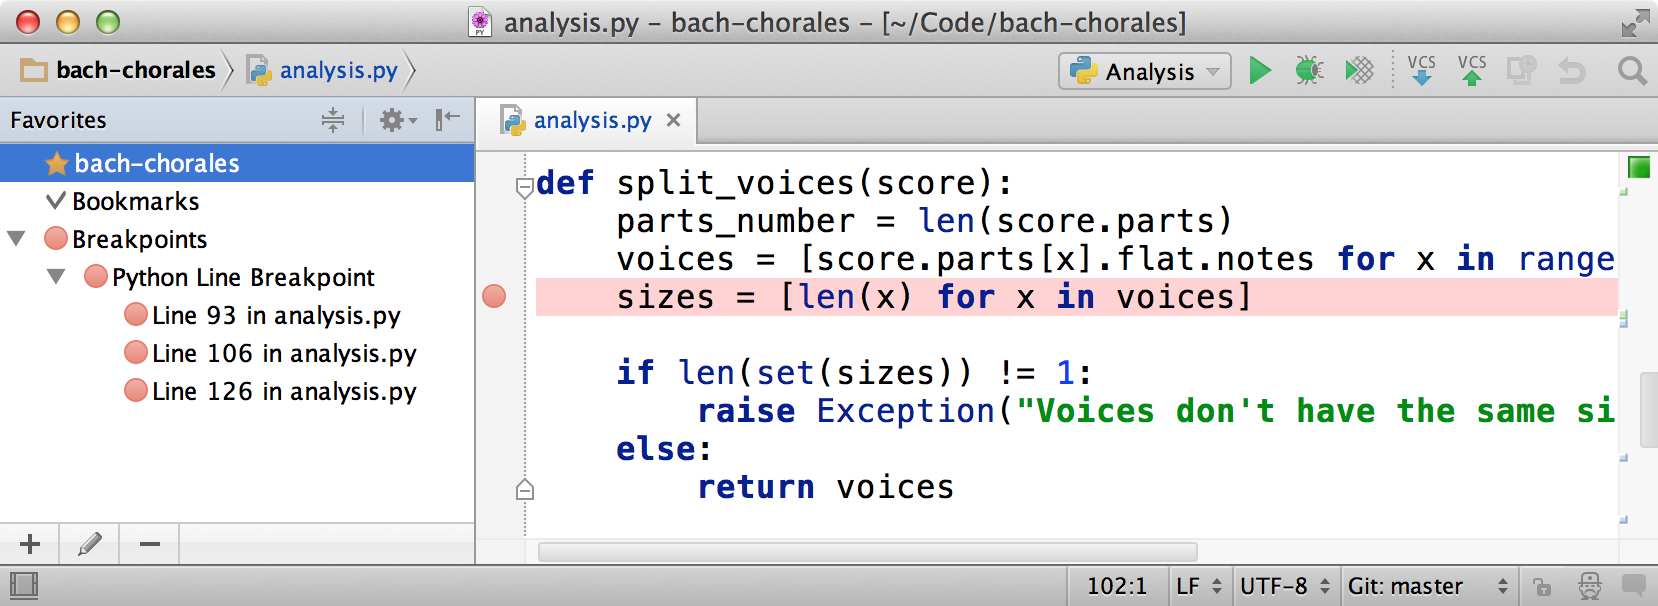
<p>We can also see the breakpoints by selecting the Favorites Tool <em>(⌘-2, A-2)</em>.</p>

<p><img src="/img/2015-03/debug-favorites.png" alt="" width="80%" /></p>

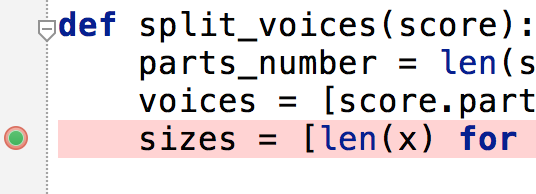
<p>A quick way to disable a breakpoint is by clicking on it with the Alt key. The breakpoint
icon will change.</p>

<p><img src="/img/2015-03/debug-disable1.png" alt="" width="80%" /></p>

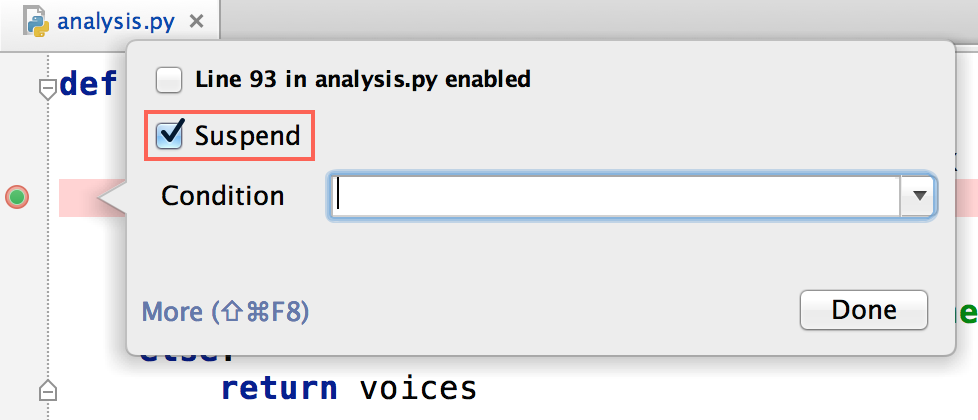
<p>Another way to disable a breakpoint is by right-clicking on it and unchecking the first
option (“Line 93 in analysis.py enabled” in the following example).</p>

<p><img src="/img/2015-03/debug-disable2.png" alt="" width="80%" /></p>

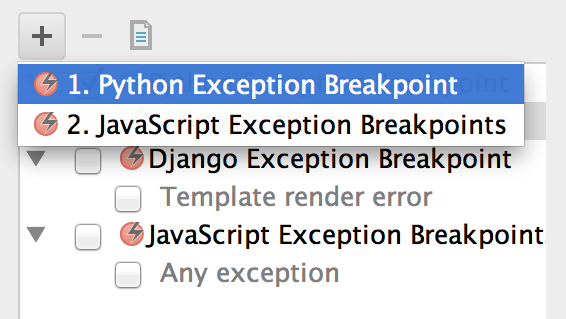
<p>Besides defining breakpoints when a line of code is reached, we can define a breakpoint
that is triggered when an exception is thrown. To add an exception breakpoint, we go to
<em>Run→View Breakpoints… (⌘-S-F8, S-C-F8)</em> and select Python Exception Breakpoint
after clicking the + button.</p>

<p><img src="/img/2015-03/debug-exception-breakpoint.png" alt="" width="80%" /></p>

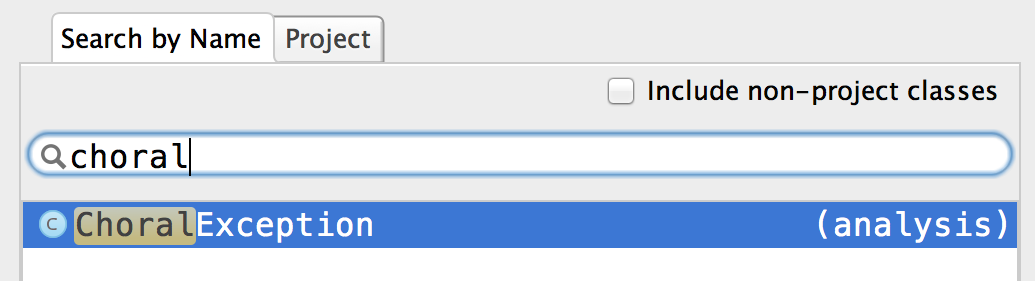
<p>We need to include the exception class by searching for its name. The search field works
with both built-in and custom exception classes.</p>

<p><img src="/img/2015-03/debug-select-class-exception.png" alt="" width="80%" /></p>

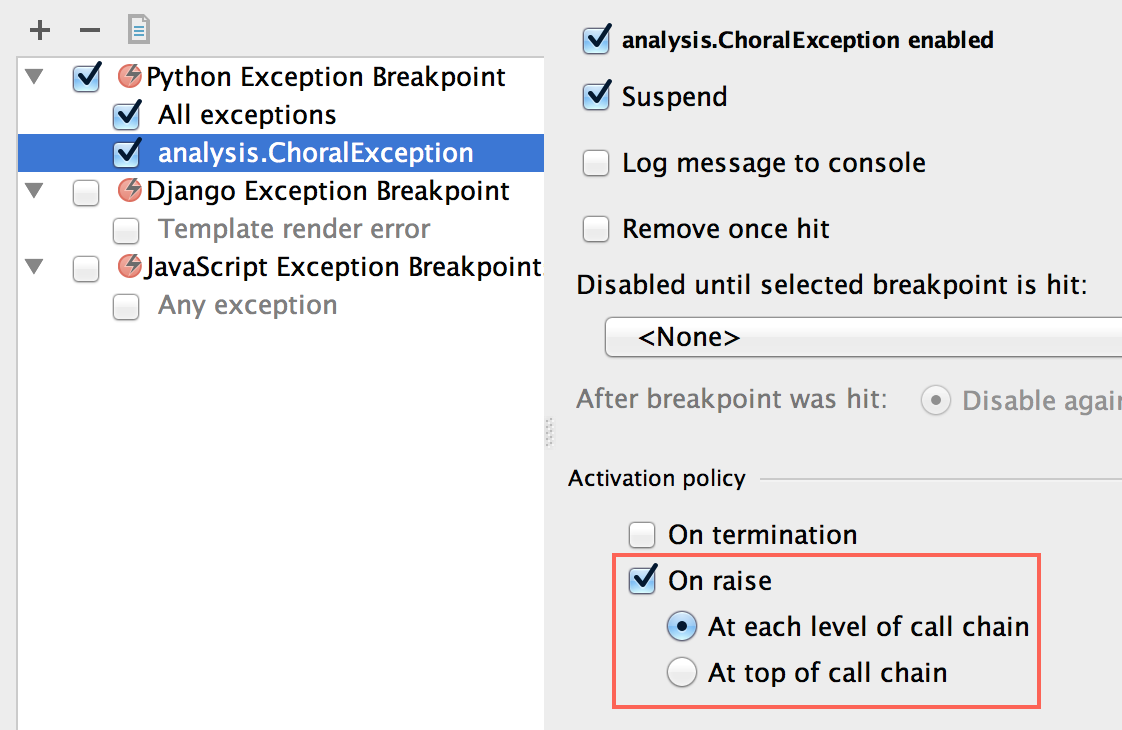
<p>Our new exception now appears on the list, where we can customize it.</p>

<p><img src="/img/2015-03/debug-new-exception.png" alt="" width="80%" /></p>

<p>In most cases, we want to activate the breakpoint when the exception is raised (the
default is to activate the breakpoint when the exception terminates):</p>

<p><img src="/img/2015-03/debug-new-exception-detail.png" alt="" width="80%" /></p>

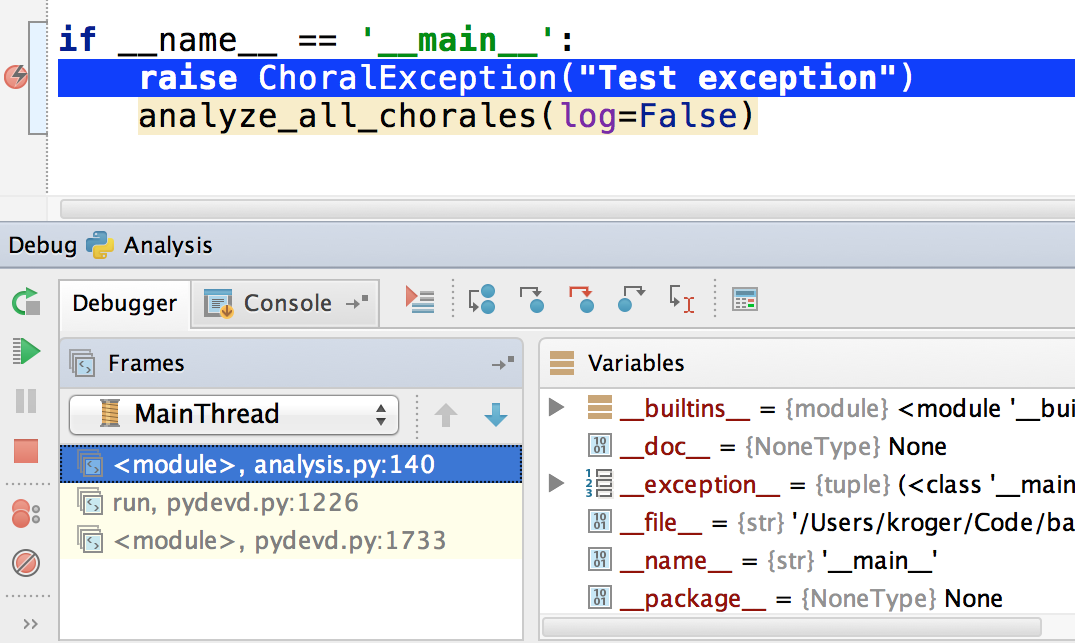
<p>Having configured an exception breakpoint, PyCharm will create the breakpoint
automatically when the exception is raised (<code class="language-plaintext highlighter-rouge">ChoralException</code>, in our example). Notice
that the exception breakpoint icon is different from the regular one.</p>

<p><img src="/img/2015-03/debug-exception-breakpoint-raise.png" alt="" width="80%" /></p>

<h3 id="python-prompt">Python Prompt</h3>

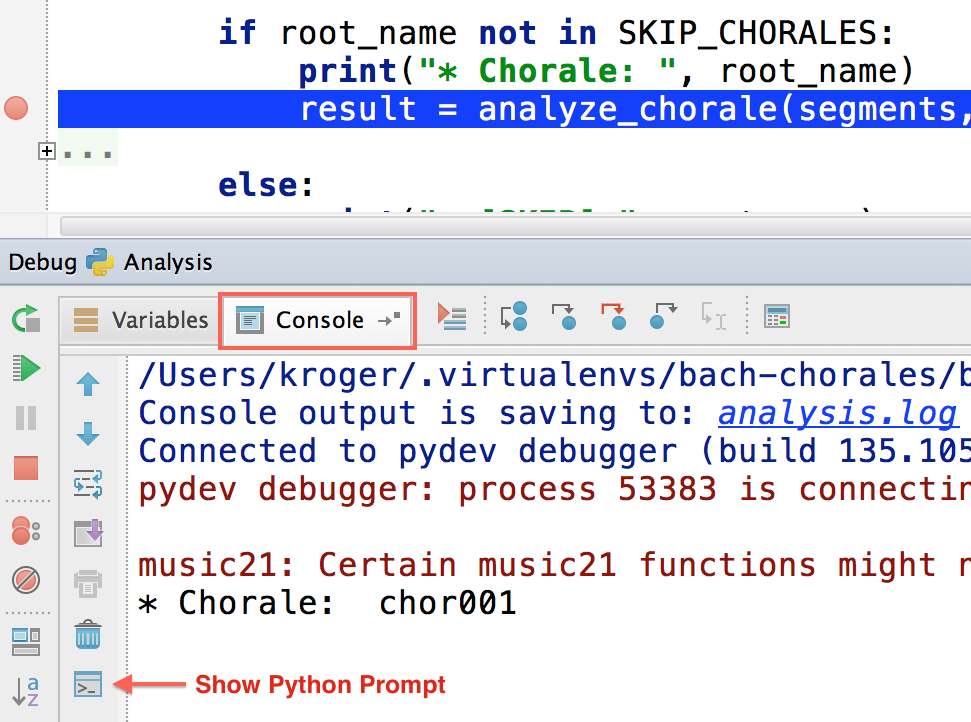
<p>Sometimes it’s useful to be able to access a Python prompt while debugging. We can do
this by clicking on the Console tab when the debugger is running and selecting the Show
Python Prompt icon.</p>

<p><img src="/img/2015-03/debug-python-prompt.png" alt="" width="80%" /></p>

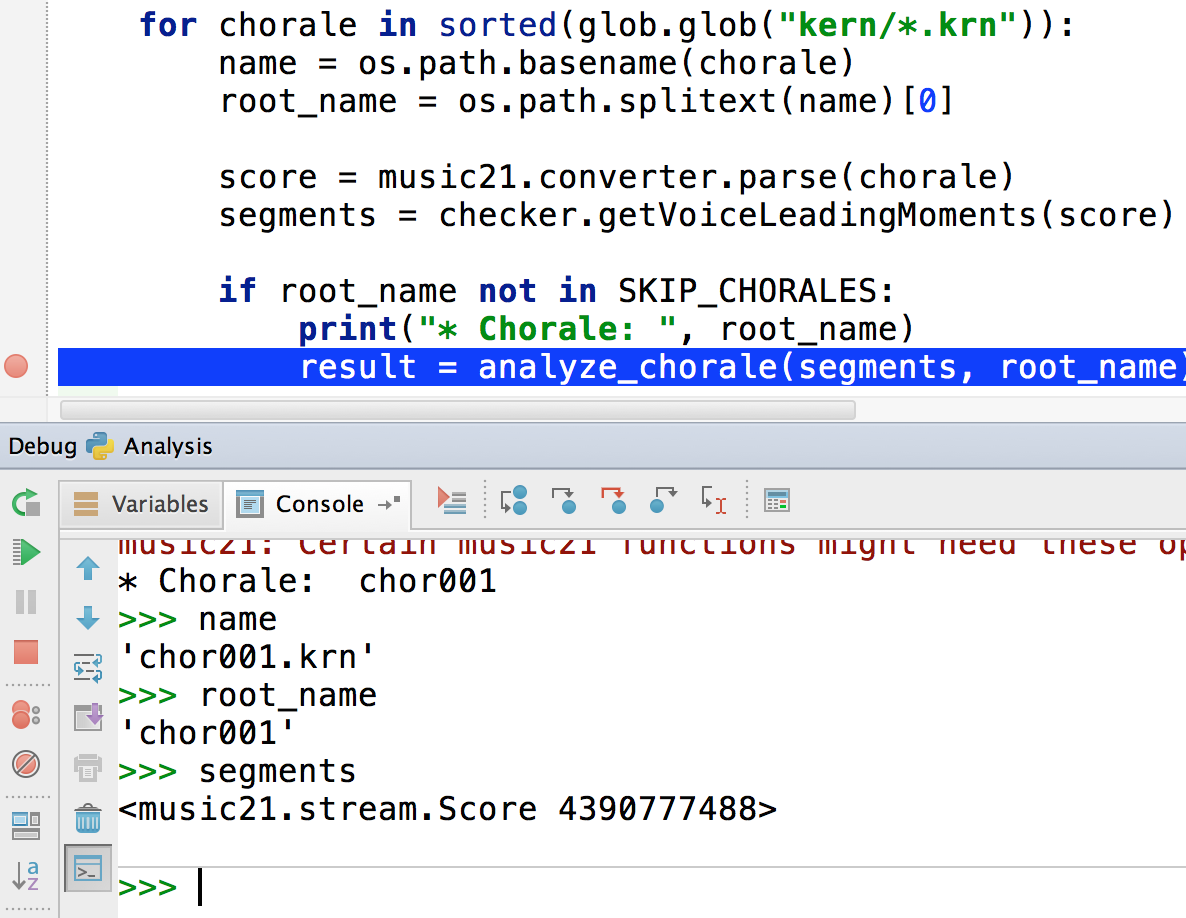
<p>Now we can use the prompt to inspect and change the variables in the current scope.</p>

<p><img src="/img/2015-03/debug-python-prompt2.png" alt="" width="80%" /></p>

<h3 id="evaluating-expressions">Evaluating Expressions</h3>

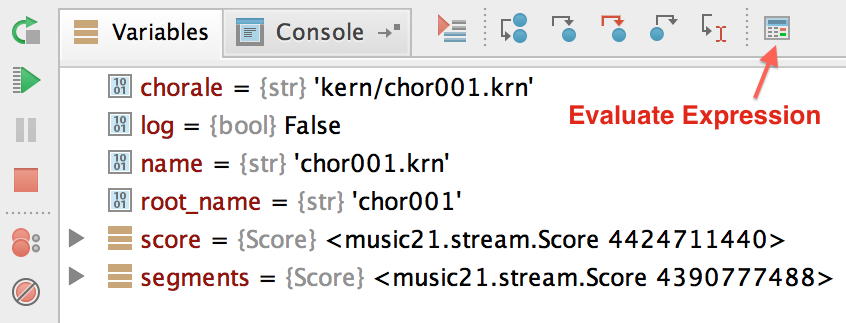
<p>Although it’s super-useful to have a full Python prompt available while debugging, the
Evaluate Expression feature may be sufficient if we just want to quickly evaluate an
expression.</p>

<p><img src="/img/2015-03/debug-evaluate-expression1.png" alt="" width="80%" /></p>

<p>As expected, we can use any variable in the current scope:</p>

<p><img src="/img/2015-03/debug-evaluate-expression2.png" alt="" width="80%" /></p>

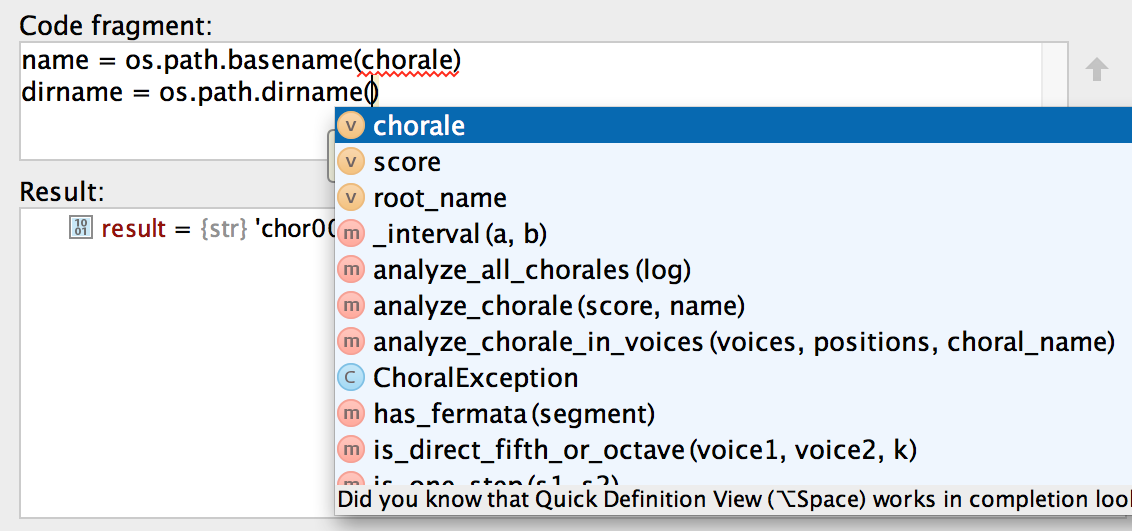
<p>If we select the Code Fragment Mode button, we can add multiple lines of code. Completion
works here as usual.</p>

<p><img src="/img/2015-03/debug-evaluate-expression3.png" alt="" width="80%" /></p>

<h3 id="inspecting-and-watching-variables">Inspecting and Watching Variables</h3>

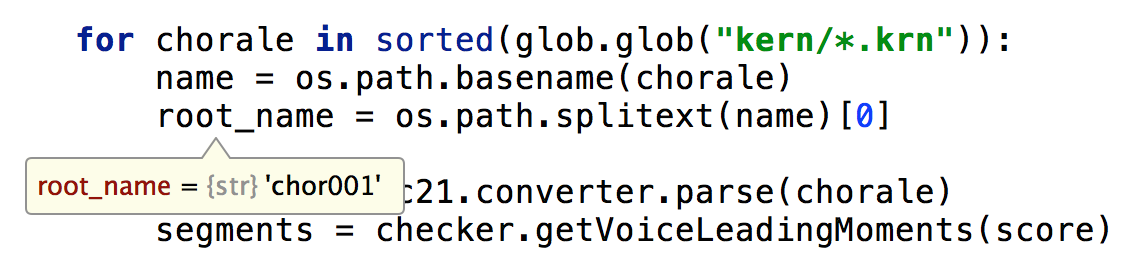
<p>The fastest way to inspect the value of variables while debugging is by hovering the
cursor over a variable name. PyCharm will show the variable name and its value.</p>

<p><img src="/img/2015-03/debug-quick-variable.png" alt="" width="80%" /></p>

<p>And, as expected, we can inspect and set a variable value by choosing the correct option
in the popup menu on the Variables pane.</p>

<p><img src="/img/2015-03/debug-inspect-variable.png" alt="" width="80%" /></p>

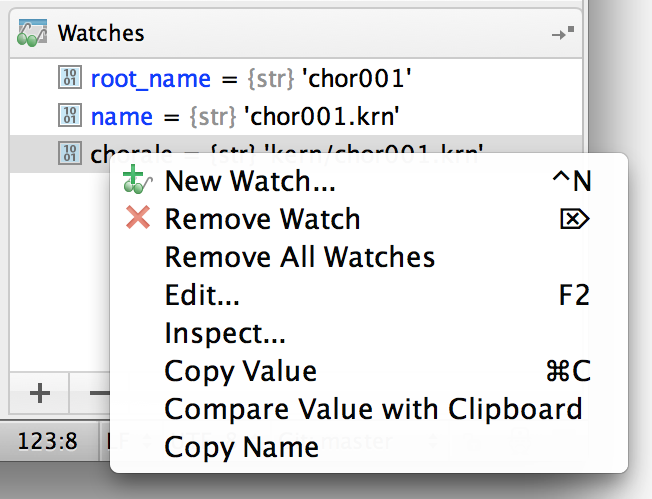
<p>The same apply to watched variables; we can edit and inspect them by using the popup menu.</p>

<p><img src="/img/2015-03/debug-inspect-watch.png" alt="" width="80%" /></p>

<h3 id="remote-debugging">Remote Debugging</h3>

<p>PyCharm has support to debug code <a href="https://www.jetbrains.com/pycharm/webhelp/remote-debugging.html">remotely</a>. Probably, the most popular and useful
way is to debug code in a Vagrant box.</p>

<h2 id="conclusion">Conclusion</h2>

<p>PyCharm has a debugger that is second to none. If you want to learn more about PyCharm
and how to use it to debug JavaScript and Django templates, check my ebook, <a href="/pycharm-book/">Modern
Python Development with PyCharm</a>.</p>]]></content><author><name>Pedro Kroger</name></author><category term="Programming" /><category term="PyCharm" /><category term="Python" /><summary type="html"><![CDATA[Many people use the standard Python debugger (pdb or ipdb) because it works well and can be used as a standalone tool or with your favorite editor. I’ve used it for years, but today I’m more productive using the PyCharm debugger. It can debug Python, JavaScript, and Django and Jinja Templates (making the debugging process seamless in web applications). Also, I don’t have to worry about leaving pdb.set_trace calls around anymore.]]></summary></entry><entry><title type="html">How to Get Started with PyCharm and Have a Productive Python IDE</title><link href="https://pedrokroger.net/emacs/programming/pycharm/python/2014/01/28/getting-started-pycharm-python-ide.html" rel="alternate" type="text/html" title="How to Get Started with PyCharm and Have a Productive Python IDE" /><published>2014-01-28T19:55:05-03:00</published><updated>2014-01-28T19:55:05-03:00</updated><id>https://pedrokroger.net/emacs/programming/pycharm/python/2014/01/28/getting-started-pycharm-python-ide</id><content type="html" xml:base="https://pedrokroger.net/emacs/programming/pycharm/python/2014/01/28/getting-started-pycharm-python-ide.html"><![CDATA[<p>The whole Editors versus IDEs debate is getting old and boring, especially because it is
not a zero sum game. I’ve been using Emacs for 15+ years and at one point I used it to
read my <a href="http://www.gnus.org">email</a>, <a href="http://emacs-w3m.namazu.org">browse the web</a>, and <a href="http://www.emacswiki.org/emacs/CoffeeMode">make coffee</a> (haven’t we all?). But
today I find that I’m more productive by using the right tool for the right job.</p>

<div class="alert alert-warning" role="alert">
  This article is very old and probably out-of-date. Please check Pycharm's documentation.
</div>

<p>Powerful editors like Emacs and Vim are fantastic. I find it puzzling that some editors
or IDEs perform basic operations such as search and replace clunkily while Vim and Emacs
get it just right.</p>

<p>And yet a search for terms like “Vim as a Python IDE” or “Emacs as a Python IDE” returns
hundreds of thousands of links, which shows that people want features such as smart
completion, code navigation, and project support. To give you one data point, one of my
most popular posts is “how to configure Emacs as a Python IDE”, even if it’s six years
old and out-of-date.</p>

<p>PyCharm is one of the most popular IDEs for Python and it’s packed with great features.
In this post I will show how to get started with PyCharm quickly to have a productive
Python development environment. I’m using PyCharm 3.0.2 Professional Edition on the Mac
(they have an <a href="http://www.jetbrains.com/pycharm/download/">open-source</a> version as well). I use a heavily modified default keymap
(it also has Emacs and Vim keymaps). I suggest you check the official <a href="http://www.jetbrains.com/pycharm/docs/PyCharm_ReferenceCard_Mac.pdf">Mac</a> and the
<a href="http://www.jetbrains.com/pycharm/docs/PyCharm_ReferenceCard.pdf">Windows/Linux</a> reference cards for the default shortcuts.</p>

<h2 id="initial-customization">Initial Customization</h2>

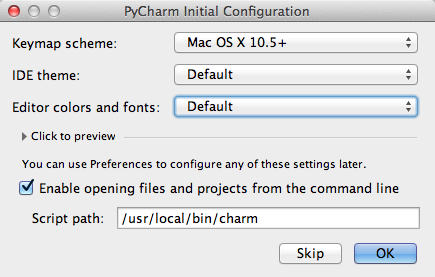
<p>When you start PyCharm for the first time it asks what keymap and theme you want to use.
I don’t like its Emacs keymap, so I use the default Mac OS X keymap and customize the
shortcuts I want:</p>

<p><img src="/img/2014-01/pycharm-initial-screen.png" alt="" width="80%" /></p>

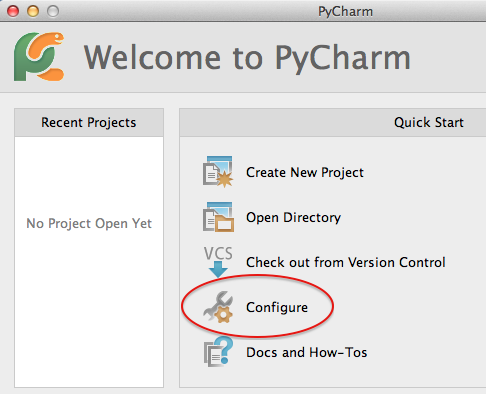
<p>If this is the first time you are using PyCharm and don’t have a configuration to import
you may want to click on “Configure” in the welcome screen to set some basic things:</p>

<p><img src="/img/2014-01/pycharm-quick-start.png" alt="" width="80%" /></p>

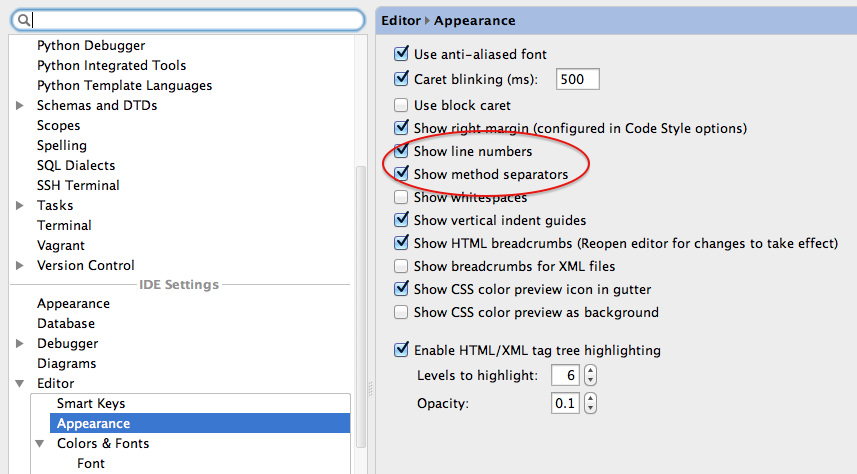
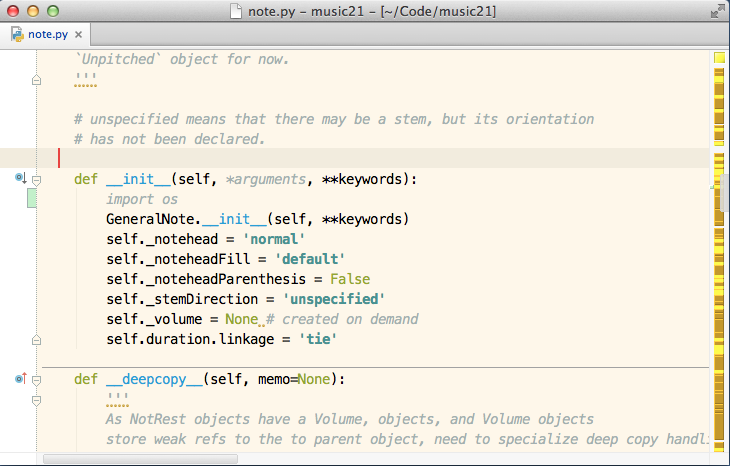
<p>I like to show the line numbers and method separators (Editor→Appearance→Show method
separators, Show line numbers):</p>

<p><img src="/img/2014-01/pycharm-config-appearance.png" alt="" width="80%" /></p>

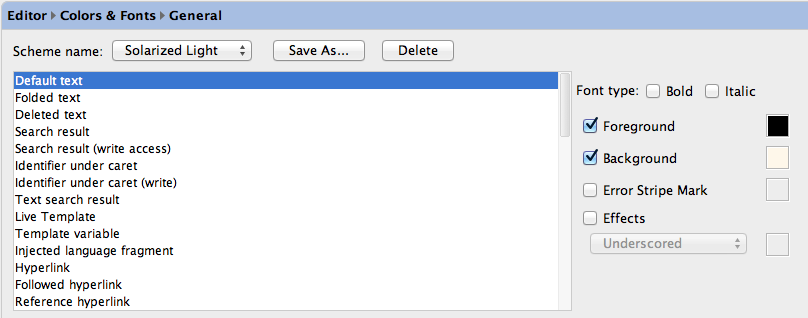
<p>Also, I like the <a href="https://github.com/jkaving/intellij-colors-solarized">Solarized</a> theme. I install it by following the instructions and
select it as the default theme in Editor→Colors &amp; Fonts. Solarized light for IntelliJ has
some weird colors choices (for instance, it uses gray for the default text instead of a
crisper black), so I change it on Editor→Colors &amp; Fonts→General. My advice is not to be
afraid to change the colors to something you like. You can export your settings in case
you need to re-install PyCharm.</p>

<p><img src="/img/2014-01/pycharm-colors.png" alt="" width="80%" /></p>

<p>Compared to some IDEs, I find PyCharm visually clean, and if you want an even cleaner UI,
you can hide the toolbar, the tool buttons, the navigation bar, and the status bar (on
the View menu):</p>

<p><img src="/img/2014-01/pycharm-appearance2.png" alt="" width="80%" /></p>

<h2 id="the-python-interpreter">The Python Interpreter</h2>

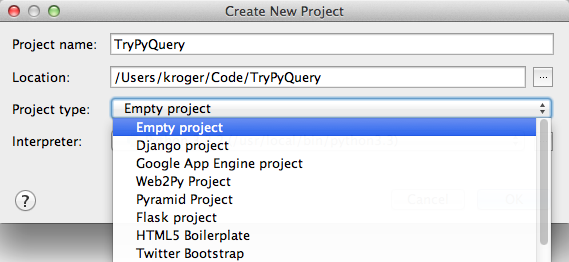
<p>You can create new projects with File→New Project or open an existing project with
File→Open Directory. PyCharm supports many types of Python projects such as Django or
Flask out-of-the-box. For this post I’ll create a simple project to test the
<a href="https://pypi.python.org/pypi/pyquery">pyquery</a> library (I’ll choose the “Empty project”).</p>

<p><img src="/img/2014-01/pycharm-new-project.png" alt="" width="80%" /></p>

<p>You need to tell PyCharm what Python interpreter you want to use since it can use a
different interpreter for each project. It will use this information to index all
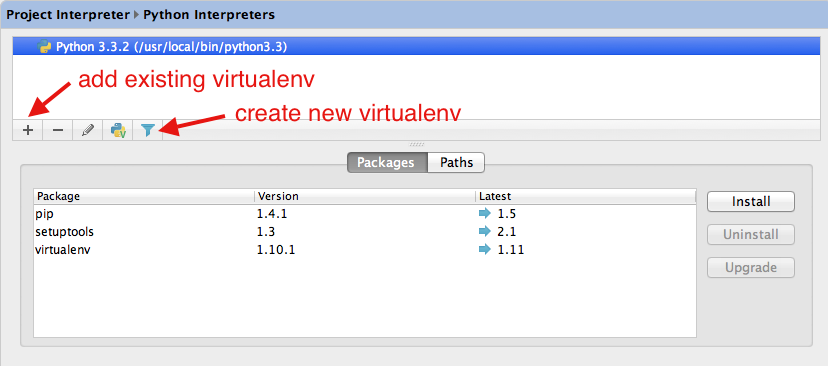
available libraries. A good practice is to have one <a href="http://www.virtualenv.org/en/latest/">virtualenv</a> for each project.
You can either use an existing virtualenv or create a new one from PyCharm
(Settings→Project Interpreter→Python Interpreters).</p>

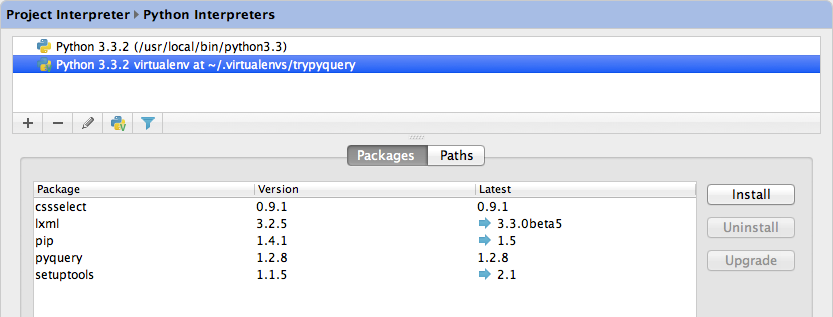
<p><img src="/img/2014-01/pycharm-interpreters.png" alt="" width="80%" /></p>

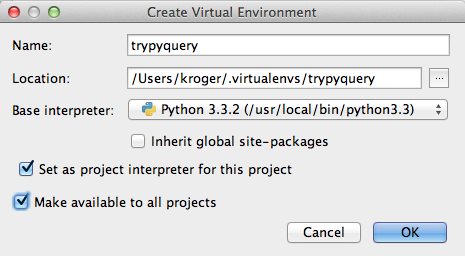
<p>For this project I’ll create a new virtualenv and make it available to all projects:</p>

<p><img src="/img/2014-01/pycharm-new-virtualenv.png" alt="" width="80%" /></p>

<p>You can quickly search, read the description, and install packages from PyCharm. This is
nothing you couldn’t do on the terminal, but it’s very convenient to be able to search
for packages without leaving your IDE.</p>

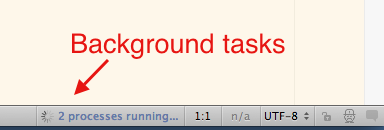
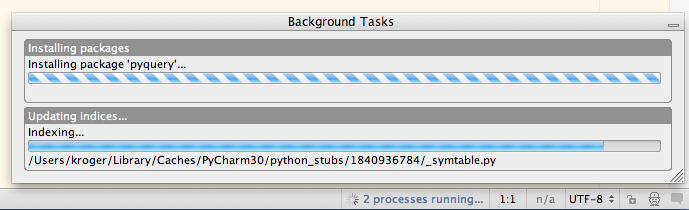
<p>Some packages may take a while to install, especially if they need to be compiled.
PyCharm runs the installation in background and you can see what is happening by clicking
on the status bar:</p>

<p><img src="/img/2014-01/pycharm-background-tasks.png" alt="" width="80%" /></p>

<p><img src="/img/2014-01/pycharm-background-tasks2.png" alt="" width="80%" /></p>

<p>As we can see, it installed not only <code class="language-plaintext highlighter-rouge">pyquery</code>, but its dependencies as well, such as
lxml (as we would expect):</p>

<p><img src="/img/2014-01/pycharm-virtualenv-installed.png" alt="" width="80%" /></p>

<h2 id="shortcuts">Shortcuts</h2>

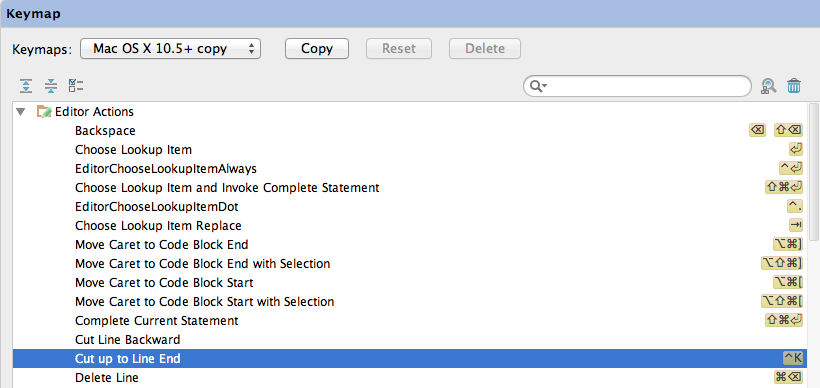
<p>PyCharm is no Vim, but you can do a lot by using only the keyboard. You can assign
shortcuts to dozens (if not hundreds) of actions in Settings→Keymap. I change the default
keymap pretty heavily since I like to have shortcuts like Control-a, Control-e,
Control-k, and Control-y that are default in any Cocoa text box but are not setup by
default in the “Mac OS X” keymap. You can also define mouse shortcuts. For instance, I
changed Quick Documentation to use Option-Click. If you are a Vim user you may want tot
try <a href="http://plugins.jetbrains.com/plugin/164">IdeaVim</a>, a Vim emulator plugin. I heard good things about it, but I didn’t have
the chance to try it yet.</p>

<p><img src="/img/2014-01/pycharm-keymap.png" alt="" width="80%" /></p>

<p>I use the Dvorak keyboard layout, and annoyingly, there’s a <a href="http://youtrack.jetbrains.com/issue/IDEABKL-6493">bug</a> where the wrong
keys are used. People have reported this problem with French Canadian and German layouts
as well. This means that I have to rebind quite a few shortcuts just to avoid this
problem.</p>

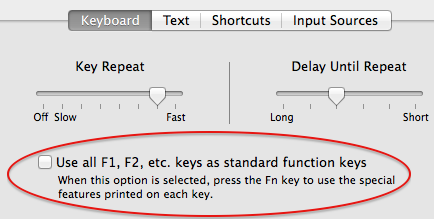
<p>PyCharm uses function keys such as F1 and F2 a lot. As you probably know, on the Mac the
top keys work as “multimedia” keys by default and as function keys by pressing the Fn
key. We can swap this behavior in System Preferences→Keyboard.</p>

<p><img src="/img/2014-01/pycharm-mac-options.png" alt="" width="80%" /></p>

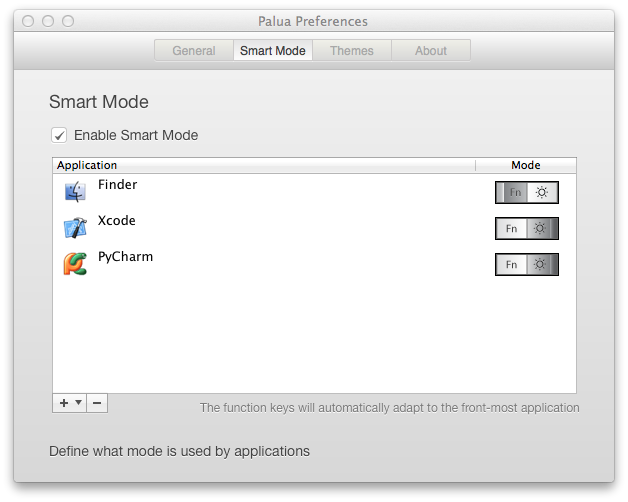
<p>I like to be able control the sound volume and change the brightness without having to
reach for the Fn key, but I also like to use the function keys while programming without
reaching for the Fn key (I’m lazy, what can I say?). I use <a href="http://www.molowa.com/mac-os-x/palua/palua-3-0/">Palua</a> to switch between
the “multimedia” and function keys. You can switch with a global key or you can configure
Palua to switch automatically when using a specific application. I use the multimedia
keys for all applications (the default) and configure Palua to use the Function keys for
Xcode and PyCharm.</p>

<p><img src="/img/2014-01/palua.png" alt="" width="80%" /></p>

<h2 id="external-editor">External Editor</h2>

<p>PyCharm can launch any external tool, so I configure it to open Emacs with the current
file. This is useful when you want to do some quick editing that is faster with your
favorite editor (Emacs, Vim, TextMate, etc).</p>

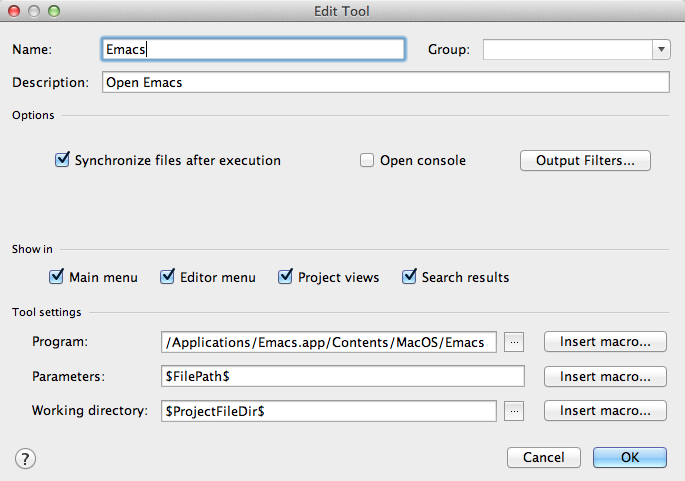
<p>Go to Settings→External Tools, make sure “Open console” is unchecked and insert the path
to the Program, the Parameters (in this case we can get the full file name with
<code class="language-plaintext highlighter-rouge">$FilePath$</code>) and the Working directory (<code class="language-plaintext highlighter-rouge">$ProjectFileDir$/$FileRelativeDir$/</code>).</p>

<p><img src="/img/2014-01/pycharm-external-tools.png" alt="" width="80%" /></p>

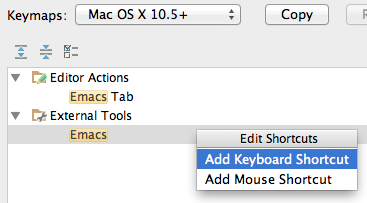
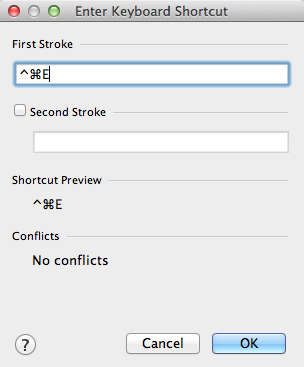
<p>You can assign it to a shortcut:</p>

<p><img src="/img/2014-01/pycharm-new-shortcut.png" alt="" width="80%" /></p>

<p><img src="/img/2014-01/pycharm-select-keybinding.png" alt="" width="80%" /></p>

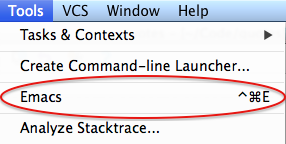
<p>And now it’s available from the menu as well.</p>

<p><img src="/img/2014-01/pycharm-external-tool-menu.png" alt="" width="80%" /></p>

<h2 id="running-code-and-the-repl">Running Code and the REPL</h2>

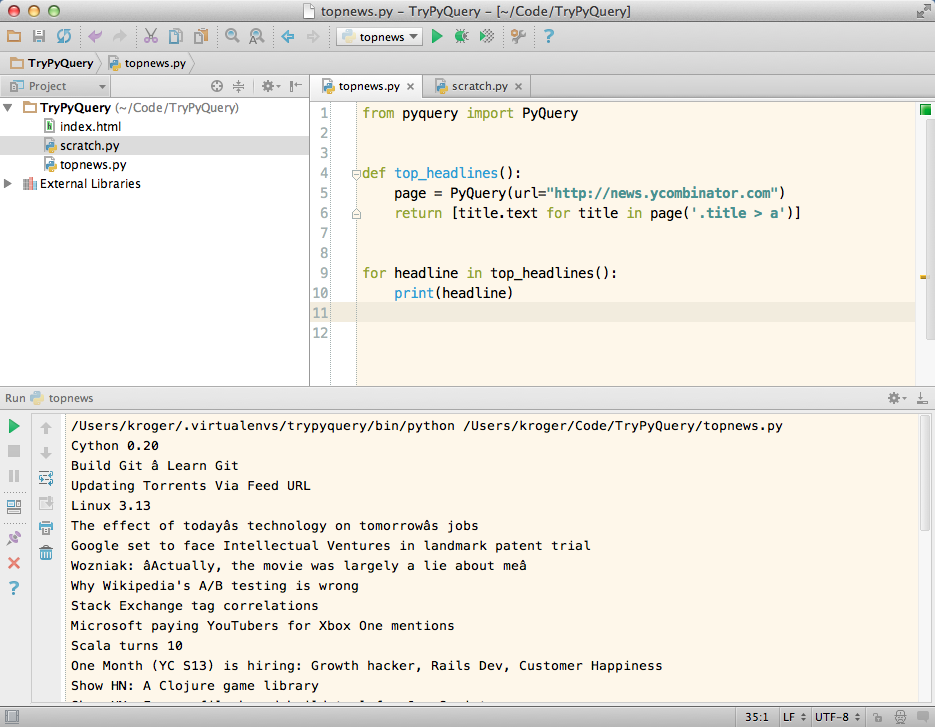
<p>There are many ways to run our code with PyCharm. We can use the venerable print function
(or statement, depending on your Python version), import code on the REPL, send code to
the console, use the debugger, or use IPython on a terminal.</p>

<h3 id="the-venerable-print">The Venerable Print</h3>

<p>Using <code class="language-plaintext highlighter-rouge">print</code> to display values is a useful and widely used technique, but it can lead to
messy code if not used carefully.</p>

<p><img src="/img/2014-01/pycharm-runcode1.png" alt="" width="80%" /></p>

<p>We can run the code by clicking on the “play” button or with Control-R if the file is
already selected to run.</p>

<p><img src="/img/2014-01/pycharm-run-file.png" alt="" width="80%" /></p>

<p>If the file is not selected to run, with can select and run it with Control-Option-R or
by right clicking and selecting from the context menu. PyCharm will remember your choice
and you can use Control-R the next time. It sounds complicated but it is really simple.
Check the <a href="http://www.jetbrains.com/pycharm/webhelp/running.html">manual</a> for more information.</p>

<h3 id="console-and-repl">Console and REPL</h3>

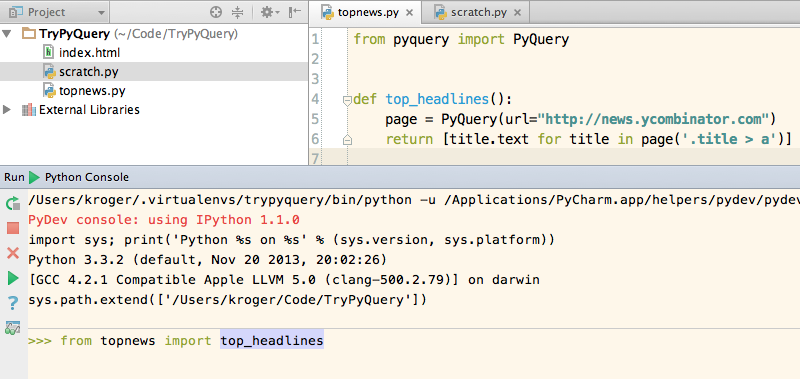
<p>My favorite way is to run the code on the REPL. You can open a Python console inside
PyCharm on Tools→Run Python Console (I’ve assigned it to Control-C Control-C). It’ll use
<a href="http://ipython.org">IPython</a> if available (I recommend you install IPython inside the virtualenv) and
will add the path of the current file to Python’s path. On the console you can import the
functions you want to execute as usual.</p>

<p><img src="/img/2014-01/pycharm-runcode2.png" alt="" width="80%" /></p>

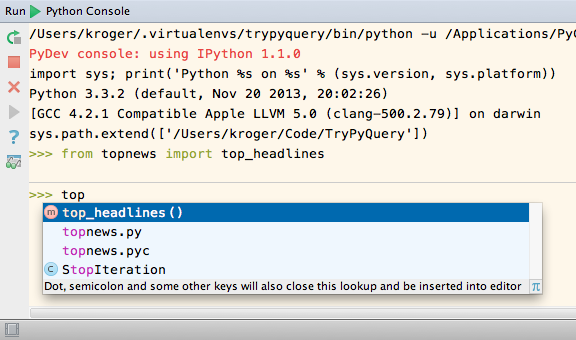
<p>Completion is available in the console as well:</p>

<p><img src="/img/2014-01/pycharm-runcode-completion.png" alt="" width="80%" /></p>

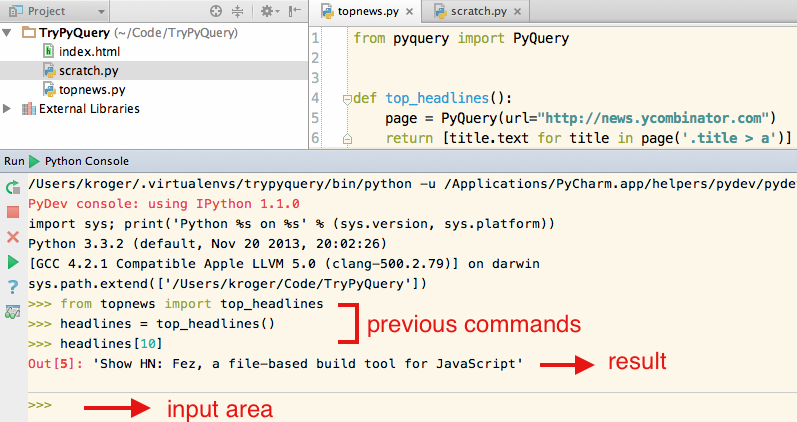
<p>Having imported the function, we can run it as usual. And we can toggle the console
visibility easily with ⌘–4.</p>

<p><img src="/img/2014-01/pycharm-runcode-console.png" alt="" width="80%" /></p>

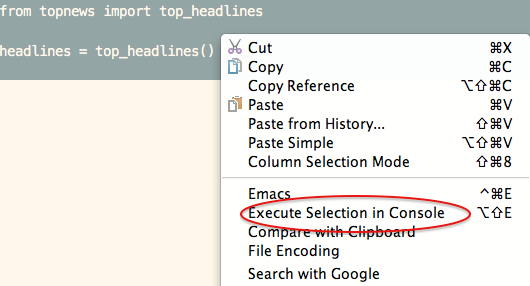
<h3 id="execute-selection-in-console">Execute Selection in Console</h3>

<p>If the code I want to run is more than a couple of one-liners and not formal enough to
write unit tests (I may be playing with data, for instance) I may save it in a scratch
file. We can select the code we want to run (usually I just select the whole file with
⌘-A) and pick “Execute Selection in Console” from the context menu (or, even better, use
the keyboard shortcut). [I omitted some menu items in the screenshot to make it shorter].</p>

<p><img src="/img/2014-01/pycharm-execute-selection.png" alt="" width="80%" /></p>

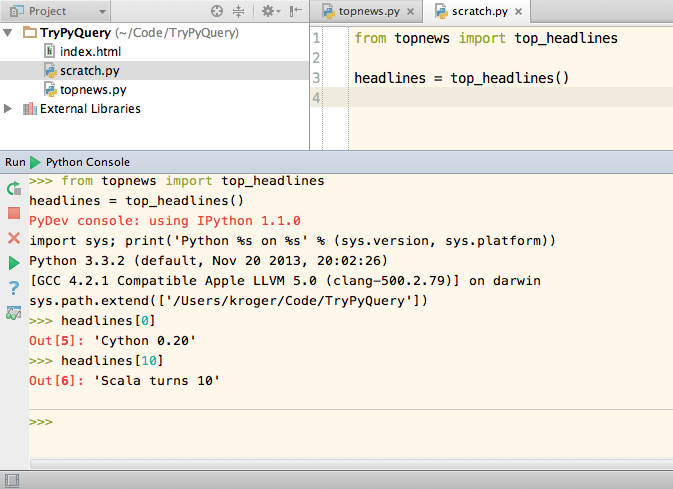
<p>In the following example the <code class="language-plaintext highlighter-rouge">headlines</code> variable is available in the console since we
have selected the whole <code class="language-plaintext highlighter-rouge">scratch</code> file to be executed in the console:</p>

<p><img src="/img/2014-01/pycharm-runcode-scratch.png" alt="" width="80%" /></p>

<h3 id="macros">Macros</h3>

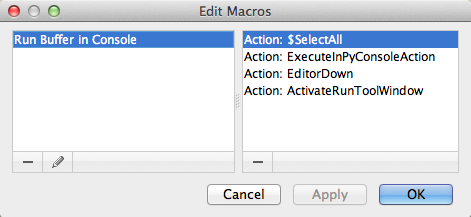
<p>It would be nice if we could send the whole file to the console in one operation.
Fortunately, we can record a macro. Select Edit→Macros→Start Macro Recording and perform
the operations as before (select the whole file, send the selection to console, switch to
the console). As you can see, my macro has only four actions (I press the down arrow key
to remove the selection):</p>

<p><img src="/img/2014-01/pycharm-list-macro.png" alt="" width="80%" /></p>

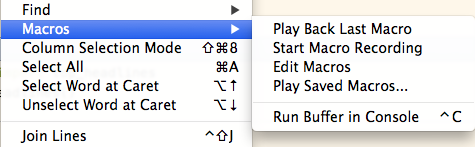
<p>After you record the macro it’s available in the Macros menu and you can assign a
shortcut to it (I use Control-C Control-E, but for some reason PyCharm only shows the
first half of shortcuts with two strokes).</p>

<p><img src="/img/2014-01/pycharm-macro-menu.png" alt="" width="80%" /></p>

<h3 id="debugger">Debugger</h3>

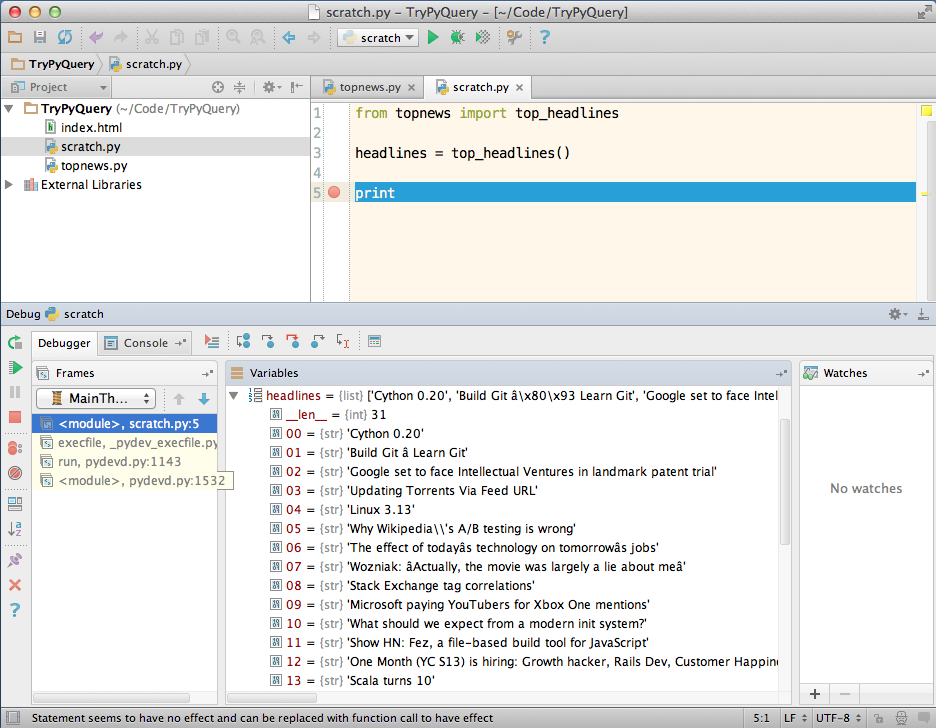
<p>Many people like to use the debugger to inspect data. Even if I prefer to use the REPL,
sometimes the debugger is just more efficient, especially when inspecting complex
objects. PyCharm doesn’t allow you to set a breakpoint on an empty line, so in this short
example I had to add an extra line (I used <code class="language-plaintext highlighter-rouge">print</code>, but I could have used <code class="language-plaintext highlighter-rouge">pass</code>) since I
wanted the debug to stop after setting the <code class="language-plaintext highlighter-rouge">headlines</code> variable. In real-life code this
is seldom necessary.</p>

<p><img src="/img/2014-01/pycharm-runcode-debug.png" alt="" width="80%" /></p>

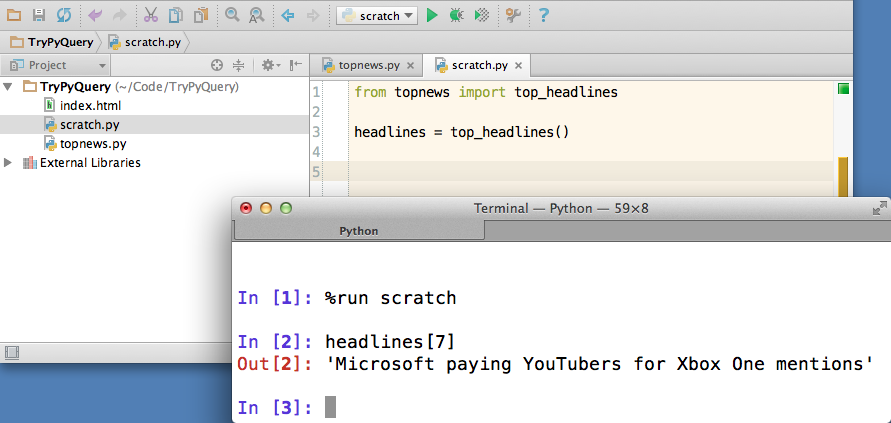
<h3 id="vanilla-ipython">Vanilla IPython</h3>

<p>Finally, there’s nothing wrong with running an external terminal with IPython and using
features such as <code class="language-plaintext highlighter-rouge">%run</code> and <a href="http://ipython.org/ipython-doc/rel-1.1.0/config/extensions/autoreload.html">autoreload</a>.</p>

<p><img src="/img/2014-01/pycharm-runcode-ipython.png" alt="" width="80%" /></p>

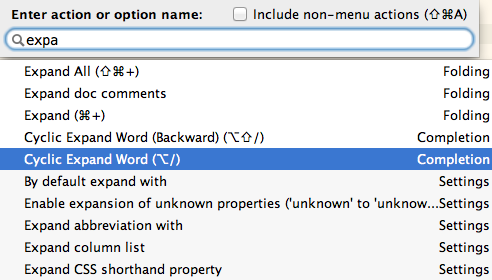
<h2 id="finding-commands">Finding Commands</h2>

<p>It’s easy to get overwhelmed with so many commands. If you use PyCharm on the Mac you can
use Help→Search as usual, or you can use Help→Find Action in any platform. It allows you
to search for any PyCharm command, including the ones not available from the menu. (Emacs
addicts will note this is somewhat similar to Emacs’ M-x). This is very useful and
powerful and I use it all the time.</p>

<p><img src="/img/2014-01/pycharm-find-action.png" alt="" width="80%" /></p>

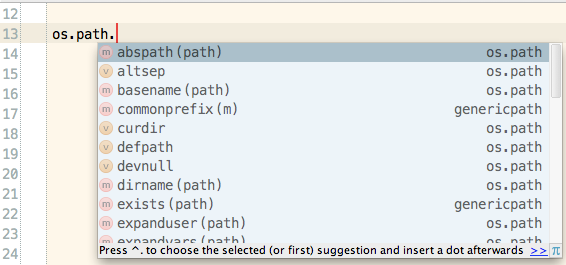
<h2 id="code-completion">Code Completion</h2>

<p>Completion in PyCharm is top notch. By default PyCharm will suggest things while you are
typing:</p>

<p><img src="/img/2014-01/pycharm-completion-default.png" alt="" width="80%" /></p>

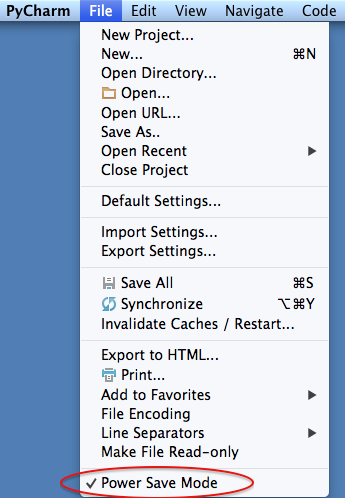
<p>Since this feature can be a little power hungry, you can disable it by selecting
File→Power Save Mode. You can still use completion by calling it explicitly with
Control-Space.</p>

<p><img src="/img/2014-01/pycharm-power-save.png" alt="" width="80%" /></p>

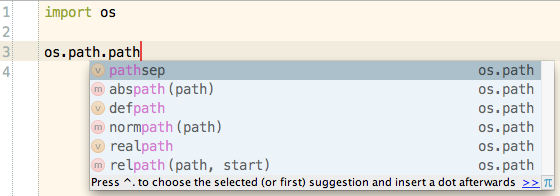
<p>When completing, you can narrow the suggestion list by typing a substring:</p>

<p><img src="/img/2014-01/pycharm-completion-simple.png" alt="" width="80%" /></p>

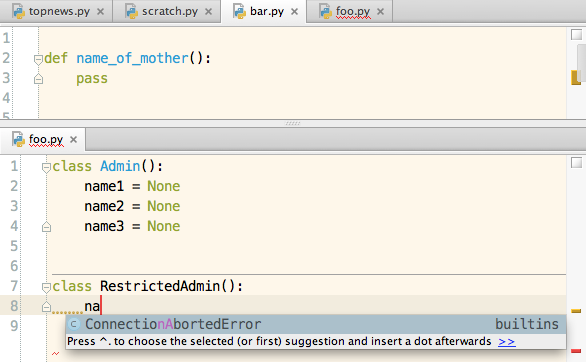
<p>Or you can type only the first letters of CammelCaseClasses or
function_names_with_underscores:</p>

<p><img src="/img/2014-01/pycharm-completion-simple2.png" alt="" width="80%" /></p>

<p>If you type Control-Space once PyCharm will try to list the most related items:</p>

<p><img src="/img/2014-01/pycharm-expand1.png" alt="" width="80%" /></p>

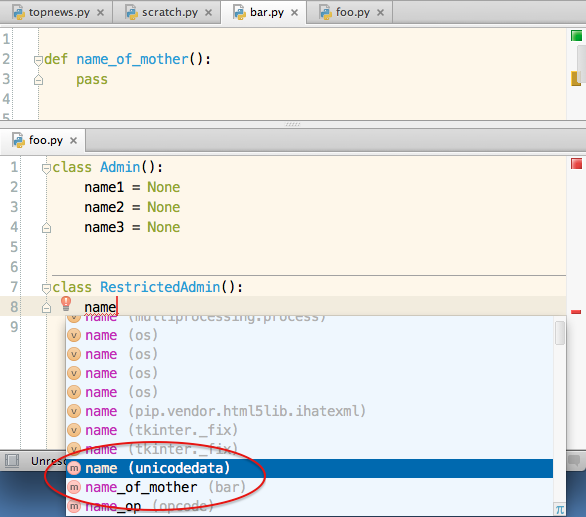
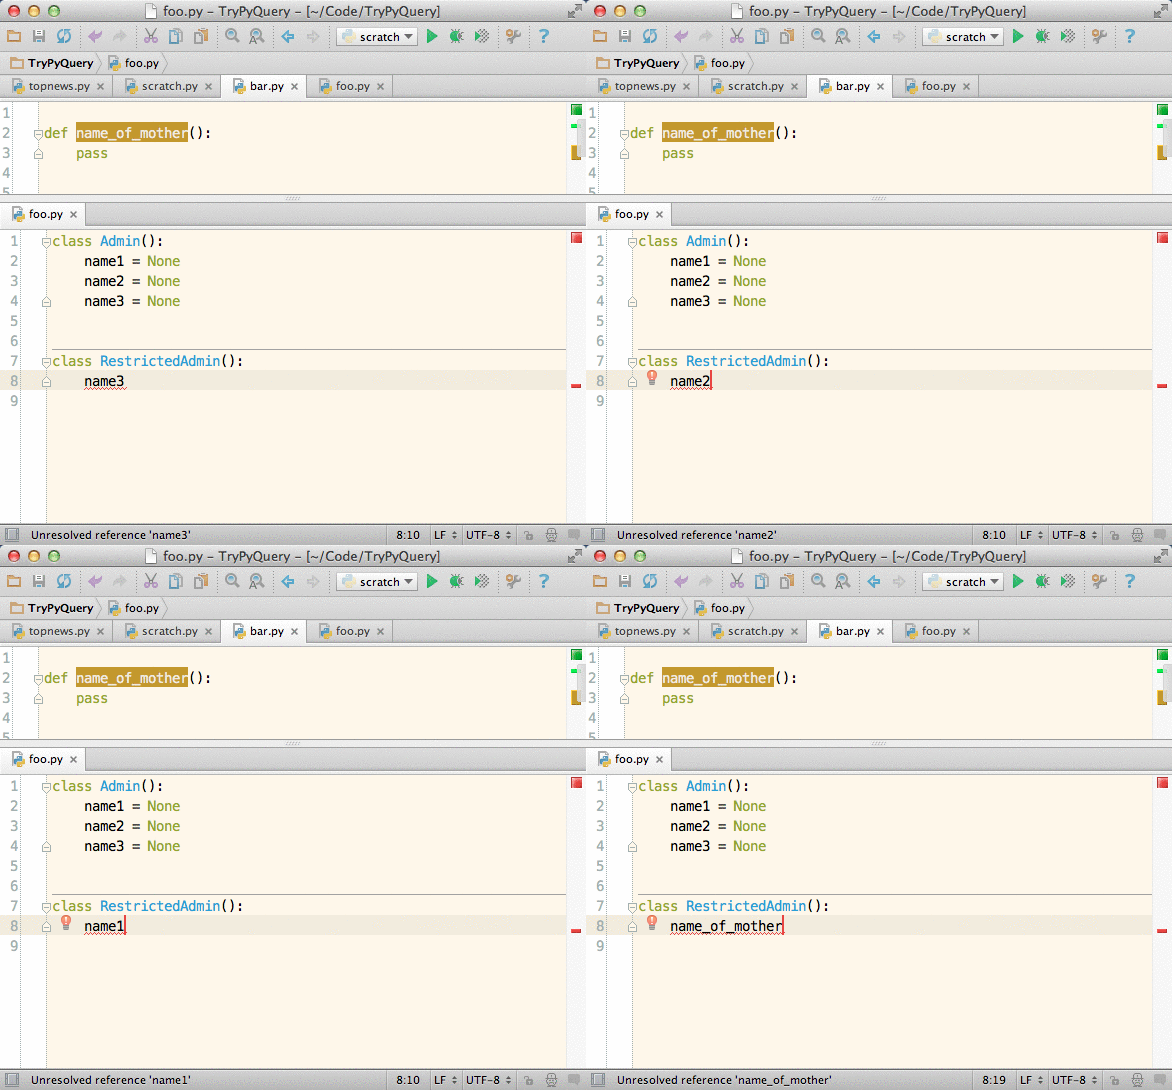
<p>If you type Control-Space again it will list every name it knows. This can be
overwhelming, but notice it is listing the function <code class="language-plaintext highlighter-rouge">name_of_mother</code> from the unimported
<code class="language-plaintext highlighter-rouge">bar.py</code> file.</p>

<p><img src="/img/2014-01/pycharm-expand2.png" alt="" width="80%" /></p>

<p>But often you just want to complete the name of a local variable in one of the opened
buffers. This feature has been available in Emacs and Vim for ages and now it’s available
in PyCharm as well. The manual calls it <a href="http://www.jetbrains.com/pycharm/webhelp/hippie-completion-expanding-words.html">Hippie Completion</a>, but the actual command
name (that is, the name you will find in Find Action) is “Cyclic Expand Word” and in my
tests it’s working even inside docstrings.</p>

<p><img src="/img/2014-01/pycharm-expand.gif" alt="" width="80%" /></p>

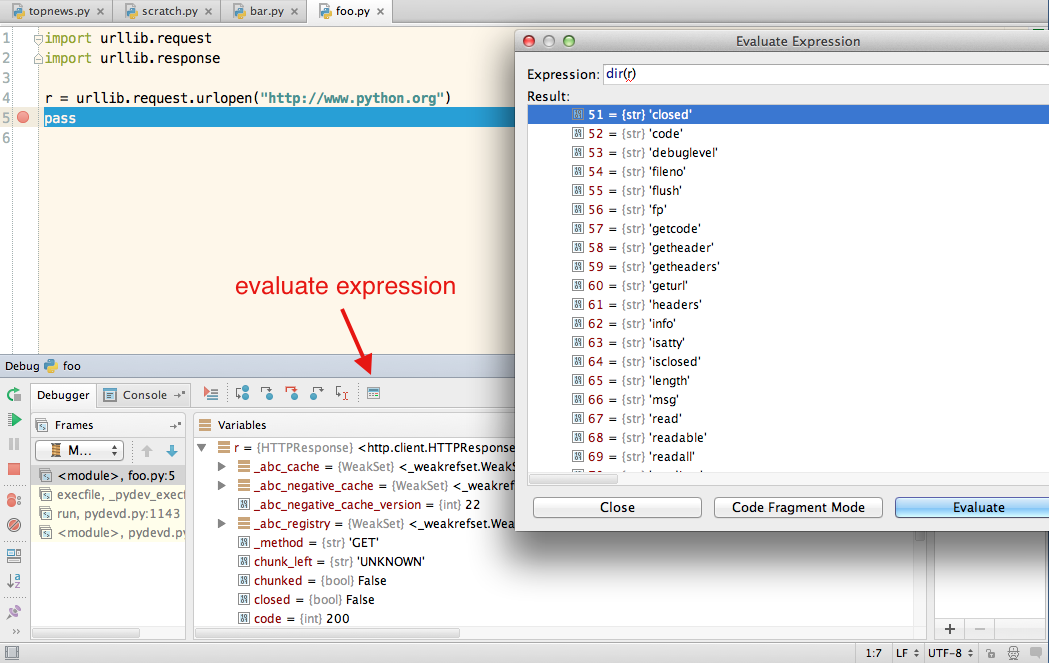
<p>Completion may not work in some cases when a library doesn’t have <a href="http://stackoverflow.com/questions/6318814/how-can-i-tell-pycharm-what-type-a-parameter-is-expected-to-be">type hints</a>. <a href="http://stackoverflow.com/questions/14611714/python-pycharm-ctrl-space-does-not-bring-up-code-completion">This
StackOverflow</a> page suggests to set a breakpoint in pdb and list the possible
attributes with <code class="language-plaintext highlighter-rouge">dir</code>. One similar solution is to create a breakpoint in PyCharm and
evaluate an expression at the breakpoint by clicking on the last icon in the debug
toolbar (or using the appropriate keyboard shortcut). In this case I evaluated the
expression “dir(r)”.</p>

<p><img src="/img/2014-01/pycharm-completion-debug.png" alt="" width="80%" /></p>

<h2 id="access-to-documentation">Access to Documentation</h2>

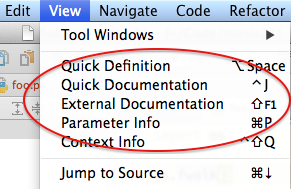
<p>PyCharm has three ways to access documentation: Quick Definition, Quick Documentation,
External Documentation, and Parameter Info. You can access them from the View menu or
from the respective shortcuts.</p>

<p><img src="/img/2014-01/pycharm-documentation1.png" alt="" width="80%" /></p>

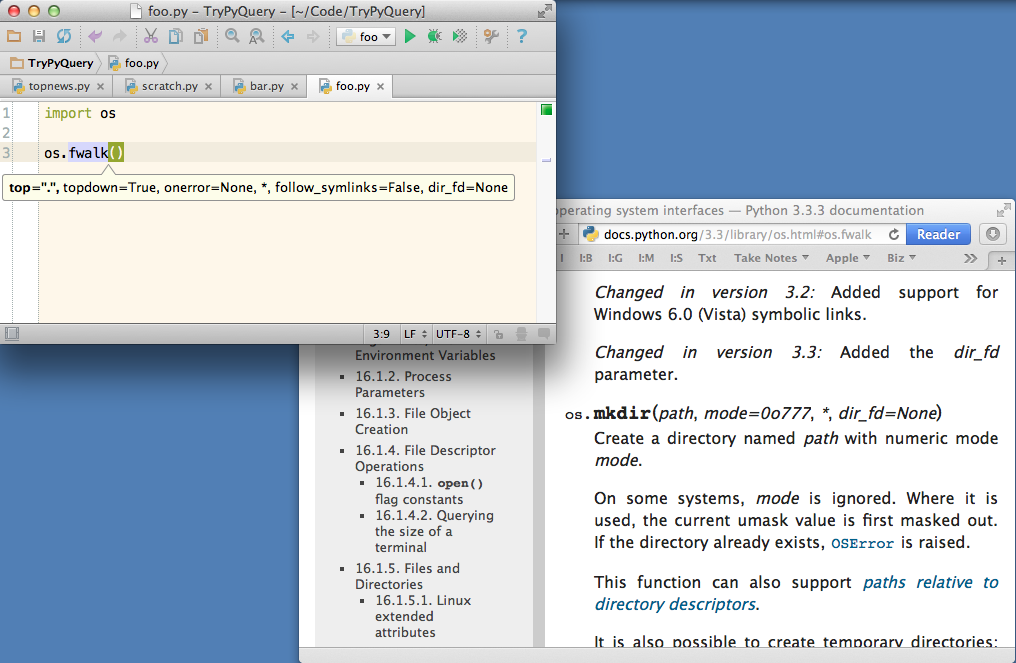
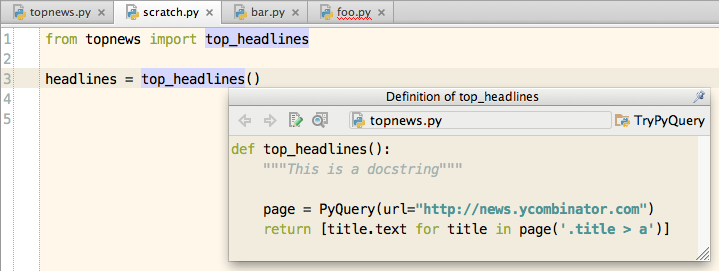
<p>Quick definition will show the whole definition (duh!) of a symbol (class, method,
function, etc), including the documentation, of course. It’s useful when you just want to
take a quick look at the definition without jumping to it.</p>

<p><img src="/img/2014-01/pycharm-documentation2.png" alt="" width="80%" /></p>

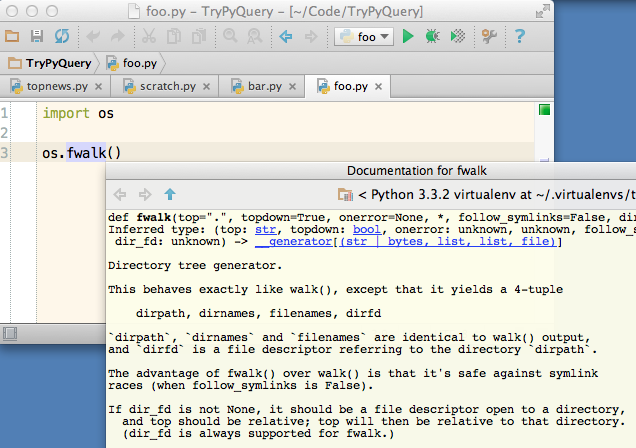
<p>Quick documentation will show the symbol’s documentation and signature.</p>

<p><img src="/img/2014-01/pycharm-documentation3.png" alt="" width="80%" /></p>

<p>Finally, External Documentation, and Parameter Info are pretty straightforward. The first
opens the documentation in the default browser and the second shows the parameter
information for a function or method (useful to quick check the name of keyword
arguments, for instance).</p>

<p><img src="/img/2014-01/pycharm-documentation4.png" alt="" width="80%" /></p>

<p>The external documentation works out-of-the-box with Python (of course), PyQt4, PySide,
gtk, wx, numpy, scipy, and kivy and you can add the path for external documentation in
Settings→Python External Documentation.</p>

<h2 id="code-quality">Code Quality</h2>

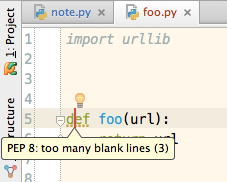
<p>PyCharm checks if your code conforms to PEP8 while you are typing. It’ll let you know if
you have too many spaces or blank lines, if you are using underscores instead of
CamelCase for classes names, and so on. If you want, you can configure PyCharm to <a href="http://blog.saturnlaboratories.co.za/archive/2012/09/10/running-pylint-pycharm">run
pylint as an external tool</a>, as well.</p>

<p><img src="/img/2014-01/pycharm-pep8.png" alt="" width="80%" /></p>

<h2 id="navigation-commands">Navigation Commands</h2>

<p>PyCharm’s power starts when you master its navigation commands. It can jump to classes,
functions, and so on. You can jump to the definition of a class, method, function, or
variable quickly with ⌘-B or ⌘-Click on a Mac or Ctrl-B or Control-Click on Windows and
Linux.</p>

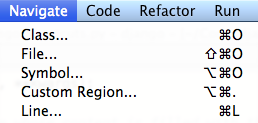
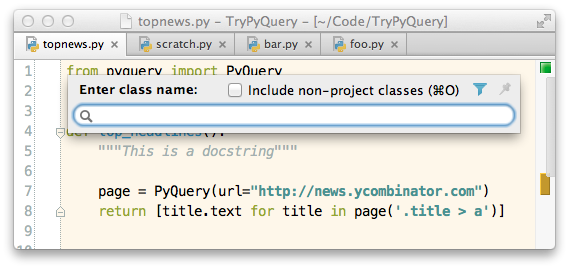
<p>The mechanism to navigate to a class, file, or symbol is pretty much the same. You are
presented with a dialog where you can type a substring, include items outside your
project, and filter the results if necessary. Go to the Navigate menu or use the
appropriate keyboard shortcut:</p>

<p><img src="/img/2014-01/pycharm-navigate.png" alt="" width="80%" /></p>

<p>This is a typical dialog to navigate to a Class definition:</p>

<p><img src="/img/2014-01/pycharm-jump-class.png" alt="" width="80%" /></p>

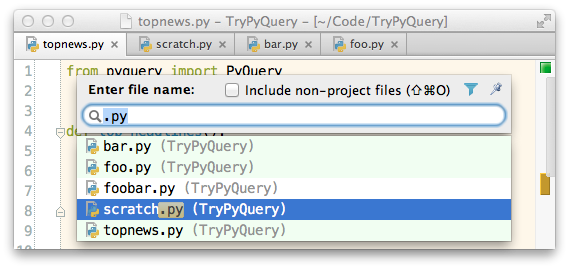
<p>You can enter part of the name, including the file extension. For instance, if you want
to open a JavaScript in a Django project but don’t remember its name, you can search for
“.js”.</p>

<p><img src="/img/2014-01/pycharm-jump-file.png" alt="" width="80%" /></p>

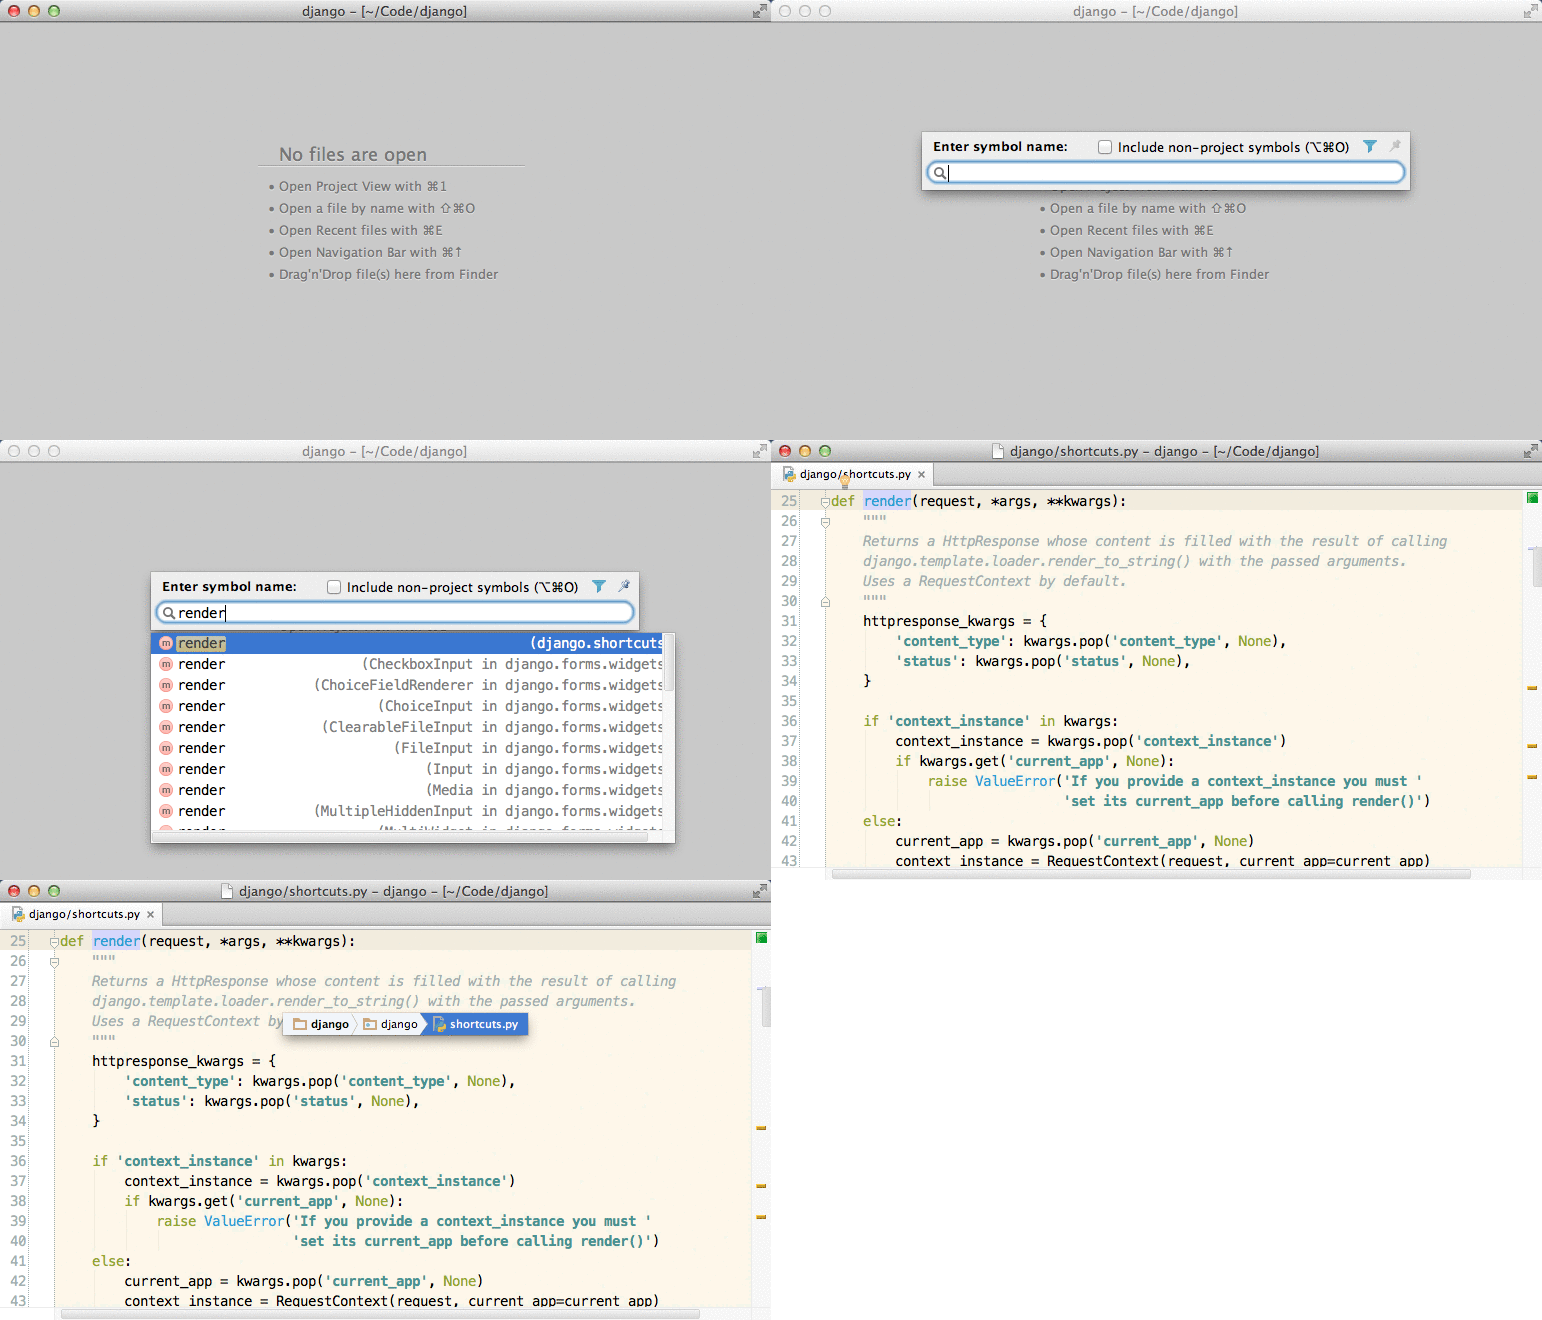
<p>These features allow us to navigate the source code very quickly. Let’s suppose we are
studying the Django source code and we want to see how the function <code class="language-plaintext highlighter-rouge">render</code> is
implemented. We don’t know where it’s defined, so we go to Navigate→Symbol (⌥-⌘-O), type
“render” and pick the first option (we can see it’s defined in <code class="language-plaintext highlighter-rouge">django.shortcuts</code>). If we
have hidden the navigation bar we can show it quickly with Navigate→Jump to the
Navigation Bar (⌘-↑) and see where the file is located (django→django→shortcuts.py):</p>

<p><img src="/img/2014-01/pycharm-find-symbol.gif" alt="" width="80%" /></p>

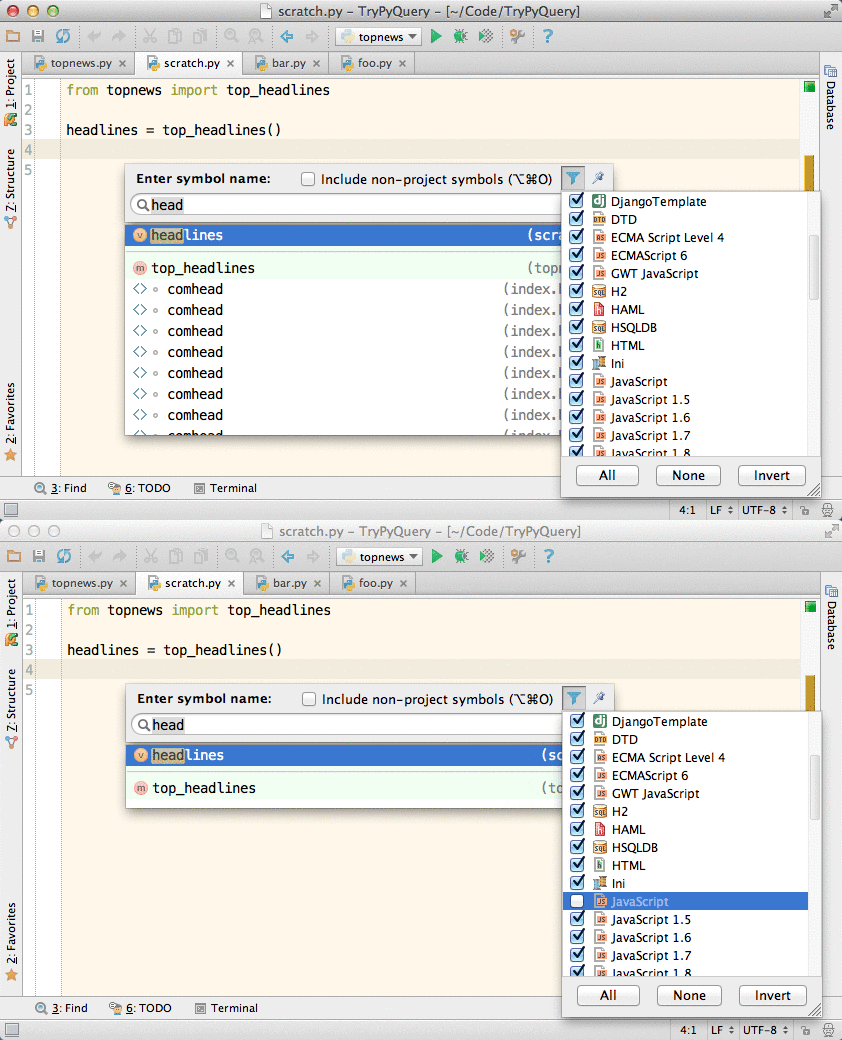
<p>Sometimes it’s useful to filter the completion results to take out things you are not
interested. In the following example I remove the results related to JavaScript to have a
much cleaner completion list:</p>

<p><img src="/img/2014-01/pycharm-goto-symbol.gif" alt="" width="80%" /></p>

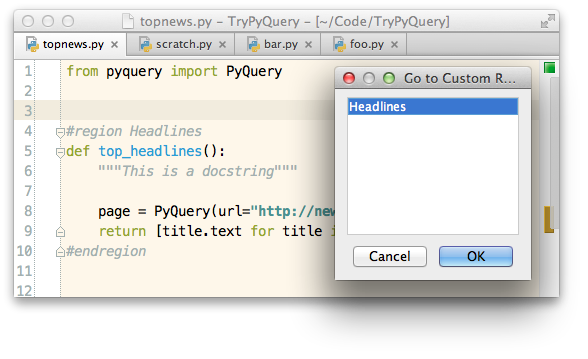
<p>PyCharm allows you to fold blocks such as classes, methods, and functions, but you can
create your own <a href="http://www.jetbrains.com/pycharm/webhelp/folding-custom-regions-with-line-comments.html">foldable regions</a>. This is useful when it makes sense to group
things (classes, methods, functions, etc) in one bigger block. These blocks can be folded
allowing us to focus on particular regions of the code. You can list all regions in a
file by going to Navigate→Custom Region or using the appropriate keyboard shortcut. Sadly
there’s no way to list all regions in a project.</p>

<p><img src="/img/2014-01/pycharm-jump-regions.png" alt="" width="80%" /></p>

<h2 id="unit-tests">Unit tests</h2>

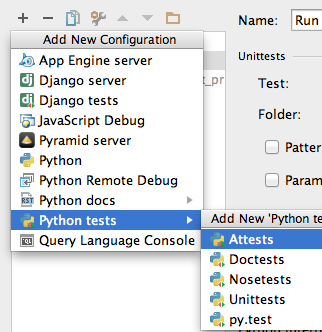
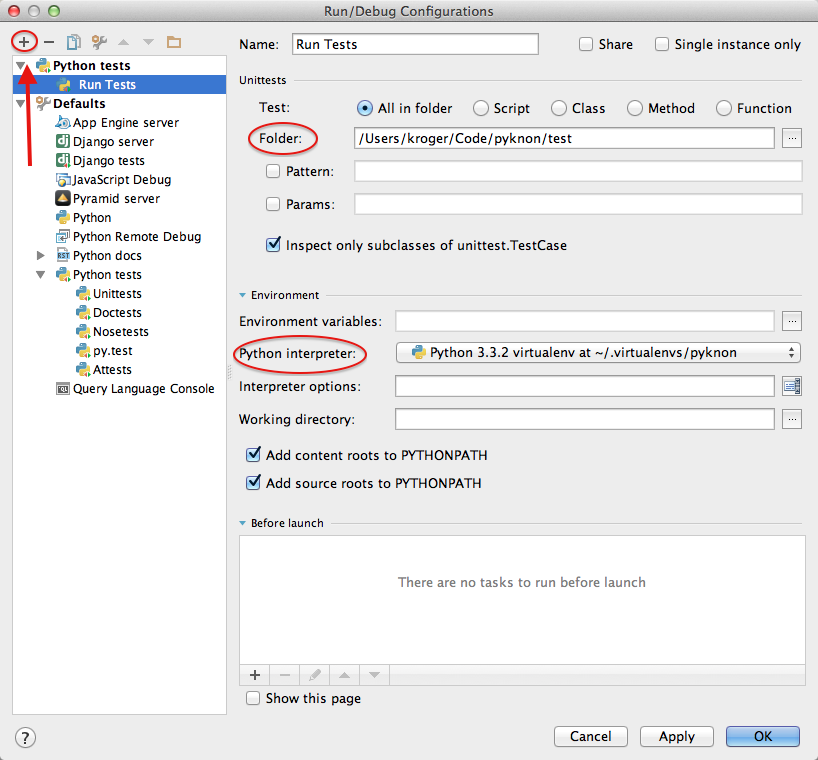
<p>Before we can run a test we need to add a new Run/Debug configuration. We go to Run→Edit
Configurations and click on the plus button on the top left corner. Then, we select
“Python tests” and the test runner. For this example I’ll use Unittests:</p>

<p><img src="/img/2014-01/pycharm-new-test-config.png" alt="" width="80%" /></p>

<p>Finally, we need to add the folder where the tests are and pick the right Python
interpreter:</p>

<p><img src="/img/2014-01/pycharm-tests.png" alt="" width="80%" /></p>

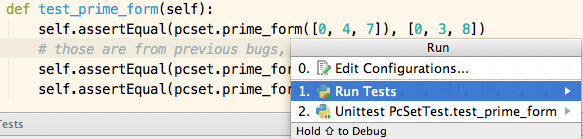
<p>Now we can run our tests just like we run code: by clicking in the toolbar or by
selecting Run→Run (Control-⌥-R). This will open a dialog where you can choose what you
want to run (you may have other things to run). You can run all tests or only the test on
the cursor.</p>

<p><img src="/img/2014-01/pycharm-run-tests.png" alt="" width="80%" /></p>

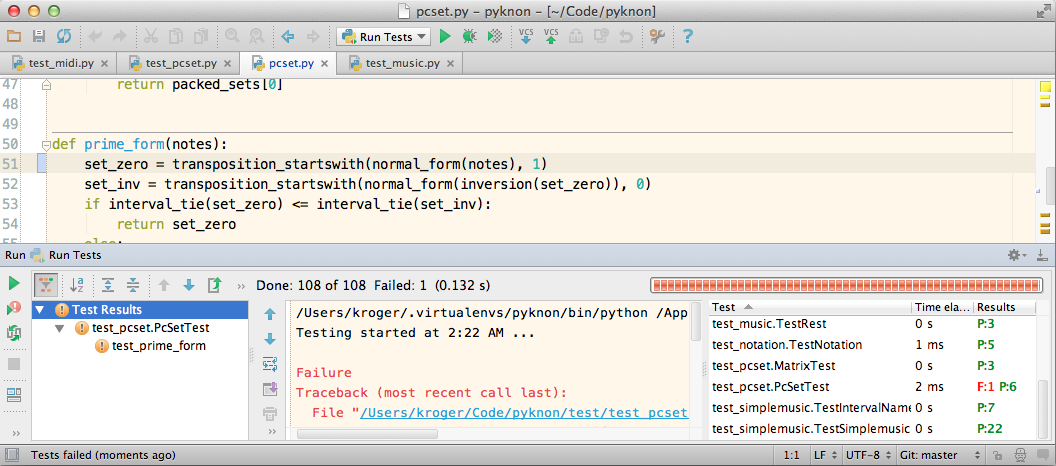
<p>After you run the tests, PyCharm will remember your last choice, so you can repeat it
with Control-R. This is useful if you are fixing one particular test case and want to run
it multiple times without running the other tests. You don’t need to have the cursor on
the test file you want to run; you can run the tests from any file. You can go from the
code to its test by selecting Navigate→Test (or appropriate hotkeys).</p>

<p><img src="/img/2014-01/pycharm-run-all-tests.png" alt="" width="80%" /></p>

<h2 id="dealing-with-multiple-files">Dealing with multiple files</h2>

<p>As you noticed, PyCharm uses one tab per file:</p>

<p><img src="/img/2014-01/pycharm-tabs.png" alt="" width="80%" /></p>

<p>To switch to tabs we can use the commands Select Next Tab and Select Previous
Tab. They are bound to Control-→ and Control-← by default, but OS X uses these
keys, so I rebind them to Control-⌘-N and Control-⌘-P (I use the same shortcuts
to switch tabs in the Terminal).</p>

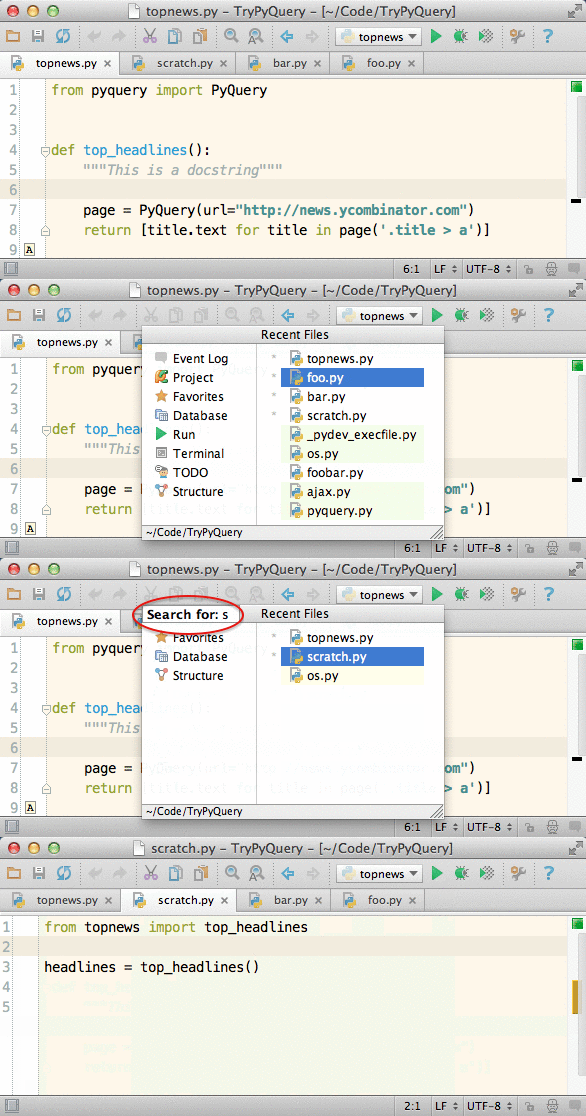
<p>One more direct approach to go to a tab is to use Navigate→File as we’ve seen, or
View→Recent Files (⌘-E) and View→Recently Changed Files (⇧-⌘-E). These last two commands
will present a list of files where you can click on type a substring to narrow the
selection. In the following example I only had to type “⌘-E”, “s”, “enter” to go to the
tab with the <code class="language-plaintext highlighter-rouge">scratch.py</code> file:</p>

<p><img src="/img/2014-01/pycharm-switch-tab.gif" alt="" width="80%" /></p>

<h2 id="split-windows">Split Windows</h2>

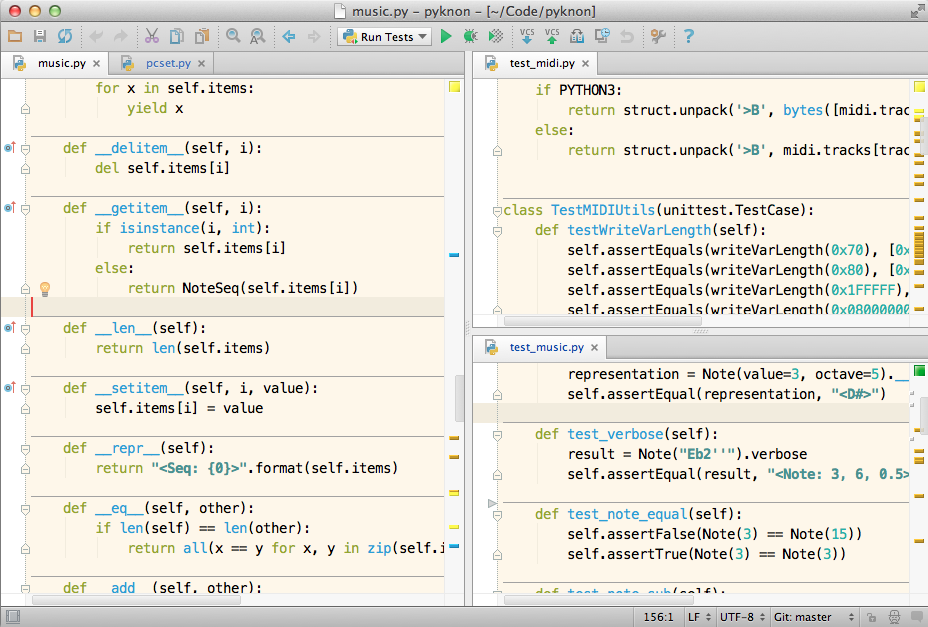
<p>PyCharm has support for split windows. It’s not as advanced as in Emacs and Vim but it’s
useful enough.</p>

<p><img src="/img/2014-01/pycharm-split-windows.png" alt="" width="80%" /></p>

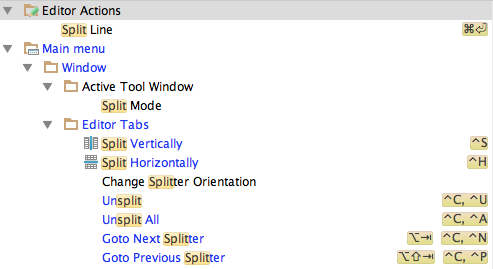
<p>No command to deal with split windows have shortcuts assigned to them by default, so
you’ll have to do it yourself. These are the keys that I use:</p>

<ul>
  <li>Split Vertically, Control-S</li>
  <li>Split Horizontally, Control-H</li>
  <li>Unsplit, Control-C Control-U</li>
  <li>Unsplit All, Control-C Control-A</li>
  <li>Goto Next Splitter, Control-C Control-N</li>
  <li>Goto Previous Splitter, Control-C Control-P</li>
  <li>Move to Opposite Group, Control-C Control-M</li>
</ul>

<p><img src="/img/2014-01/pycharm-split-shortcuts.png" alt="" width="80%" /></p>

<p>Move to Opposite Group will move a tab to another group, but it only works if we have
only two panes. In this case it’s just easier to drag and drop the tab to the desired
place.</p>

<h2 id="conclusion">Conclusion</h2>

<p>PyCharm can do a lot for us out-of-the-box. We saw how to use virtualenv, define
shortcuts, use an external editor, run code, define macros, find commands with Find
Action, be productive with code completion, access documentation, navigate the source
code, run unit tests, and deal with multiple files and split windows.</p>

<p>And we are just scratching the surface. We didn’t talk about editing, version control,
plugins, debugging (local and remote), templates, using TextMate bundles, web
development, and much more.</p>

<p>I suggest you check PyCharm’s official documentation, including the <a href="http://www.jetbrains.com/pycharm/quickstart/index.html">Quickstart
Guide</a> and the <a href="http://www.jetbrains.com/pycharm/webhelp/getting-help.html">Online Help</a>. Also, Andrew Brookins wrote a very good PyCharm
review from a <a href="http://andrewbrookins.com/tech/one-year-later-an-epic-review-of-pycharm-2-7-from-a-vim-users-perspective/">Vim’s user perspective</a>. I recommend it even if you don’t use Vim.</p>]]></content><author><name>Pedro Kroger</name></author><category term="Emacs" /><category term="Programming" /><category term="PyCharm" /><category term="Python" /><summary type="html"><![CDATA[The whole Editors versus IDEs debate is getting old and boring, especially because it is not a zero sum game. I’ve been using Emacs for 15+ years and at one point I used it to read my email, browse the web, and make coffee (haven’t we all?). But today I find that I’m more productive by using the right tool for the right job.]]></summary></entry><entry><title type="html">Converting MIDI Files to MP3 on the Mac OS</title><link href="https://pedrokroger.net/mac/music/2013/08/12/converting-midi-files-mp3-mac-os.html" rel="alternate" type="text/html" title="Converting MIDI Files to MP3 on the Mac OS" /><published>2013-08-12T12:02:28-03:00</published><updated>2013-08-12T12:02:28-03:00</updated><id>https://pedrokroger.net/mac/music/2013/08/12/converting-midi-files-mp3-mac-os</id><content type="html" xml:base="https://pedrokroger.net/mac/music/2013/08/12/converting-midi-files-mp3-mac-os.html"><![CDATA[<p>I often need to convert a bunch of MIDI files to MP3 for teaching and lecturing. There
are a few commercial graphical apps for the Mac and you can even use Garageband, but I
always wanted to be able to convert MIDI files using the command line since it’s easier
and I can automate the whole process. On the Mac we can use Timidity++ or Fluidsynth,
both available using homebrew.</p>

<!--more-->

<h2 id="fluidsynth">Fluidsynth</h2>

<p>The easiest way to generate a MP3 from a MIDI on the Mac is by using <a href="https://sourceforge.net/apps/trac/fluidsynth/">fluidsynth</a>. You can install it easily with <a href="http://brew.sh">homebrew</a>:</p>

<div class="language-plaintext highlighter-rouge"><div class="highlight"><pre class="highlight"><code>brew install libsndfile lame
brew install --with-libsndfile fluidsynth
</code></pre></div></div>

<p>If everything is working properly, when you run <code class="language-plaintext highlighter-rouge">fluidsynth -T help</code> you should see something like the following:</p>

<div class="language-plaintext highlighter-rouge"><div class="highlight"><pre class="highlight"><code>kroger@orestes $ fluidsynth -T help
FluidSynth version 1.1.6
Copyright (C) 2000-2012 Peter Hanappe and others.
Distributed under the LGPL license.
SoundFont(R) is a registered trademark of E-mu Systems, Inc.

-T options (audio file type):
'aiff','au','auto','avr','caf','htk','iff','mat','mpc','paf','pvf','raw','rf64','sd2','sds','sf','voc','w64','wav','wve','xi'

auto: Determine type from file name extension, defaults to "wav"
</code></pre></div></div>

<p>With fluidsynth working, the conversion is simple. Just pass a <a href="http://en.wikipedia.org/wiki/SoundFont">SoundFont</a> and a MIDI file as parameters and you should be good to go:</p>

<div class="language-plaintext highlighter-rouge"><div class="highlight"><pre class="highlight"><code>fluidsynth -F output.wav ~/Soundfonts/my-soundfont.sf2 myfile.midi
lame output.wav
</code></pre></div></div>

<p>If you are lazy, check <a href="https://gist.github.com/kroger/6211862">this bash script</a>. It accepts multiple MIDI files and removes the intermediate WAV file.</p>

<h2 id="timidity">Timidity++</h2>

<p>Timidity++ is my go to program to convert midi files to wav. To install just use homebrew:</p>

<div class="language-plaintext highlighter-rouge"><div class="highlight"><pre class="highlight"><code>brew install timidity
</code></pre></div></div>

<p>You may need to create a configuration file at
<code class="language-plaintext highlighter-rouge">/usr/local/Cellar/timidity/2.14.0/share/timidity/timidity.cfg</code> and list where your
SoundFonts are. For instance, in my <code class="language-plaintext highlighter-rouge">timidity.cfg</code> file I have:</p>

<div class="language-plaintext highlighter-rouge"><div class="highlight"><pre class="highlight"><code>soundfont /Users/kroger/Dropbox/Sfonts/Steinway-Grand-Piano1.2.sf2
</code></pre></div></div>

<p>You can read more about the configuration format by using its man page: <code class="language-plaintext highlighter-rouge">man timidity.cfg</code>.</p>

<p>There you go. We have two ways to convert MIDI files to MP3 on the Mac using free software.</p>]]></content><author><name>Pedro Kroger</name></author><category term="Mac" /><category term="Music" /><summary type="html"><![CDATA[I often need to convert a bunch of MIDI files to MP3 for teaching and lecturing. There are a few commercial graphical apps for the Mac and you can even use Garageband, but I always wanted to be able to convert MIDI files using the command line since it’s easier and I can automate the whole process. On the Mac we can use Timidity++ or Fluidsynth, both available using homebrew.]]></summary></entry><entry><title type="html">Time Tracking for Founders</title><link href="https://pedrokroger.net/productivity/programming/2012/11/22/time-tracking-founders.html" rel="alternate" type="text/html" title="Time Tracking for Founders" /><published>2012-11-22T08:04:22-03:00</published><updated>2012-11-22T08:04:22-03:00</updated><id>https://pedrokroger.net/productivity/programming/2012/11/22/time-tracking-founders</id><content type="html" xml:base="https://pedrokroger.net/productivity/programming/2012/11/22/time-tracking-founders.html"><![CDATA[<p>How many hours have you worked on your Minimum Viable Product (MVP) in the past month?
How many hours have you worked on your lifestyle business this week? How long does it
take to write a book? I’m able to give reasonable answers to these questions because I
track my time.</p>

<p>Hackers turned founders rightfully track many things about their products (downloads,
page visits, conversions, etc) but, surprisingly, many of them don’t track where they
spend their time.</p>

<p>Of course it’s easy to fool yourself thinking that working more hours means accomplishing
more. Working 10 hours on something doesn’t</p>

<p>necessarily mean accomplishing twice of working 5 hours. But I believe that time is a
valuable metric that can provide you with significant insights. I track what I call
“focused time”. If I stop working on my task to read my email, I’ll stop the stopwatch.
If I’m working and someone or something interrupts me, I’ll pause the stopwatch.</p>

<h2 id="the-basic-questions">The Basic Questions</h2>

<p>I like to be able to answer the following questions:</p>

<ol>
  <li>How many hours did it take me to finish project X?</li>
  <li>How many hours to finish task T?</li>
  <li>For how long have I been working on task T today?</li>
  <li>How many hours have I worked on my product this week?</li>
</ol>

<h2 id="advantages">Advantages</h2>

<p>To me, the main advantage of tracking your time is focus. I trained myself to focus on
the task at hand when I start the stopwatch. Also, it makes me think for a second what
I’m trying to accomplish. Instead of just thinking “I’m going to work on my app”, I’ll be
more specific, like “I’m going to close bug #23”. It sounds obvious but it’s not uncommon
for me to start one task and jump to another without even realizing (and without
finishing the first task). Since many tasks are connected the jump will feel fluid, but I
may end up with many half-finished tasks at the end of the day. This alone would be a
compelling enough reason to track my time. Even if I didn’t save the data, I’d still do
it just to help me in keeping focused. But since I do have the data, there are other
advantages as well.</p>

<p>I can use past data to help me to make decisions. For instance, if a project or task is
taking longer than it should, I can decide to kill it. I do this often with scripts that
I think I can finish in half hour but end up taking hours instead. The flip side is that
I’m becoming much better at predicting how long something is going to take.</p>

<p>Knowing how long things can take helps me to sort my priorities and say no when
necessary. For instance, I know that it takes me around 15 hours to write a basic project
proposal. So when someone asks me to write something I can say “I wish I could, but this
is going to take about 15 to 20 hours and I need to work on project X instead”.</p>

<p>I’m not big on motivation. Although I think it’s important, it’s hard to stay “motivated”
all the time. But it’s very motivating to see how many hours you have been putting on
your projects.</p>

<h2 id="what-i-need">What I Need</h2>

<p>There are many different type of programs to log time. Some concentrate on tracking the
time of tasks, others on tracking billable hours and generating billing reports. I don’t
need any complicated features, just Projects (such as “Write post ‘Time tracking for
founders’), Tasks (such as “Write first draft”), and Categories (such as “Blog”).
Unfortunately I’ve found few programs that can help me to answer the questions that I
proposed above.</p>

<p>Before I switched to the Mac, I used a very nice Gnome applet called <a href="http://projecthamster.wordpress.comparisson">Hamster</a>. I
haven’t been able to find anything similar for the Mac. I tried I few but it seems I’ll
have to write my own.</p>

<h3 id="on-the-menubar">On the menubar</h3>

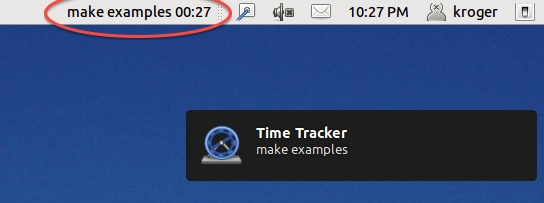
<p>To me, the most important feature is be able to see the task name and stopwatch on the
menubar. I like to be able to glance at the menubar and see what I’m supposed to be
working and for how long I’ve been working. In the example below (using Hamster) you can
see that I’m working on a task called “make examples” and I’ve been working on it for 27
minutes. You can configure Hamster to show a notification from time to time with the task
name (the black thing in the screenshot). Some will find this annoying, but it helps me
to keep focused. You can, of course, disable it.</p>

<p><img src="/img/2012-11/hamster-pokeme.png" alt="" width="80%" /></p>

<h3 id="pause-and-stop">Pause and Stop</h3>

<p>I like to be able to pause and stop the timer. This is a simple feature but a few applications don’t implement it. Extra points to have a global hotkey for these actions. It’s handy to deal with interruptions.</p>

<h3 id="input-and-edit-past-events">Input and edit past events</h3>

<p>It’s important to be able to rename, delete, and change the duration of an entry. It’s also useful to be able to input old entries, specially for tasks I have performed outside the computer. Believe it or not, some apps don’t have this feature.</p>

<h3 id="work-offline">Work Offline</h3>

<p>There are a good number of online apps to track time (I have even used one for a few months). The obvious advantage is that you can access them in different computers and operating systems. But since I work mainly from one computer, I prefer to use a program that works offline.</p>

<h3 id="quick-statistics">Quick Statistics</h3>

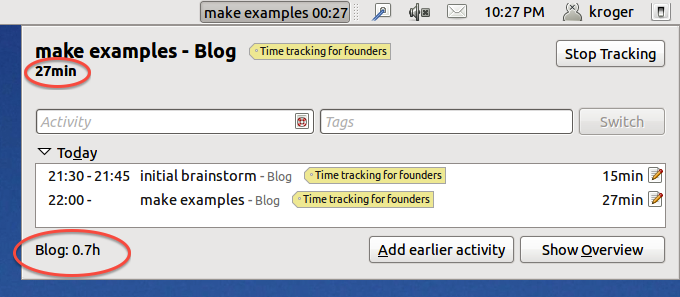
<p>One thing that I like about Hamster is that it shows some basic information on the main screen without the need to go to the separate reports window. In the following image we can see the total time for a category (Blog: 0.7h), the time for the current task (27 min), and the project name (“Time tracking for founders”).</p>

<p><img src="/img/2012-11/hamster-full.png" alt="" width="80%" /></p>

<h2 id="manual-vs-automatic">Manual vs. Automatic</h2>

<p>Automatic time tracking programs such as <a href="http://www.rescuetime.com">RescueTime</a> are great, but they don’t help me to answer the questions I want. These programs work by recording how long you stay in one program or website. This is great to find your major distractions, but one major problem is that one program or website may have multiple uses. For example, watching videos on Youtube can be a productive task (lectures, screencasts, tutorials) that is part of a project or a plain distraction (kittens videos FTW!). However, applications like RescueTime will mark both as distractions.</p>

<p>Also, automatic time tracking tools are passive (duh! That’s their main selling point). I like to see in real time how long things are taking and, as I mentioned, it help me to focus.</p>

<h2 id="analysis">Analysis</h2>

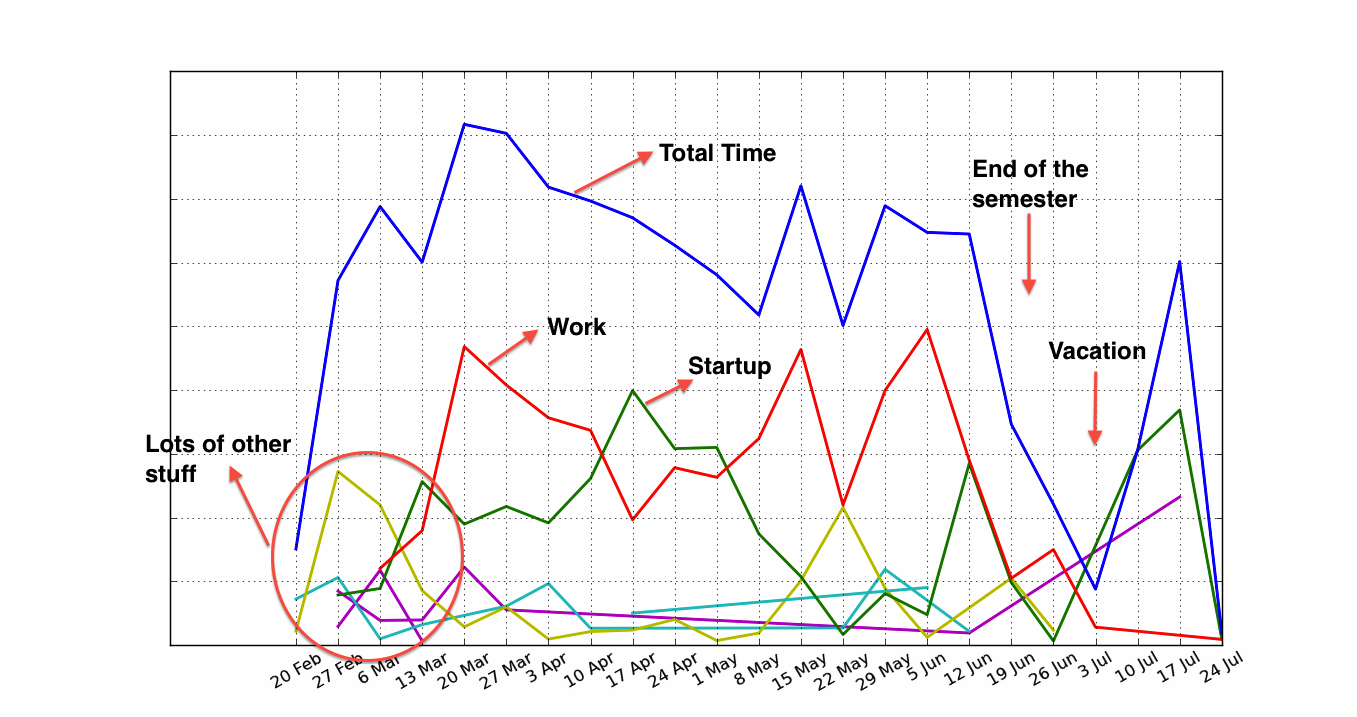
<p>After more than one year collecting data, I was able to analyze it and gather some interesting results. In the following image we can see the amount of time I worked in different categories (startup is green, day job is red) over six months. In the first weeks I was trying to work in too many different things at once, therefore not focusing on my startup. Also, we can see I used my vacation time to do some serious startup work. (The original image has the number of hours on the Y axis, but I’m not comfortable sharing this information.)</p>

<p><img src="/img/2012-11/tasks-no-label.png" alt="" width="100%" /></p>

<p>I was able to find my most productive day, that is, the day I worked consistently more hours on my startup over a period of n months. Surprisingly, it was Monday:</p>

<div class="language-plaintext highlighter-rouge"><div class="highlight"><pre class="highlight"><code>Mon: 22.72%
Thu: 17.95%
Sun: 16.33%
Tue: 16.06%
Fri: 10.37%
Wed:  8.74%
Sat:  7.83%
</code></pre></div></div>

<p>Also, after analyzing this data, I gave up trying to be productive on Saturdays. Now it’s my day off.</p>

<p>But to me the biggest payoff is when I analyze the time I’ve spent on individual projects. For instance, I realized I spent a huge amount of time fiddling with tools when I was writing <a href="http://musicforgeeksandnerds.com">my book</a> (I tend to do that). The next time I write a book I’ll be careful not to do that (as much).</p>

<h2 id="energy-level">Energy Level</h2>

<p>Of course time is only one metric. Energy level is as import as time. If you have time and no energy you are not going to accomplish much. On the other hand, given enough time and energy you can do anything you want. Unfortunately, tracking energy levels is difficult and invasive. Out of curiosity, I recorded my perceived energy level during the day for almost two weeks. Every half-hour I’d rate my energy level as:</p>

<ul>
  <li>0: sleeping</li>
  <li>1: need a nap</li>
  <li>2: low energy</li>
  <li>3: very good</li>
  <li>4: very energetic</li>
</ul>

<p>Originally I was going to show the following graphic that has the average levels for each week:</p>

<p><img src="/img/2012-11/energy-by-hour.png" alt="" width="100%" /></p>

<p>But once I reviewed the data, I realized the graphic above is useless. Look how wild my energy levels were during the two weeks:</p>

<p><img src="/img/2012-11/energy-level.png" alt="" width="100%" /></p>

<p>I collected this data one year ago and, frankly, I don’t know what to make of it today. I’m still curious about energy levels, though. Maybe I’ll do this experiment again.</p>

<h2 id="what-i-use-now">What I Use Now</h2>

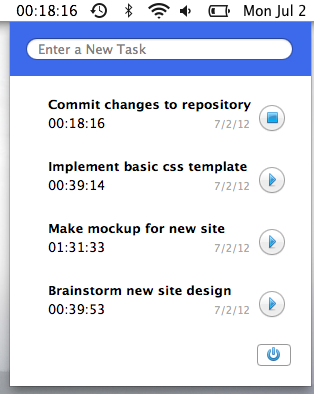
<p>The setup I have now it’s not perfect but it’s working for me. To collect the time I use
StopWatchMenu, a simple Mac app that I developed myself. It sits on the menubar and
allows me to enter and pause tasks:</p>

<p><img src="/img/2012-11/stop-watch-menu.png" alt="" width="80%" /></p>

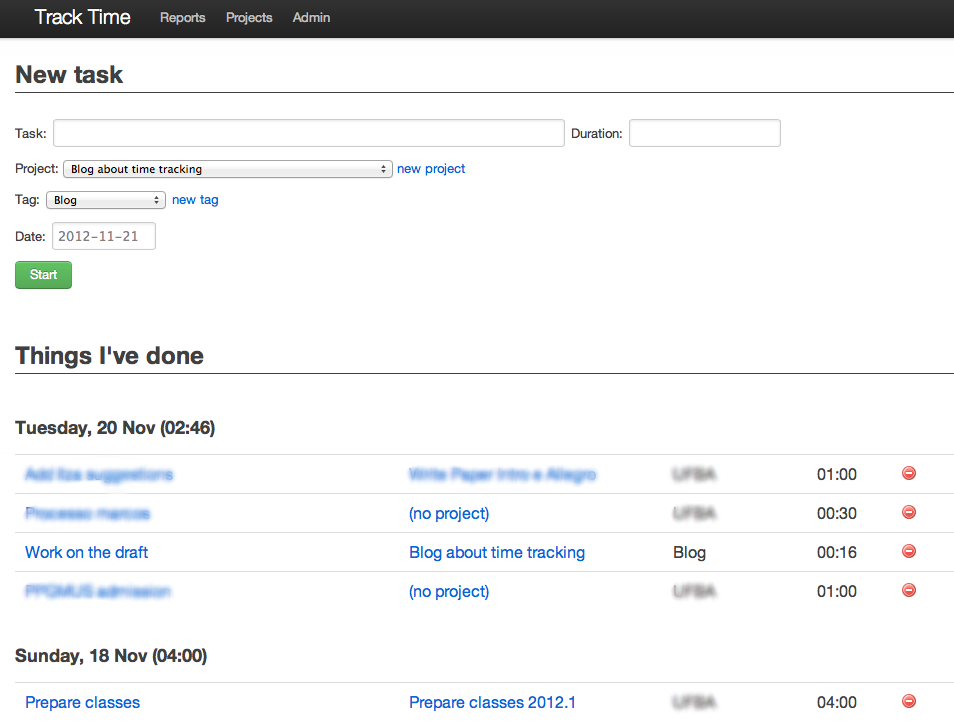
<p>At the end of the day I enter the data in a simple Django app I hacked together (I run it
locally). I use this app to generate reports and analyze the data I have:</p>

<p><img src="/img/2012-11/tracktime.png" alt="" width="100%" /></p>

<p>Naturally, I’d like to have one single app for all my time tracking purposes. I couldn’t
find one Mac application that works the way I want and generates the reports I care
about. Even Hamster doesn’t generate the reports I want; when I was using it I’d export
the data and use a Python script to generate reports.</p>

<h2 id="conclusion">Conclusion</h2>

<p>I’m fully aware that time is not the only metric; what counts is results. But tracking my
time has been beneficial, not intrusive and it helps with procrastination and focus.
Usually I don’t like to say how much time I’ve spent on things because, in my experience,
people who don’t track time don’t have the slightest idea of how long things may take
(specially for long projects) and may misinterpret the data (if I tell you how long I’ve
spent building my first product you’d flip out 😉</p>

<p>Finally, I don’t necessarily care about the precise duration of a project, down to the
minute. I like to know the order of time a project took to be accomplished. Some projects
will need the order of a couple dozen hours while others the order of one hundred hours.
So even if I didn’t track every single minute I was working on a project (I don’t track
the time I’m having ideas on the shower or on a long walk) I still get a decent estimate
of how much time was necessary to complete a project and how much time I may need for
similar projects.</p>

<p>Let me know in the comments how tracking your time has helped you and if you have a good
solution to track energy levels.</p>]]></content><author><name>Pedro Kroger</name></author><category term="Productivity" /><category term="Programming" /><summary type="html"><![CDATA[How many hours have you worked on your Minimum Viable Product (MVP) in the past month? How many hours have you worked on your lifestyle business this week? How long does it take to write a book? I’m able to give reasonable answers to these questions because I track my time.]]></summary></entry><entry><title type="html">Using Sphinx to Write Technical Books</title><link href="https://pedrokroger.net/python/sphinx/2012/10/10/using-sphinx-write-technical-books.html" rel="alternate" type="text/html" title="Using Sphinx to Write Technical Books" /><published>2012-10-10T00:35:56-03:00</published><updated>2012-10-10T00:35:56-03:00</updated><id>https://pedrokroger.net/python/sphinx/2012/10/10/using-sphinx-write-technical-books</id><content type="html" xml:base="https://pedrokroger.net/python/sphinx/2012/10/10/using-sphinx-write-technical-books.html"><![CDATA[<p>As I mentioned in a <a href="/music-for-geeks-and-nerds/">previous blog post</a>, I used <a href="http://sphinx.pocoo.org/">Sphinx</a> to write my book, <a href="/mgfan/">Music
for Geeks and Nerds</a>. With Sphinx I could generate HTML, Epub, Mobi (for the Kindle),
and two PDF versions (black-and-white and color). Sphinx works quite nicely
out-of-the-box for documenting computer programs, but I had to bend it a little to
generate output more suitable for a book.</p>

<!--more-->

<div class="alert alert-warning" role="alert">
  This post is very old and probably out-of-date.
</div>

<p>Please keep in mind that I came up with these techniques while writing my book. My main
goal was to finish the book and to spend as little time as possible fiddling with my
tools. Therefore, while some of these solutions are ok, others are kind of hacky. I’m
posting them hoping they’ll be useful, but they are not a polished product.</p>

<h2 id="themes">Themes</h2>

<p>Sphinx comes with a few <a href="http://sphinx.pocoo.org/theming.html">themes</a> out-of-the-box and it’s very easy to create <a href="http://sphinx.pocoo.org/templating.html">new
ones</a>. I created three themes: a minimalist html theme for previewing the book while I
was writing (called ‘book’), an Epub theme (‘epub2’), and a mobi theme (‘mobi’). Here is
a screenshot of the html theme:</p>

<p><img src="/img/2012-10/sphinx-html.png" alt="" width="90%" /></p>

<p>Besides removing things from the base theme such as the sidebar, I used <code class="language-plaintext highlighter-rouge">@font-face</code> to
define Anonymous Pro as the font for the code examples. I defined the following in my
<code class="language-plaintext highlighter-rouge">themes/book/static/default.css_t</code> (with similar code for for bold, italic, and
bold-italic variants):</p>

<div class="language-css highlighter-rouge"><div class="highlight"><pre class="highlight"><code><span class="k">@font-face</span> <span class="p">{</span>
<span class="nl">font-family</span><span class="p">:</span> <span class="n">AnonymousPro</span><span class="p">;</span>
<span class="nl">font-weight</span><span class="p">:</span> <span class="nb">normal</span><span class="p">;</span>
<span class="nl">font-style</span><span class="p">:</span> <span class="nb">normal</span><span class="p">;</span>
<span class="nl">src</span><span class="p">:</span> <span class="sx">url("fonts/Anonymous Pro.ttf")</span><span class="p">;</span>
<span class="p">}</span>
</code></pre></div></div>

<p>In <code class="language-plaintext highlighter-rouge">themes/book/theme.conf</code> I defined Palatino as the body font:</p>

<div class="language-conf highlighter-rouge"><div class="highlight"><pre class="highlight"><code><span class="n">bodyfont</span> = <span class="s1">'Palatino'</span>, <span class="n">serif</span>
<span class="n">headfont</span> = <span class="n">Tahoma</span>, <span class="n">Geneva</span>, <span class="n">sans</span>-<span class="n">serif</span>;
</code></pre></div></div>

<p>The ePub theme is very simple. Sphinx comes with a default theme for ePub, but
it has some rough edges. For instance, it shows a copyright notice at the end of
each chapter:</p>

<p><img src="/img/2012-10/epub-copyright.png" alt="" width="80%" /></p>

<p>Most Sphinx themes extends a basic theme. Since the html for the ePub file is very
simple, I decided to create the <code class="language-plaintext highlighter-rouge">layout.html</code> file from scratch, without inheriting from
the base theme. As you can see <a href="https://gist.github.com/3212526">here</a>, my Epub theme is super simple. In the css file
I use the same <code class="language-plaintext highlighter-rouge">@font-face</code> trick I used in the html theme. I also changed small things,
like not showing bullets in the Table of Contents:</p>

<p><img src="/img/2012-10/epub-toc-original.png" alt="" width="45%" /></p>

<p><img src="/img/2012-10/epub-toc-new.png" alt="" width="45%" /></p>

<p>In the following image you can see the difference between the out-of-the box ePub style
and my style using pygments and AnonymousPro:</p>

<p><img src="/img/2012-10/epub-code-original.png" alt="" width="45%" /></p>

<p><img src="/img/2012-10/epub-code-new.png" alt="" width="45%" /></p>

<p>The mobi theme is very similar to the epub2 style, except it doesn’t use <code class="language-plaintext highlighter-rouge">@font-face</code> and
the highlighted source code is black and white, since most kindle readers don’t support
these features. However, there’s a bug in iBooks that prevents it from showing the right
font when one uses the <code class="language-plaintext highlighter-rouge">span</code> tag, as pigments does to generate the highlighted source
code. Kindle seems to have similar restrictions. To fix this I created custom builders.</p>

<h2 id="the-epub-builder">The ePub Builder</h2>

<p>The builder <code class="language-plaintext highlighter-rouge">epub2</code> is a subclass of the built-in ePub builder. It disables visible links
and replaces the <code class="language-plaintext highlighter-rouge">span</code> tag with <code class="language-plaintext highlighter-rouge">samp</code> due to the bug I mentioned earlier. By default
the built-in ePub builder will generate links like this:</p>

<p><img src="/img/2012-10/epub-link-default.png" alt="" width="80%" /></p>

<p>but I prefer not to show the url:</p>

<p><img src="/img/2012-10/epub-link-new.png" alt="" width="80%" /></p>

<p>You can see the full builder <a href="https://gist.github.com/3212745">here</a>. A much nicer solution would be to create a <a href="http://sphinx.pocoo.org/ext/tutorial.html">new
writer</a> by subclassing <code class="language-plaintext highlighter-rouge">writers.html.HTMLWriter</code> and have it emit <code class="language-plaintext highlighter-rouge">samp</code> directly
instead of <code class="language-plaintext highlighter-rouge">span</code>. However, I could not find a way to make my builder use the new writer
without copying a lot of code from the original <code class="language-plaintext highlighter-rouge">HTMLWriter</code> (and, therefore, negating
the benefits of subclassing).</p>

<h2 id="the-mobi-builder">The mobi Builder</h2>

<p>I created a <a href="https://gist.github.com/kroger/5866756">mobi builder</a> by copying the epub builder from Sphinx and making the
necessary changes. Maybe I could have subclassed it (I’ve seen a mobi builder on github
that did that), but I wanted to have separate configuration options for the mobi file,
such as <code class="language-plaintext highlighter-rouge">mobi_cover</code>. It uses Amazon’s <a href="http://www.amazon.com/gp/feature.html?ie=UTF8&amp;docId=1000765211">kindlegen</a> to convert the html pages to the
mobi format.</p>

<h2 id="code-examples">Code examples</h2>

<p>Sphinx makes it really easy to show <a href="http://sphinx.pocoo.org/markup/code.html#includes">code examples</a> with <code class="language-plaintext highlighter-rouge">literalinclude</code>, specially
with the <code class="language-plaintext highlighter-rouge">:pyobject:</code> option, which shows only a selected Python class, function, or
method in a file. In the following example I want to show the definition of the function
<code class="language-plaintext highlighter-rouge">note_name</code> defined in <code class="language-plaintext highlighter-rouge">pyknon/simplemusic.py</code>:</p>

<pre><code class="language-rst">.. literalinclude:: pyknon/simplemusic.py
    :pyobject: note_name
</code></pre>

<p>This is very simple and straightforward, but I also wanted an easy way to show examples
displaying the usage of a function and the result of its computation, like in the
following image:</p>

<p><img src="/img/2012-10/note-name.png" alt="" width="30%" /></p>

<p>I could just type the code in the python REPL and copy and paste the result, but if the
function changes I might need to update the examples manually, which could lead to some
examples being outdated or wrong. And code examples that won’t run or with mistakes can
be a big source of frustration in programming books. To solve this I hacked an extension
called <code class="language-plaintext highlighter-rouge">code-example</code> that behaves like <code class="language-plaintext highlighter-rouge">literalinclude</code>, but it adds the code and the
result of its computation in a Python REPL. Its usage is the same as <code class="language-plaintext highlighter-rouge">literalinclude</code>:</p>

<pre><code class="language-rst">.. code-example:: note_name.py
</code></pre>

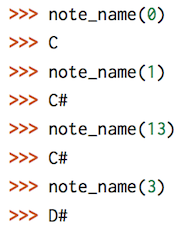
<p>Following is the content of <code class="language-plaintext highlighter-rouge">note_name.py</code>. Notice <code class="language-plaintext highlighter-rouge">note_name</code> is called four times, but
<code class="language-plaintext highlighter-rouge">note_name.py</code> doesn’t have the result of the function calls. The result will be computed
and displayed by <code class="language-plaintext highlighter-rouge">code-example</code>. Also, <code class="language-plaintext highlighter-rouge">import</code> lines won’t show in the result:</p>

<div class="language-python highlighter-rouge"><div class="highlight"><pre class="highlight"><code><span class="kn">from</span> <span class="n">pyknon.simplemusic</span> <span class="kn">import</span> <span class="n">note_name</span>

<span class="nf">note_name</span><span class="p">(</span><span class="mi">0</span><span class="p">)</span>
<span class="nf">note_name</span><span class="p">(</span><span class="mi">1</span><span class="p">)</span>
<span class="nf">note_name</span><span class="p">(</span><span class="mi">13</span><span class="p">)</span>
<span class="nf">note_name</span><span class="p">(</span><span class="mi">3</span><span class="p">)</span>
</code></pre></div></div>

<p>You can find <a href="https://gist.github.com/3856749">code-example here</a>. It’s hackish, but it saved me a lot of time
checking if my code examples where updated and gave more confidence in the final result.</p>

<h2 id="autoimage">Autoimage</h2>

<p>One of the most annoying things about working with a source file that is intended to have
multiple outputs such as PDF and HTML is how to deal with images. Often images will have
to be scaled differently depending on the output. For instance, I used to have code like
the following:</p>

<pre><code class="language-rst">.. only:: not latex

.. image:: figs/notation3.png
    :scale: 40

.. only:: latex

.. image:: figs/notation3.png
    :scale: 80
</code></pre>

<p>It has quite a bit of repetition and sometimes I’d type an extra space or the wrong
number of blank lines and the output would be wrong since Sphinx is fastidious about
spacing and blank lines (for instance, it needs the blank like after the line with
<code class="language-plaintext highlighter-rouge">..only</code>). I wrote the extension <a href="https://gist.github.com/3856821">autoimage</a> to simplify this. With it the previous
example becomes:</p>

<pre><code class="language-rst">.. autoimage:: notation3.png
    :scale-html: 40
    :scale-latex: 80
</code></pre>

<p>Autoimage is somewhat smart. It tries to use a pdf image if it’s available and the
backend is LaTeX, and looks for a black-and-white image if the configuration option
<code class="language-plaintext highlighter-rouge">black_and_white</code> is true. After I finished the extension and converted the whole book I
discovered that Sphinx caches things and share values among builds. It means that, in the
previous example, if I built a pdf and a html version of my book in that order,
<code class="language-plaintext highlighter-rouge">notation3.png</code> would be scaled 80% in both cases, instead of 80 and 40 percent. To solve
this I just run <code class="language-plaintext highlighter-rouge">sphinx-build</code> with the <code class="language-plaintext highlighter-rouge">-E</code> option.</p>

<h2 id="configuration">Configuration</h2>

<p>My <a href="https://gist.github.com/3856835">Sphinx configuration</a> file is the most boring part of this blog post, but I’m
including it here in case you’re curious. I unset almost all LaTeX options. This allows
me to use these options in any <a href="https://gist.github.com/3856845">LaTeX style</a> I want. I use two styles, one for the
color version and another for B&amp;W:</p>

<div class="language-python highlighter-rouge"><div class="highlight"><pre class="highlight"><code><span class="n">latex_elements</span> <span class="o">=</span> <span class="p">{</span>
    <span class="sh">'</span><span class="s">papersize</span><span class="sh">'</span><span class="p">:</span> <span class="sh">''</span><span class="p">,</span>
    <span class="sh">'</span><span class="s">fontpkg</span><span class="sh">'</span><span class="p">:</span> <span class="sh">''</span><span class="p">,</span>
    <span class="sh">'</span><span class="s">fncychap</span><span class="sh">'</span><span class="p">:</span> <span class="sh">''</span><span class="p">,</span>
    <span class="sh">'</span><span class="s">maketitle</span><span class="sh">'</span><span class="p">:</span> <span class="sh">'</span><span class="s">\cover</span><span class="sh">'</span><span class="p">,</span>
    <span class="sh">'</span><span class="s">pointsize</span><span class="sh">'</span><span class="p">:</span> <span class="sh">''</span><span class="p">,</span>
    <span class="sh">'</span><span class="s">preamble</span><span class="sh">'</span><span class="p">:</span> <span class="sh">''</span><span class="p">,</span>
    <span class="sh">'</span><span class="s">releasename</span><span class="sh">'</span><span class="p">:</span> <span class="sh">""</span><span class="p">,</span>
    <span class="sh">'</span><span class="s">babel</span><span class="sh">'</span><span class="p">:</span> <span class="sh">''</span><span class="p">,</span>
    <span class="sh">'</span><span class="s">printindex</span><span class="sh">'</span><span class="p">:</span> <span class="sh">''</span><span class="p">,</span>
    <span class="sh">'</span><span class="s">fontenc</span><span class="sh">'</span><span class="p">:</span> <span class="sh">''</span><span class="p">,</span>
    <span class="sh">'</span><span class="s">inputenc</span><span class="sh">'</span><span class="p">:</span> <span class="sh">''</span><span class="p">,</span>
    <span class="sh">'</span><span class="s">classoptions</span><span class="sh">'</span><span class="p">:</span> <span class="sh">''</span><span class="p">,</span>
    <span class="sh">'</span><span class="s">utf8extra</span><span class="sh">'</span><span class="p">:</span> <span class="sh">''</span><span class="p">,</span>
<span class="p">}</span>

<span class="n">latex_additional_files</span> <span class="o">=</span> <span class="p">[</span><span class="sh">"</span><span class="s">mfgan-bw.sty</span><span class="sh">"</span><span class="p">,</span> <span class="sh">"</span><span class="s">mfgan.sty</span><span class="sh">"</span><span class="p">,</span> <span class="sh">"</span><span class="s">_static/cover.png</span><span class="sh">"</span><span class="p">]</span>
</code></pre></div></div>

<p>I also map a few unicode characters to their LaTeX equivalents:</p>

<div class="language-python highlighter-rouge"><div class="highlight"><pre class="highlight"><code><span class="k">def</span> <span class="nf">setup</span><span class="p">(</span><span class="n">app</span><span class="p">):</span>
    <span class="kn">from</span> <span class="n">sphinx.util.texescape</span> <span class="kn">import</span> <span class="n">tex_replacements</span>
    <span class="n">tex_replacements</span> <span class="o">+=</span> <span class="p">[(</span><span class="sa">u</span><span class="sh">'</span><span class="s">♮</span><span class="sh">'</span><span class="p">,</span> <span class="sa">u</span><span class="sh">'</span><span class="s">$</span><span class="se">\n</span><span class="s">atural$</span><span class="sh">'</span><span class="p">),</span>
                         <span class="p">(</span><span class="sa">u</span><span class="sh">'</span><span class="s">ē</span><span class="sh">'</span><span class="p">,</span> <span class="sa">u</span><span class="sh">'</span><span class="s">=e</span><span class="sh">'</span><span class="p">),</span>
                         <span class="p">(</span><span class="sa">u</span><span class="sh">'</span><span class="s">♩</span><span class="sh">'</span><span class="p">,</span> <span class="sa">u</span><span class="sh">'</span><span class="s">quarternote</span><span class="sh">'</span><span class="p">),</span>
                         <span class="p">(</span><span class="sa">u</span><span class="sh">'</span><span class="s">↑</span><span class="sh">'</span><span class="p">,</span> <span class="sa">u</span><span class="sh">'</span><span class="s">$\uparrow$</span><span class="sh">'</span><span class="p">)]</span>
</code></pre></div></div>

<h2 id="compiling">Compiling</h2>

<p>Finally, I use a custom <a href="https://gist.github.com/3856862">Makefile</a> to run Sphinx. It manages to be even more boring
than my configuration file, but it’s what allows me to generate multiple outputs. The
secret is to use the <code class="language-plaintext highlighter-rouge">-D</code> option in <code class="language-plaintext highlighter-rouge">sphinx-build</code> to set or override a setting in the
configuration file. For instance, these are the options I use to generate a B&amp;W PDF to be
printed and a color PDF to be read on the screen:</p>

<div class="language-make highlighter-rouge"><div class="highlight"><pre class="highlight"><code><span class="nv">PAPEROPTS</span><span class="o">=</span> <span class="nt">-D</span> latex_elements.pointsize<span class="o">=</span>11pt <span class="nt">-D</span> latex_elements.preamble<span class="o">=</span><span class="se">\u</span>sepackage<span class="o">{</span>mfgan-bw<span class="o">}</span> <span class="se">\</span>
<span class="nt">-D</span> <span class="nv">pygments_style</span><span class="o">=</span>bw <span class="nt">-D</span> <span class="nv">black_and_white</span><span class="o">=</span>True <span class="nt">-D</span> <span class="nv">code_example_wrap</span><span class="o">=</span>67 <span class="se">\</span>
<span class="nt">-D</span> <span class="nv">latex_show_pagerefs</span><span class="o">=</span>True

<span class="nv">SCREENOPTS</span><span class="o">=</span> <span class="nt">-D</span> latex_elements.pointsize<span class="o">=</span>12pt <span class="nt">-D</span> latex_elements.classoptions<span class="o">=</span>,openany,oneside <span class="se">\</span>
<span class="nt">-D</span> latex_elements.preamble<span class="o">=</span><span class="se">\u</span>sepackage<span class="o">{</span>mfgan<span class="o">}</span> <span class="nt">-D</span> <span class="nv">pygments_style</span><span class="o">=</span>my_pygment_style.BookStyle <span class="se">\</span>
<span class="nt">-D</span> <span class="nv">code_example_wrap</span><span class="o">=</span>67
</code></pre></div></div>

<p>And these are the related targets that use those options:</p>

<div class="language-plaintext highlighter-rouge"><div class="highlight"><pre class="highlight"><code>pdf:
    $(SPHINXBUILD) -b latex $(SCREENOPTS) $(ALLSPHINXOPTS) $(BUILDDIR)/latex
    sed -i .bak -f process-latex $(BUILDDIR)/latex/$(LATEX-NAME).tex
    rsync -a latex/ $(BUILDDIR)/latex/
    $(MAKE) -C $(BUILDDIR)/latex pdf

pdf-bw:
    $(SPHINXBUILD) -b latex -t black_and_white $(PAPEROPTS) $(ALLSPHINXOPTS) $(LATEX-BW)
    sed -i .bak -f process-latex $(LATEX-BW)/$(LATEX-NAME).tex
    sed -i .bak '/\setcounter{page}{1}/d' $(LATEX-BW)/sphinxmanual.cls
    rsync -a latex/ $(LATEX-BW)/
    $(MAKE) -C $(LATEX-BW)/ pdf
</code></pre></div></div>

<p>As we can see, I use <code class="language-plaintext highlighter-rouge">sed</code> to do some pre-processing and cleanup. Also, I use
<a href="http://latex-mk.sourceforge.net">latex-mk</a> to compile the LaTeX files. The Makefile that comes with Sphinx will
always compile the <code class="language-plaintext highlighter-rouge">.tex</code> file three times, even if it’s not necessary, while latex-mk
will only run LaTeX if necessary, resulting in shorter build times.</p>

<h2 id="conclusion">Conclusion</h2>

<p>I’m pretty happy with the final result. People have complemented me on how good the <a href="https://s3.amazonaws.com/musicforgeeksandnerds.com/music-for-geeks-and-nerds-sample.pdf">pdf
looks</a>. I think the Epub and Mobi versions are good enough, although not perfect.
However, they are as good as many commercial ebooks I’ve purchased. Although Docutils and
Sphinx can be extended, I wish they were even easier to extend, specially to change the
generated HTML and LaTeX outputs. The worst part in this process was dealing with Epub
and mobi readers. I love these devices as an user, but generating good looking technical
books proved to be a challenge due to bugs and lack of precise documentation. After I
launched my book I was horrified to discover that older Kindles don’t display tables. I
had to replace the tables with images in the mobi file.</p>

<p>I’m sorry I don’t have a simple one-click-install plugin to make Sphinx generate
beautiful books automatically. I’ll mature the ideas in this post and submit patches to
these projects. Let me know in the comments of similar features you need or things I
could have done better.</p>

<p><strong>Update</strong>: I forgot to mention that I’ve used the <code class="language-plaintext highlighter-rouge">XeLaTex</code> engine to be able to use TrueType fonts. That’s another reason I unset most LaTeX variables on <code class="language-plaintext highlighter-rouge">conf.py</code>.</p>

<p><strong>Edit:</strong> All (my) code linked is this post is released under the MIT license.</p>]]></content><author><name>Pedro Kroger</name></author><category term="Python" /><category term="Sphinx" /><summary type="html"><![CDATA[As I mentioned in a previous blog post, I used Sphinx to write my book, Music for Geeks and Nerds. With Sphinx I could generate HTML, Epub, Mobi (for the Kindle), and two PDF versions (black-and-white and color). Sphinx works quite nicely out-of-the-box for documenting computer programs, but I had to bend it a little to generate output more suitable for a book.]]></summary></entry><entry><title type="html">My ebook: Music for Geeks and Nerds</title><link href="https://pedrokroger.net/music/python/2012/07/25/music-for-geeks-and-nerds.html" rel="alternate" type="text/html" title="My ebook: Music for Geeks and Nerds" /><published>2012-07-25T21:00:07-03:00</published><updated>2012-07-25T21:00:07-03:00</updated><id>https://pedrokroger.net/music/python/2012/07/25/music-for-geeks-and-nerds</id><content type="html" xml:base="https://pedrokroger.net/music/python/2012/07/25/music-for-geeks-and-nerds.html"><![CDATA[<p>I’m happy to announce that I’m launching my ebook, <a href="/mfgan/">Music for Geeks and
Nerds</a>. It uses programming and mathematics to teach same aspects of music
and it answers long-standing questions such as why Eb and D# are different, and
which sequence <em>sounds</em> better, Pascal’s triangle or Fibonacci (place your
bets). I wrote it because I have friends who are programmers, computer
scientists, or engineers and they are always asking me for book recommendations
to learn more about music. There are good books out there, but I always feel
they present things in a prescriptive, “magical”, or worse, artsy way.</p>

<!--more-->

<p>We can see music in three layers:</p>

<ol>
  <li><strong>natural:</strong> <a href="http://en.wikipedia.org/wiki/Acoustics">acoustics</a> and <a href="http://en.wikipedia.org/wiki/Psychoacoustics">psychoacoustics</a>.</li>
  <li><strong>logical:</strong> the math for things like transposition and inversion.</li>
  <li><strong>social:</strong> the result of social conventions and usage over hundreds of years such as note and interval names.</li>
</ol>

<p>I find that hackers and programmers can learn the first two layers very quickly and, as a
result, they can have a better understanding of the social layer. In the book I explain
musical concepts in English with a corresponding implementation in Python, using the
<a href="https://github.com/kroger/pyknon">Pyknon</a> music library. By implementing musical concepts in a programming language we
can have a more precise way to describe and understand them.</p>

<p>For instance, some music students have problems to transpose notes mentally. However, it
becomes easy once you realize that transposition is nothing more than the sum of a note
and a transposition index (in the following example we use an integer notation for notes
where C = 0, C# = 1, …, B = 11):</p>

<p><img src="/img/2012-07/transposition.png" alt="" width="80%" /></p>

<p>I wrote the book using the <a href="http://docutils.sourceforge.net/rst.html">reStructuredText</a> markup and I used <a href="http://sphinx.pocoo.org">Sphinx</a> to
generate the following formats: black &amp; white pdf (for the printed version), color pdf,
mobi for kindle, epub, and html (for previewing). My favorite feature in Sphinx is the
<code class="language-plaintext highlighter-rouge">literalinclude</code> directive with the <code class="language-plaintext highlighter-rouge">pyobject</code> option to include the source code of
functions and methods.</p>

<p>My second favorite feature is the possibility of creating custom directives. For example,
I created a directive to insert the source code and the result of its execution in a
Python REPL, as we can see in the transposition example above. I also created custom
layouts for epub, mobi, and latex, and did some bending to use <a href="http://en.wikipedia.org/wiki/XeTeX">XeLaTeX</a> (to be able
to use nicer fonts). I’ll write about the details of using Sphinx to write books in an
upcoming blog post.</p>

<p>Finally, I used the services of <a href="http://proofreadingpal.com">Proofreadingpal</a> to professionally proofread and edit the manuscript.</p>

<p>I’m very pleased with the result. The idea for this book has been in the back of my head for a long time and it’s a joy to finally see it materialize. If you have suggestions or questions, I’d love to hear from you.</p>]]></content><author><name>Pedro Kroger</name></author><category term="Music" /><category term="Python" /><summary type="html"><![CDATA[I’m happy to announce that I’m launching my ebook, Music for Geeks and Nerds. It uses programming and mathematics to teach same aspects of music and it answers long-standing questions such as why Eb and D# are different, and which sequence sounds better, Pascal’s triangle or Fibonacci (place your bets). I wrote it because I have friends who are programmers, computer scientists, or engineers and they are always asking me for book recommendations to learn more about music. There are good books out there, but I always feel they present things in a prescriptive, “magical”, or worse, artsy way.]]></summary></entry><entry><title type="html">Harmonizing Every Scale With Python</title><link href="https://pedrokroger.net/music/python/2011/09/29/harmonizing-every-scale-python.html" rel="alternate" type="text/html" title="Harmonizing Every Scale With Python" /><published>2011-09-29T10:55:39-03:00</published><updated>2011-09-29T10:55:39-03:00</updated><id>https://pedrokroger.net/music/python/2011/09/29/harmonizing-every-scale-python</id><content type="html" xml:base="https://pedrokroger.net/music/python/2011/09/29/harmonizing-every-scale-python.html"><![CDATA[<p>I was advising some students the other day about harmonizing non-traditional scales and
someone mentioned how it would be useful to have a list of harmonizations for every
possible scale. I bragged that I could write a program in half-hour to accomplish it. Of
course it took longer than that, but I quickly wrote a small python program to generate
harmonizations for every possible scale and used <a href="lilypond.org/">LilyPond</a> to typeset them.</p>

<!--more-->

<p>The harmonization for the major scale is pretty simple; you stack notes vertically following every other note in the scale:</p>

<p><img src="/img/2011-09/scale.png" alt="" width="80%" /></p>

<p>In modern music it’s fairly common to use non-traditional scales to generate new and
interesting harmonies. For instance, in the example bellow I have a 7-note scale that is
very different from the good ol’ major scale. Right after the scale we have
harmonizations for every 3, 4, and 5 notes of the scale. Also notice that we break the
thing about having the interval in which we pick notes be the same of the horizontal
notes (that is, having chords in thirds, fourths, and so on). This leads to very
interesting harmonies.</p>

<p><img src="/img/2011-09/scales.png" alt="" width="100%" /></p>

<p>By the way, this is one of the reasons I got into programming in the first place; to
generate material to use in my <a href="/compositions/">compositions</a> (using Pascal back in the 90’s, if you
must know).</p>

<p>So, in order to harmonize every scale we need to know how many scales exist and the
answer will vary depending to whom you ask. In a way a scale is an ordered set of notes,
so I used the 129 <a href="http://en.wikipedia.org/wiki/Set_theory_(music)">pitch class sets</a> with cardinality greater than 5. <a href="https://github.com/kroger/pyknon/blob/master/pyknon/pc_sets.py">Here</a> is a
complete list of all pitch class sets. Some people will find that using <a href="http://www.jaytomlin.com/music/settheory/help.html#primeform">prime forms</a>
is too condensed and doesn’t take in account a bunch of scales, but it’ll do for the
purpose of this post.</p>

<p>The code to generate the harmonizations is actually very simple (with the help of my
in-progress <a href="https://github.com/kroger/pyknon">python library</a>). We harmonize the first note of a scale with
<code class="language-plaintext highlighter-rouge">harmonize_first_note</code> and use it in a list comprehension to harmonize every note of the
scale. The helper function <code class="language-plaintext highlighter-rouge">rotate_set</code> will generate every rotation of a list.</p>

<div class="language-python highlighter-rouge"><div class="highlight"><pre class="highlight"><code><span class="k">def</span> <span class="nf">harmonize_first_note</span><span class="p">(</span><span class="n">scale</span><span class="p">,</span> <span class="n">interval</span><span class="p">,</span> <span class="n">size</span><span class="p">):</span>
    <span class="n">i</span> <span class="o">=</span> <span class="p">(</span><span class="n">interval</span> <span class="o">-</span> <span class="mi">1</span><span class="p">)</span>
    <span class="n">indexes</span> <span class="o">=</span> <span class="p">[</span><span class="n">x</span> <span class="o">%</span> <span class="nf">len</span><span class="p">(</span><span class="n">scale</span><span class="p">)</span> <span class="k">for</span> <span class="n">x</span> <span class="ow">in</span> <span class="nf">range</span><span class="p">(</span><span class="mi">0</span><span class="p">,</span> <span class="n">size</span> <span class="o">*</span> <span class="n">i</span><span class="p">,</span> <span class="n">i</span><span class="p">)]</span>
    <span class="k">return</span> <span class="p">[</span><span class="n">scale</span><span class="p">[</span><span class="n">index</span><span class="p">]</span> <span class="k">for</span> <span class="n">index</span> <span class="ow">in</span> <span class="n">indexes</span><span class="p">]</span>

<span class="k">def</span> <span class="nf">harmonize_scale</span><span class="p">(</span><span class="n">scale</span><span class="p">,</span> <span class="n">interval</span><span class="p">,</span> <span class="n">size</span><span class="o">=</span><span class="mi">3</span><span class="p">):</span>
    <span class="n">scales</span> <span class="o">=</span> <span class="n">musiclib</span><span class="p">.</span><span class="nf">rotate_set</span><span class="p">(</span><span class="nf">sorted</span><span class="p">(</span><span class="n">scale</span><span class="p">))</span>
    <span class="k">return</span> <span class="p">[</span><span class="nf">harmonize_first_note</span><span class="p">(</span><span class="n">scale</span><span class="p">,</span> <span class="n">interval</span><span class="p">,</span> <span class="n">size</span><span class="p">)</span> <span class="k">for</span> <span class="n">scale</span> <span class="ow">in</span> <span class="n">scales</span><span class="p">]</span>
</code></pre></div></div>

<p>Here’s how we use it: A scale is defined as a list of integers (we are using <a href="http://en.wikipedia.org/wiki/Pitch_class#Integer_notation">integer
notation</a>). Let’s put the major scale in a variable. The result of
<code class="language-plaintext highlighter-rouge">harmonize_first_note</code> will be, as expected, just the first chord (C major) as a list of
integers:</p>

<div class="language-python highlighter-rouge"><div class="highlight"><pre class="highlight"><code><span class="n">scale</span> <span class="o">=</span> <span class="p">[</span><span class="mi">0</span><span class="p">,</span> <span class="mi">2</span><span class="p">,</span> <span class="mi">4</span><span class="p">,</span> <span class="mi">5</span><span class="p">,</span> <span class="mi">7</span><span class="p">,</span> <span class="mi">9</span><span class="p">,</span> <span class="mi">11</span><span class="p">]</span>

<span class="nf">harmonize_first_note</span><span class="p">(</span><span class="n">scale</span><span class="p">,</span> <span class="mi">3</span><span class="p">,</span> <span class="mi">3</span><span class="p">)</span>
<span class="o">&gt;&gt;&gt;</span> <span class="p">[</span><span class="mi">0</span><span class="p">,</span> <span class="mi">4</span><span class="p">,</span> <span class="mi">7</span><span class="p">]</span>
</code></pre></div></div>

<p>And the result of <code class="language-plaintext highlighter-rouge">harmonize_scale</code> will be a list with the harmonization of every chord
in the scale. In the next example I’m using 4 as the chord size to generate tetrads:</p>

<div class="language-python highlighter-rouge"><div class="highlight"><pre class="highlight"><code><span class="nf">harmonize_scale</span><span class="p">(</span><span class="n">scale</span><span class="p">,</span> <span class="mi">3</span><span class="p">,</span> <span class="mi">4</span><span class="p">)</span>
<span class="o">&gt;&gt;&gt;</span> <span class="p">[[</span><span class="mi">0</span><span class="p">,</span> <span class="mi">4</span><span class="p">,</span> <span class="mi">7</span><span class="p">,</span> <span class="mi">11</span><span class="p">],</span> <span class="p">[</span><span class="mi">2</span><span class="p">,</span> <span class="mi">5</span><span class="p">,</span> <span class="mi">9</span><span class="p">,</span> <span class="mi">0</span><span class="p">],</span> <span class="p">[</span><span class="mi">4</span><span class="p">,</span> <span class="mi">7</span><span class="p">,</span> <span class="mi">11</span><span class="p">,</span> <span class="mi">2</span><span class="p">],</span> <span class="p">[</span><span class="mi">5</span><span class="p">,</span> <span class="mi">9</span><span class="p">,</span> <span class="mi">0</span><span class="p">,</span> <span class="mi">4</span><span class="p">],</span>
     <span class="p">[</span><span class="mi">7</span><span class="p">,</span> <span class="mi">11</span><span class="p">,</span> <span class="mi">2</span><span class="p">,</span> <span class="mi">5</span><span class="p">],</span> <span class="p">[</span><span class="mi">9</span><span class="p">,</span> <span class="mi">0</span><span class="p">,</span> <span class="mi">4</span><span class="p">,</span> <span class="mi">7</span><span class="p">],</span> <span class="p">[</span><span class="mi">11</span><span class="p">,</span> <span class="mi">2</span><span class="p">,</span> <span class="mi">5</span><span class="p">,</span> <span class="mi">9</span><span class="p">]]</span>
</code></pre></div></div>

<p>Finally, lets generate tetrads separated by fourths instead of thirds:</p>

<div class="language-python highlighter-rouge"><div class="highlight"><pre class="highlight"><code><span class="nf">harmonize_scale</span><span class="p">(</span><span class="n">scale</span><span class="p">,</span> <span class="mi">4</span><span class="p">,</span> <span class="mi">4</span><span class="p">)</span>
<span class="o">&gt;&gt;&gt;</span> <span class="p">[[</span><span class="mi">0</span><span class="p">,</span> <span class="mi">5</span><span class="p">,</span> <span class="mi">11</span><span class="p">,</span> <span class="mi">4</span><span class="p">],</span> <span class="p">[</span><span class="mi">2</span><span class="p">,</span> <span class="mi">7</span><span class="p">,</span> <span class="mi">0</span><span class="p">,</span> <span class="mi">5</span><span class="p">],</span> <span class="p">[</span><span class="mi">4</span><span class="p">,</span> <span class="mi">9</span><span class="p">,</span> <span class="mi">2</span><span class="p">,</span> <span class="mi">7</span><span class="p">],</span> <span class="p">[</span><span class="mi">5</span><span class="p">,</span> <span class="mi">11</span><span class="p">,</span> <span class="mi">4</span><span class="p">,</span> <span class="mi">9</span><span class="p">],</span>
     <span class="p">[</span><span class="mi">7</span><span class="p">,</span> <span class="mi">0</span><span class="p">,</span> <span class="mi">5</span><span class="p">,</span> <span class="mi">11</span><span class="p">],</span> <span class="p">[</span><span class="mi">9</span><span class="p">,</span> <span class="mi">2</span><span class="p">,</span> <span class="mi">7</span><span class="p">,</span> <span class="mi">0</span><span class="p">],</span> <span class="p">[</span><span class="mi">11</span><span class="p">,</span> <span class="mi">4</span><span class="p">,</span> <span class="mi">9</span><span class="p">,</span> <span class="mi">2</span><span class="p">]]</span>
</code></pre></div></div>

<p>The code to generate the LilyPond file is boring, so I won’t talk about it here.</p>

<p>Generating harmonizations for every scale is interesting and all, but it start to get
interesting when we can filter things. For instance, I may want to generate
harmonizations for the scales that have more than 4 notes and have consecutive intervals
greater than 1 semitone. This can be accomplished with <code class="language-plaintext highlighter-rouge">filter_sets</code>. This is how I’d
express the previous example:</p>

<div class="language-python highlighter-rouge"><div class="highlight"><pre class="highlight"><code><span class="nf">filter_sets</span><span class="p">(</span><span class="k">lambda</span> <span class="n">intervals</span><span class="p">,</span> <span class="n">size</span><span class="p">:</span> <span class="n">size</span> <span class="o">&gt;</span> <span class="mi">4</span> <span class="ow">and</span> <span class="mi">1</span> <span class="ow">not</span> <span class="ow">in</span> <span class="n">intervals</span><span class="p">)</span>
</code></pre></div></div>

<p>The function <code class="language-plaintext highlighter-rouge">filter_sets</code> accepts an anonymous function with a list of the consecutive
intervals in a set and the size of a set as parameters. If the condition in the body of
the anonymous function is met the set is returned:</p>

<div class="language-python highlighter-rouge"><div class="highlight"><pre class="highlight"><code><span class="k">def</span> <span class="nf">filter_sets</span><span class="p">(</span><span class="n">condition</span><span class="p">):</span>
    <span class="n">sets</span> <span class="o">=</span> <span class="p">{}</span>
    <span class="k">for</span> <span class="n">forte</span><span class="p">,</span> <span class="n">pc_set</span> <span class="ow">in</span> <span class="n">musiclib</span><span class="p">.</span><span class="n">PC_SETS</span><span class="p">.</span><span class="nf">items</span><span class="p">():</span>
        <span class="n">intervals</span> <span class="o">=</span> <span class="n">musiclib</span><span class="p">.</span><span class="nf">intervals</span><span class="p">(</span><span class="n">pc_set</span><span class="p">)</span>
        <span class="n">size</span> <span class="o">=</span> <span class="nf">len</span><span class="p">(</span><span class="n">pc_set</span><span class="p">)</span>
        <span class="k">if</span> <span class="nf">condition</span><span class="p">(</span><span class="n">intervals</span><span class="p">,</span> <span class="n">size</span><span class="p">):</span>
            <span class="n">sets</span><span class="p">[</span><span class="n">forte</span><span class="p">]</span> <span class="o">=</span> <span class="n">pc_set</span>
    <span class="k">return</span> <span class="n">sets</span>
</code></pre></div></div>

<p>This is an example of how high-order functions can be used to abstract code. Also, the
built-in function all is very handy to chain conditions. Let’s say I want to get scales
that have more than 4 notes and have only 1 consecutive halftone and 1 consecutive whole
tone:</p>

<div class="language-python highlighter-rouge"><div class="highlight"><pre class="highlight"><code><span class="nf">filter_sets</span><span class="p">(</span><span class="k">lambda</span> <span class="n">i</span><span class="p">,</span> <span class="n">s</span><span class="p">:</span> <span class="nf">all</span><span class="p">([</span><span class="n">s</span> <span class="o">&gt;</span> <span class="mi">4</span><span class="p">,</span> <span class="n">i</span><span class="p">.</span><span class="nf">count</span><span class="p">(</span><span class="mi">1</span><span class="p">)</span> <span class="o">==</span> <span class="mi">1</span><span class="p">,</span> <span class="n">i</span><span class="p">.</span><span class="nf">count</span><span class="p">(</span><span class="mi">2</span><span class="p">)</span> <span class="o">==</span> <span class="mi">1</span><span class="p">]))</span>
</code></pre></div></div>

<p>Since I want to filter scales by interval content, it makes sense to write a small
function to help me. <code class="language-plaintext highlighter-rouge">cond_interval_count</code> abstracts the previous code:</p>

<div class="language-python highlighter-rouge"><div class="highlight"><pre class="highlight"><code><span class="k">def</span> <span class="nf">cond_interval_count</span><span class="p">(</span><span class="n">count_list</span><span class="p">):</span>
    <span class="k">return</span> <span class="k">lambda</span> <span class="n">i</span><span class="p">,</span> <span class="n">s</span><span class="p">:</span> <span class="nf">all</span><span class="p">([</span><span class="n">i</span><span class="p">.</span><span class="nf">count</span><span class="p">(</span><span class="n">interval</span><span class="p">)</span> <span class="o">==</span> <span class="n">count</span> <span class="k">for</span>
                             <span class="n">count</span><span class="p">,</span> <span class="n">interval</span> <span class="ow">in</span> <span class="n">count_list</span><span class="p">])</span>
</code></pre></div></div>

<p>So if I want the scales that have no consecutive halftones and only 1 consecutive whole
tone I can write it as:</p>

<div class="language-python highlighter-rouge"><div class="highlight"><pre class="highlight"><code><span class="n">cond</span> <span class="o">=</span> <span class="nf">cond_interval_count</span><span class="p">(((</span><span class="mi">0</span><span class="p">,</span> <span class="mi">1</span><span class="p">),</span> <span class="p">(</span><span class="mi">1</span><span class="p">,</span> <span class="mi">2</span><span class="p">)))</span>
<span class="nf">filter_sets</span><span class="p">(</span><span class="n">cond</span><span class="p">)</span>
</code></pre></div></div>

<p>There are a few things that can be improved:</p>

<ul>
  <li>Use some pitch spelling algorithm, like (<a href="http://citeseer.ist.psu.edu/viewdoc/summary?doi=10.1.1.12.8569">Meredith, 2003</a>) so we won’t have chords like C, D#, G</li>
  <li>Have better functions for filtering. The function I’m using looks for
consecutive intervals but it would be better to search for every interval in
the Pitch Class Set.</li>
  <li>Handle octaves better in the LilyPond generation. Some notes would be better on a different octave:</li>
</ul>

<p><img src="/img/2011-09/wrong-octave.png" alt="" width="15%" /></p>

<p>This post only scratches the surface of all things we can do. For anything more
complicated than that I’d use <a href="http://mit.edu/music21/">music21</a>, a nice and professional Python library for
computer-aided musicology. But it’s interesting too see how far we can go with a few
dozen lines of pure Python code and the use of nice abstractions. If you have an interest
in this kind of thing, there are lots of <a href="http://wiki.python.org/moin/PythonInMusic">Python packages</a> for music programming and
<a href="http://www.amazon.com/Notes-Metalevel-Introduction-Computer-Composition/dp/9026519753">Notes from the Metalevel: An Introduction to Computer Composition</a> is a nice book
about the topic (but it uses Scheme, not Python for the code).</p>]]></content><author><name>Pedro Kroger</name></author><category term="Music" /><category term="Python" /><summary type="html"><![CDATA[I was advising some students the other day about harmonizing non-traditional scales and someone mentioned how it would be useful to have a list of harmonizations for every possible scale. I bragged that I could write a program in half-hour to accomplish it. Of course it took longer than that, but I quickly wrote a small python program to generate harmonizations for every possible scale and used LilyPond to typeset them.]]></summary></entry><entry><title type="html">SICP in Python: 1.1 The Elements of Programming</title><link href="https://pedrokroger.net/programming/python/sicp/2011/09/01/sicp-python-1-1-elements-programming.html" rel="alternate" type="text/html" title="SICP in Python: 1.1 The Elements of Programming" /><published>2011-09-01T11:19:58-03:00</published><updated>2011-09-01T11:19:58-03:00</updated><id>https://pedrokroger.net/programming/python/sicp/2011/09/01/sicp-python-1-1-elements-programming</id><content type="html" xml:base="https://pedrokroger.net/programming/python/sicp/2011/09/01/sicp-python-1-1-elements-programming.html"><![CDATA[<p>I’m writing a series of posts about SICP in Python. You can read more about the
reasoning in the <a href="/sicp-python/">introductory post</a>.</p>

<p>The first chapter is about building abstractions with functions. I think it’s
remarkable that a book for beginners (pretty smart beginners, but still)
introduces assignment only in the third chapter (on page 220). I really think
this is the way to start a programming course. Probably all students know about
mathematical functions and with functions we can talk about things like bound
variables, scope, abstraction, composition, and recursion.</p>

<p>A powerful language needs to have the following things to allow the combination
of simple ideas to form complex ideas:</p>

<ul>
  <li>
    <p><strong>primitive expressions:</strong> the simplest entities in a language. Things like
numbers and arithmetic operations and functions.</p>
  </li>
  <li>
    <p><strong>means of combination:</strong> “by which compound elements are built from simpler
ones”;. Nesting combinations, such as <code class="language-plaintext highlighter-rouge">square(2 * square(3 + 7))</code> are simple
means of combination.</p>
  </li>
  <li>
    <p><strong>means of abstraction:</strong> “by which compound elements can be named and
manipulated as units”.</p>
  </li>
</ul>

<p><code class="language-plaintext highlighter-rouge">def</code> is the simplest mean of abstraction. The following code creates a function
and associates it with a name:</p>

<div class="language-python highlighter-rouge"><div class="highlight"><pre class="highlight"><code><span class="k">def</span> <span class="nf">square</span><span class="p">(</span><span class="n">x</span><span class="p">):</span>
    <span class="k">return</span> <span class="n">x</span> <span class="o">*</span> <span class="n">x</span>
</code></pre></div></div>

<p>It’s important to make the distinction of the act of creating a function and
naming it. We can create a function without a name (an anonymous function) with
<code class="language-plaintext highlighter-rouge">lambda</code>:</p>

<div class="language-python highlighter-rouge"><div class="highlight"><pre class="highlight"><code><span class="k">lambda</span> <span class="n">x</span><span class="p">:</span> <span class="n">x</span> <span class="o">*</span> <span class="n">x</span>
</code></pre></div></div>

<p>And we can assign it to a variable, giving it a name:</p>

<div class="language-python highlighter-rouge"><div class="highlight"><pre class="highlight"><code><span class="n">square2</span> <span class="o">=</span> <span class="k">lambda</span> <span class="n">x</span><span class="p">:</span> <span class="n">x</span> <span class="o">*</span> <span class="n">x</span>
</code></pre></div></div>

<p>And, in fact, we can see (with the help of the <a href="http://docs.python.org/library/dis.html">bytecode disassembler
module</a>) that Python will generate the same bytecode for both <code class="language-plaintext highlighter-rouge">square</code> and
<code class="language-plaintext highlighter-rouge">square2</code>:</p>

<div class="language-python highlighter-rouge"><div class="highlight"><pre class="highlight"><code><span class="o">&gt;&gt;&gt;</span> <span class="kn">import</span> <span class="n">dis</span>
<span class="o">&gt;&gt;&gt;</span> <span class="n">dis</span><span class="p">.</span><span class="nf">dis</span><span class="p">(</span><span class="n">square</span><span class="p">)</span>
<span class="mi">1</span> <span class="mi">0</span> <span class="n">LOAD_FAST</span> <span class="mi">0</span> <span class="p">(</span><span class="n">x</span><span class="p">)</span>
<span class="mi">3</span> <span class="n">LOAD_FAST</span> <span class="mi">0</span> <span class="p">(</span><span class="n">x</span><span class="p">)</span>
<span class="mi">6</span> <span class="n">BINARY_MULTIPLY</span>
<span class="mi">7</span> <span class="n">RETURN_VALUE</span>

<span class="o">&gt;&gt;&gt;</span> <span class="n">dis</span><span class="p">.</span><span class="nf">dis</span><span class="p">(</span><span class="n">square2</span><span class="p">)</span>
<span class="mi">1</span> <span class="mi">0</span> <span class="n">LOAD_FAST</span> <span class="mi">0</span> <span class="p">(</span><span class="n">x</span><span class="p">)</span>
<span class="mi">3</span> <span class="n">LOAD_FAST</span> <span class="mi">0</span> <span class="p">(</span><span class="n">x</span><span class="p">)</span>
<span class="mi">6</span> <span class="n">BINARY_MULTIPLY</span>
<span class="mi">7</span> <span class="n">RETURN_VALUE</span>
</code></pre></div></div>

<p>Having defined <em>square,</em> we can use it in combinations:</p>

<div class="language-python highlighter-rouge"><div class="highlight"><pre class="highlight"><code><span class="nf">square</span><span class="p">(</span><span class="mi">2</span> <span class="o">+</span> <span class="mi">5</span><span class="p">)</span>
<span class="nf">square</span><span class="p">(</span><span class="nf">square</span><span class="p">(</span><span class="mi">7</span> <span class="o">+</span> <span class="nf">square </span><span class="p">(</span><span class="mi">3</span><span class="p">)))</span>
</code></pre></div></div>

<p>And, naturally, we can use <code class="language-plaintext highlighter-rouge">square</code> as a building block:</p>

<div class="language-python highlighter-rouge"><div class="highlight"><pre class="highlight"><code><span class="k">def</span> <span class="nf">sum_of_squares</span><span class="p">(</span><span class="n">x</span><span class="p">,</span> <span class="n">y</span><span class="p">):</span>
    <span class="k">return</span> <span class="nf">square</span><span class="p">(</span><span class="n">x</span><span class="p">)</span> <span class="o">+</span> <span class="nf">square</span><span class="p">(</span><span class="n">y</span><span class="p">)</span>

<span class="nf">sum_of_squares</span><span class="p">(</span><span class="mi">3</span><span class="p">,</span> <span class="mi">4</span><span class="p">)</span>

<span class="k">def</span> <span class="nf">f</span><span class="p">(</span><span class="n">a</span><span class="p">):</span>
    <span class="k">return</span> <span class="nf">sum_of_squares</span><span class="p">(</span><span class="n">a</span> <span class="o">+</span> <span class="mi">1</span><span class="p">,</span> <span class="n">a</span> <span class="o">*</span> <span class="mi">2</span><span class="p">)</span>
</code></pre></div></div>

<p>The association between names and values, such as the name of a function, is
saved in a place called the <code class="language-plaintext highlighter-rouge">environment</code>. Chapter 3 will talk about the
environment in greater detail.</p>

<h2 id="applicative-and-normal-order">Applicative and Normal Order</h2>

<p>To evaluate combinations we follow a recursive rule (quoted verbatim):</p>

<ol>
  <li>Evaluate the subexpressions of the combination.</li>
  <li>Apply the procedure that is the value of the leftmost subexpression (the
operator) to the arguments that are the values of the other subexpressions
(the operands).</li>
</ol>

<p>The <a href="http://mitpress.mit.edu/sicp/full-text/book/book-Z-H-10.html#%_sec_1.1.5">substitution model</a> is a simple model to help us understand what happens
during evaluation. To evaluate procedures we have the following rule:</p>

<blockquote>
  <p>To apply a compound procedure to arguments, evaluate the body of the
procedure with each formal parameter replaced by the corresponding
argument.</p>
</blockquote>

<p>Keep in mind that “the purpose of the substitution is to help us think
about procedure application, not to provide a description of how the interpreter
really works” and SICP presents “a sequence of increasingly
elaborate models of how interpreters work, culminating with a complete
implementation of an interpreter and compiler in chapter 5”.</p>

<p>In the example below we can see two ways to evaluate the function <code class="language-plaintext highlighter-rouge">f</code> we defined
previously. The function <code class="language-plaintext highlighter-rouge">f</code> is defined in terms of <code class="language-plaintext highlighter-rouge">sum_of_squares</code>, which is
defined in terms of <code class="language-plaintext highlighter-rouge">square</code>, which is defined as the multiplication of a number
by itself. In the evaluation method on the left, an expression such as 5+1 is
evaluated and applied immediately. This method of evaluation is known as
<a href="http://en.wikipedia.org/wiki/Evaluation_strategy#Applicative_order">applicative order evaluation</a> (a kind of <a href="http://en.wikipedia.org/wiki/Strict_evaluation">strict evaluation</a>, used in
most programming languages, inclusive Python and Scheme). The evaluation method
on the right only evaluates an expression when needed. It’ll fully expand all
function calls first, and then evaluate what’s left. This is known as <em>normal
order evaluation</em>. Compare the result of both methods in line 5:</p>

<div class="language-python highlighter-rouge"><div class="highlight"><pre class="highlight"><code> <span class="c1"># applicative order normal order
</span><span class="nf">f</span><span class="p">(</span><span class="mi">5</span><span class="p">)</span> <span class="nf">f</span><span class="p">(</span><span class="mi">5</span><span class="p">)</span>
<span class="nf">sum_of_squares</span><span class="p">(</span><span class="mi">5</span><span class="o">+</span><span class="mi">1</span><span class="p">,</span> <span class="mi">5</span><span class="o">*</span><span class="mi">2</span><span class="p">)</span> <span class="nf">sum_of_squares</span><span class="p">(</span><span class="mi">5</span><span class="o">+</span><span class="mi">1</span><span class="p">,</span> <span class="mi">5</span><span class="o">*</span><span class="mi">2</span><span class="p">)</span>
<span class="nf">sum_of_squares</span><span class="p">(</span><span class="mi">6</span><span class="p">,</span> <span class="mi">10</span><span class="p">)</span> <span class="nf">square</span><span class="p">(</span><span class="mi">5</span><span class="o">+</span><span class="mi">1</span><span class="p">)</span> <span class="o">+</span> <span class="nf">square</span><span class="p">(</span><span class="mi">5</span><span class="o">*</span><span class="mi">2</span><span class="p">)</span>
<span class="nf">square</span><span class="p">(</span><span class="mi">6</span><span class="p">)</span> <span class="o">+</span> <span class="nf">square</span><span class="p">(</span><span class="mi">10</span><span class="p">)</span> <span class="p">((</span><span class="mi">5</span><span class="o">+</span><span class="mi">1</span><span class="p">)</span> <span class="o">*</span> <span class="p">(</span><span class="mi">5</span><span class="o">+</span><span class="mi">1</span><span class="p">))</span> <span class="o">+</span> <span class="p">((</span><span class="mi">5</span><span class="o">*</span><span class="mi">2</span><span class="p">)</span> <span class="o">*</span> <span class="p">(</span><span class="mi">5</span><span class="o">*</span><span class="mi">2</span><span class="p">))</span>
<span class="p">(</span><span class="mi">6</span> <span class="o">*</span> <span class="mi">6</span><span class="p">)</span> <span class="o">+</span> <span class="p">(</span><span class="mi">10</span> <span class="o">*</span> <span class="mi">10</span><span class="p">)</span> <span class="p">(</span><span class="mi">6</span> <span class="o">*</span> <span class="mi">6</span><span class="p">)</span> <span class="o">+</span> <span class="p">(</span><span class="mi">10</span> <span class="o">*</span> <span class="mi">10</span><span class="p">)</span>
<span class="mi">36</span> <span class="o">+</span> <span class="mi">100</span> <span class="mi">36</span> <span class="o">+</span> <span class="mi">100</span>
<span class="mi">136</span> <span class="mi">136</span>
</code></pre></div></div>

<p>Of course both methods yield the same answer, but this will not always be the
case, as we’ll see latter in this post (exercise 1.5) and in this series.</p>

<h2 id="conditional-expressions">Conditional Expressions</h2>

<p>The main point of this sub-section is to show how to write conditional
expressions in Scheme by implementing a function named <em>abs</em> to calculate the
absolute value of a number. Since <em>abs</em> is a built-in function in Python, I’ll
use <em>myabs</em> (it’s pretty hard not to think about cheesy late-night infomercials
with a function named like this ;-)). The first implementation follows the
mathematical definition and uses multiple predicates:</p>

<div class="language-python highlighter-rouge"><div class="highlight"><pre class="highlight"><code><span class="k">def</span> <span class="nf">myabs</span><span class="p">(</span><span class="n">x</span><span class="p">):</span>
    <span class="k">if</span> <span class="n">x</span> <span class="o">&gt;</span> <span class="mi">0</span><span class="p">:</span>
        <span class="k">return</span> <span class="n">x</span>
    <span class="k">elif</span> <span class="n">x</span> <span class="o">==</span> <span class="mi">0</span><span class="p">:</span>
        <span class="k">return</span> <span class="n">x</span>
    <span class="k">elif</span> <span class="n">x</span> <span class="o">&lt;</span> <span class="mi">0</span><span class="p">:</span>
        <span class="k">return</span> <span class="n">x</span>
</code></pre></div></div>

<p>This is unnecessarily long and can be shortened as:</p>

<div class="language-python highlighter-rouge"><div class="highlight"><pre class="highlight"><code><span class="k">def</span> <span class="nf">myabs</span><span class="p">(</span><span class="n">x</span><span class="p">):</span>
    <span class="k">if</span> <span class="n">x</span> <span class="o">&lt;</span> <span class="mi">0</span><span class="p">:</span>
        <span class="k">return</span> <span class="o">-</span><span class="n">x</span>
    <span class="k">else</span><span class="p">:</span>
        <span class="k">return</span> <span class="n">x</span>
</code></pre></div></div>

<p>And it can be even shorter by using the ternary operator (new in Python 2.5):</p>

<div class="language-python highlighter-rouge"><div class="highlight"><pre class="highlight"><code><span class="k">def</span> <span class="nf">myabs</span><span class="p">(</span><span class="n">x</span><span class="p">):</span>
    <span class="k">return</span> <span class="o">-</span><span class="n">x</span> <span class="k">if</span> <span class="n">x</span> <span class="o">&lt;</span> <span class="mi">0</span> <span class="k">else</span> <span class="n">x</span>
</code></pre></div></div>

<p>This sub-section also shows logical operators such as <em>and</em>, <em>or</em>, and <em>not</em>.
For instance, in Scheme the expression 5 &lt; x &lt; 10 would be written as (and (&gt; x
5) (&lt; x 10)) but the same thing in Python is just 5 &lt; x &lt; 10. Pretty cool, huh?</p>

<h3 id="exercise-14">Exercise 1.4</h3>

<p>This exercise asks the reader to describe the behavior of the following
procedure. I’ll use the original Scheme code, then I’ll show the equivalent in
Python.</p>

<div class="language-scheme highlighter-rouge"><div class="highlight"><pre class="highlight"><code><span class="p">(</span><span class="k">define</span> <span class="p">(</span><span class="nf">a-plus-abs-b</span> <span class="nv">a</span> <span class="nv">b</span><span class="p">)</span>
  <span class="p">((</span><span class="k">if</span> <span class="p">(</span><span class="nb">&gt;</span> <span class="nv">b</span> <span class="mi">0</span><span class="p">)</span> <span class="nv">+</span> <span class="nv">-</span><span class="p">)</span> <span class="nv">a</span> <span class="nv">b</span><span class="p">))</span>
</code></pre></div></div>

<p>This code may look weird at first (and I’m not talking about the parenthesis),
but we can just apply the substitution model to understand how it works. Let’s
copy the function’s body:</p>

<p><code class="language-plaintext highlighter-rouge">((if (&gt; b 0) + -) a b)</code></p>

<p>If <em>b</em> is greater than 0, the conditional expression will return the <em>+</em>
(addition) function, otherwise it’ll return the – (subtraction) function.
In Scheme + and – are functions, just like <code class="language-plaintext highlighter-rouge">sqrt</code>. Let’s suppose that <em>b</em>
is greater than 0 and the conditional expression will return +. We substitute +
for the conditional expression:</p>

<p><code class="language-plaintext highlighter-rouge">(+ a b)</code></p>

<p>The resulting expression is just the sum of <em>a</em> and <em>b</em>. This kind of thing is
possible because in Scheme functions are <a href="http://en.wikipedia.org/wiki/First-class_function">first-class</a>; we can create them at
runtime, pass them as arguments to other functions, and return them as values.</p>

<p>Functions are also first-class in Python, but + and – are not functions.
We can access Python’s basic operators with the <code class="language-plaintext highlighter-rouge">operator</code> module. For instance,
<code class="language-plaintext highlighter-rouge">operator.add(2, 2)</code> is equivalent to the expression <code class="language-plaintext highlighter-rouge">2 + 2</code>. So, we can write
the Scheme code above in Python as:</p>

<div class="language-python highlighter-rouge"><div class="highlight"><pre class="highlight"><code><span class="kn">from</span> <span class="n">operator</span> <span class="kn">import</span> <span class="n">add</span><span class="p">,</span> <span class="n">sub</span>

<span class="k">def</span> <span class="nf">a_plus_abs_b</span><span class="p">(</span><span class="n">a</span><span class="p">,</span> <span class="n">b</span><span class="p">):</span>
    <span class="nf">return </span><span class="p">(</span><span class="n">add</span> <span class="k">if</span> <span class="n">b</span> <span class="o">&gt;</span> <span class="mi">0</span> <span class="k">else</span> <span class="n">sub</span><span class="p">)(</span><span class="n">a</span><span class="p">,</span> <span class="n">b</span><span class="p">)</span>
</code></pre></div></div>

<h3 id="exercise-15">Exercise 1.5</h3>

<p>This exercise asks the reader to describe the behavior of the following code if
the interpreter uses applicative order evaluation and normal order evaluation.</p>

<div class="language-python highlighter-rouge"><div class="highlight"><pre class="highlight"><code><span class="k">def</span> <span class="nf">p</span><span class="p">():</span>
    <span class="k">return</span> <span class="nf">p</span><span class="p">()</span>

<span class="k">def</span> <span class="nf">test</span><span class="p">(</span><span class="n">x</span><span class="p">,</span> <span class="n">y</span><span class="p">):</span>
    <span class="k">return</span> <span class="mi">0</span> <span class="k">if</span> <span class="n">x</span> <span class="o">==</span> <span class="mi">0</span> <span class="k">else</span> <span class="n">y</span>

<span class="nf">test</span><span class="p">(</span><span class="mi">0</span><span class="p">,</span> <span class="nf">p</span><span class="p">())</span>
</code></pre></div></div>

<p>In applicative order evaluation, the interpreter will enter in an infinite loop,
regardless of the value of <code class="language-plaintext highlighter-rouge">test</code>‘s first argument, because both operands
will be evaluated before the function is called (line 7). With normal order
evaluation, the interpreter will evaluate only what is necessary, so if the
first argument of <code class="language-plaintext highlighter-rouge">test</code> is 0, it’ll return 0 because the second argument will
not be evaluated.</p>

<h2 id="square-roots-by-newtons-method">Square Roots By Newton’s Method</h2>

<p>One way to calculate square roots is by using Newton’s method of successive
approximations. We start with a guess <em>g</em> for the square root of a number <em>x</em>
and calculate a better guess by averaging <em>g</em> with <em>x/g</em>, or:</p>

<p><img src="/img/2011-09/square-root.png" alt="" width="30%" /></p>

<p>The following procedure tests if the guess we have is good enough for the number
<em>x</em> (the radicand) we want to compute the square root. If not it’ll keep trying
to improve the guess until it’s good enough:</p>

<div class="language-python highlighter-rouge"><div class="highlight"><pre class="highlight"><code><span class="k">def</span> <span class="nf">sqrt_iter</span><span class="p">(</span><span class="n">guess</span><span class="p">,</span> <span class="n">x</span><span class="p">):</span>
    <span class="k">if</span> <span class="nf">is_good_enough</span><span class="p">(</span><span class="n">guess</span><span class="p">,</span> <span class="n">x</span><span class="p">):</span>
        <span class="k">return</span> <span class="n">guess</span>
    <span class="k">else</span><span class="p">:</span>
        <span class="k">return</span> <span class="nf">sqrt_iter</span><span class="p">(</span><span class="nf">improve</span><span class="p">(</span><span class="n">guess</span><span class="p">,</span> <span class="n">x</span><span class="p">),</span> <span class="n">x</span><span class="p">)</span>
</code></pre></div></div>

<p>To improve a guess we average it by the number <em>x</em> divided by the guess:</p>

<div class="language-python highlighter-rouge"><div class="highlight"><pre class="highlight"><code><span class="k">def</span> <span class="nf">improve</span><span class="p">(</span><span class="n">guess</span><span class="p">,</span> <span class="n">x</span><span class="p">):</span>
    <span class="k">return</span> <span class="nf">average</span><span class="p">(</span><span class="n">guess</span><span class="p">,</span> <span class="n">x</span><span class="o">/</span><span class="n">guess</span><span class="p">)</span>
</code></pre></div></div>

<p>Average is easy enough to define:</p>

<div class="language-python highlighter-rouge"><div class="highlight"><pre class="highlight"><code><span class="k">def</span> <span class="nf">average</span><span class="p">(</span><span class="n">x</span><span class="p">,</span> <span class="n">y</span><span class="p">):</span>
    <span class="nf">return </span><span class="p">(</span><span class="n">x</span> <span class="o">+</span> <span class="n">y</span><span class="p">)</span><span class="o">/</span><span class="mi">2</span>
</code></pre></div></div>

<p>Of course, we need to define <code class="language-plaintext highlighter-rouge">is_good_enough</code>. A basic test is to see if the
square of the guess minus the original number <em>x</em> is smaller than some threshold
(we use 0.001). This is not a good test for very small and large numbers (see
exercise 1.7 in the book) but will do for a first try:</p>

<div class="language-python highlighter-rouge"><div class="highlight"><pre class="highlight"><code><span class="k">def</span> <span class="nf">is_good_enough</span><span class="p">(</span><span class="n">guess</span><span class="p">,</span> <span class="n">x</span><span class="p">):</span>
    <span class="k">return</span> <span class="nf">abs</span><span class="p">(</span><span class="nf">square</span><span class="p">(</span><span class="n">guess</span><span class="p">)</span> <span class="o">-</span> <span class="n">x</span><span class="p">)</span> <span class="o">&lt;</span> <span class="mf">0.001</span>
</code></pre></div></div>

<p>Finally, we need to start at some point. We begin with 1.0 as a guess:</p>

<div class="language-python highlighter-rouge"><div class="highlight"><pre class="highlight"><code><span class="k">def</span> <span class="nf">sqrt</span><span class="p">(</span><span class="n">x</span><span class="p">):</span>
    <span class="k">return</span> <span class="nf">sqrt_iter</span><span class="p">(</span><span class="mf">1.0</span><span class="p">,</span> <span class="n">x</span><span class="p">)</span>
</code></pre></div></div>

<h2 id="procedures-as-abstractions">Procedures as Abstractions</h2>

<p>One problem with our implementation of <code class="language-plaintext highlighter-rouge">sqrt</code> is that functions like
<code class="language-plaintext highlighter-rouge">is_good_enough</code>, <code class="language-plaintext highlighter-rouge">sqrt_iter</code> and <code class="language-plaintext highlighter-rouge">improve</code> are cluttering the global namespace.
It’s very important to decompose a problem in sub-parts like we did, were each
function does only one thing, but it’s also important to be able to group things
that are not going to be used in other contexts (like <code class="language-plaintext highlighter-rouge">improve</code> and
<code class="language-plaintext highlighter-rouge">sqrt_iter</code>). One solution is to nest the procedures in one <code class="language-plaintext highlighter-rouge">block structure</code>:</p>

<div class="language-python highlighter-rouge"><div class="highlight"><pre class="highlight"><code><span class="k">def</span> <span class="nf">sqrt</span><span class="p">(</span><span class="n">x</span><span class="p">):</span>
    <span class="k">def</span> <span class="nf">is_good_enough</span><span class="p">(</span><span class="n">guess</span><span class="p">,</span> <span class="n">x</span><span class="p">):</span>
        <span class="k">return</span> <span class="nf">abs</span><span class="p">(</span><span class="nf">square</span><span class="p">(</span><span class="n">guess</span><span class="p">)</span> <span class="o">-</span> <span class="n">x</span><span class="p">)</span> <span class="o">&lt;</span> <span class="mf">0.001</span>

    <span class="k">def</span> <span class="nf">improve</span><span class="p">(</span><span class="n">guess</span><span class="p">,</span> <span class="n">x</span><span class="p">):</span>
        <span class="k">return</span> <span class="nf">average</span><span class="p">(</span><span class="n">guess</span><span class="p">,</span> <span class="n">x</span><span class="o">/</span><span class="n">guess</span><span class="p">)</span>

    <span class="k">def</span> <span class="nf">sqrt_iter</span><span class="p">(</span><span class="n">guess</span><span class="p">,</span> <span class="n">x</span><span class="p">):</span>
        <span class="k">if</span> <span class="nf">is_good_enough</span><span class="p">(</span><span class="n">guess</span><span class="p">,</span> <span class="n">x</span><span class="p">):</span>
            <span class="k">return</span> <span class="n">guess</span>
        <span class="k">else</span><span class="p">:</span>
            <span class="k">return</span> <span class="nf">sqrt_iter</span><span class="p">(</span><span class="nf">improve</span><span class="p">(</span><span class="n">guess</span><span class="p">,</span> <span class="n">x</span><span class="p">),</span> <span class="n">x</span><span class="p">)</span>

    <span class="k">return</span> <span class="nf">sqrt_iter</span><span class="p">(</span><span class="mf">1.0</span><span class="p">,</span> <span class="n">x</span><span class="p">)</span>
</code></pre></div></div>

<p>Now the functions <code class="language-plaintext highlighter-rouge">sqrt_iter</code>, <code class="language-plaintext highlighter-rouge">is_good_enough</code>, and <code class="language-plaintext highlighter-rouge">improve</code> are internal to <em>sqrt</em> and are not exposed to other programmers.</p>

<p>But there’s something else. The variable <em>x</em> is bound in the scope of <code class="language-plaintext highlighter-rouge">sqrt</code> and
since <code class="language-plaintext highlighter-rouge">improve</code>, <code class="language-plaintext highlighter-rouge">is_good_enough</code>, and <code class="language-plaintext highlighter-rouge">sqrt_iter</code> are in the scope of <code class="language-plaintext highlighter-rouge">sqrt</code> we
don’t need to pass <em>x</em> explicitly as as argument to these functions. We can
rewrite the code to make <em>x</em> a free variable inside these functions. In this
case the interpreter will get the value of <em>x</em> from the enclosing scope_._ This
is an example of <a href="http://en.wikipedia.org/wiki/Scope_(programming#Lexical_scoping)">lexical scoping</a>:</p>

<div class="language-python highlighter-rouge"><div class="highlight"><pre class="highlight"><code><span class="k">def</span> <span class="nf">sqrt</span><span class="p">(</span><span class="n">x</span><span class="p">):</span>
    <span class="k">def</span> <span class="nf">is_good_enough</span><span class="p">(</span><span class="n">guess</span><span class="p">):</span>
        <span class="k">return</span> <span class="nf">abs</span><span class="p">(</span><span class="nf">square</span><span class="p">(</span><span class="n">guess</span><span class="p">)</span> <span class="o">-</span> <span class="n">x</span><span class="p">)</span> <span class="o">&lt;</span> <span class="mf">0.001</span>

    <span class="k">def</span> <span class="nf">improve</span><span class="p">(</span><span class="n">guess</span><span class="p">):</span>
        <span class="k">return</span> <span class="nf">average</span><span class="p">(</span><span class="n">guess</span><span class="p">,</span> <span class="n">x</span><span class="o">/</span><span class="n">guess</span><span class="p">)</span>

    <span class="k">def</span> <span class="nf">sqrt_iter</span><span class="p">(</span><span class="n">guess</span><span class="p">):</span>
        <span class="k">if</span> <span class="nf">is_good_enough</span><span class="p">(</span><span class="n">guess</span><span class="p">):</span>
            <span class="k">return</span> <span class="n">guess</span>
        <span class="k">else</span><span class="p">:</span>
            <span class="k">return</span> <span class="nf">sqrt_iter</span><span class="p">(</span><span class="nf">improve</span><span class="p">(</span><span class="n">guess</span><span class="p">))</span>

    <span class="k">return</span> <span class="nf">sqrt_iter</span><span class="p">(</span><span class="mf">1.0</span><span class="p">)</span>
</code></pre></div></div>

<h2 id="summary">Summary</h2>

<p>In the first section of SICP the authors introduce the notion of the environment
and lexical scoping (both will be explored in more detail latter in the book),
evaluation methods, and, above all, functional abstraction. I think this is a
pretty sophisticated introduction for beginners and shows why SICP is considered
one of the classics of computer science.</p>]]></content><author><name>Pedro Kroger</name></author><category term="Programming" /><category term="Python" /><category term="SICP" /><summary type="html"><![CDATA[I’m writing a series of posts about SICP in Python. You can read more about the reasoning in the introductory post.]]></summary></entry><entry><title type="html">SICP in Python</title><link href="https://pedrokroger.net/programming/python/sicp/2011/08/31/sicp-python.html" rel="alternate" type="text/html" title="SICP in Python" /><published>2011-08-31T11:29:21-03:00</published><updated>2011-08-31T11:29:21-03:00</updated><id>https://pedrokroger.net/programming/python/sicp/2011/08/31/sicp-python</id><content type="html" xml:base="https://pedrokroger.net/programming/python/sicp/2011/08/31/sicp-python.html"><![CDATA[<p><em>Structure and Interpretation of Computer Programs</em> (a.k.a SICP, or “The Wizard
Book”) is considered one of the <a href="http://www.amazon.com/review/R3G05B1TQ5XGZP/ref=cm_cr_rdp_perm">great computer science books</a>. <a href="http://programming-musings.org/2007/01/31/a-scheme-bookshelf/">Some
people</a> claim it will make you a <a href="http://lispy.wordpress.com/2007/10/13/how-studying-sicp-made-me-a-better-programmer/">better programmer</a>. It was the
entry-level computer science subject at MIT and it’s still used in universities
like Berkeley. One of the great things about SICP is that it focus on
computational processes and ideas, instead of just teaching syntax.</p>

<!--more-->

<p>We can find more about the book’s goals in the <a href="http://mitpress.mit.edu/sicp/full-text/book/book-Z-H-7.html">Preface to the First Edition</a>:</p>

<blockquote class="blockquote">
  <p>Our design of this introductory computer-science subject reflects two major
concerns. First, we want to establish the idea that a computer language is not
just a way of getting a computer to perform operations but rather that it is a
novel formal medium for expressing ideas about methodology. Thus, <strong>programs
must be written for people to read, and only incidentally for machines to
execute</strong>. Second, we believe that the essential material to be addressed by a
subject at this level is not the syntax of particular programming-language
constructs, nor clever algorithms for computing particular functions
efficiently, nor even the mathematical analysis of algorithms and the
foundations of computing, but rather the techniques used to control the
intellectual complexity of large software systems. <strong>Our goal is that students
who complete this subject should have a good feel for the elements of style
and the aesthetics of programming</strong>.</p>
</blockquote>

<p>The emphasis in bold is mine to show a couple of my favorite quotes (my favorite
quote of all times must be Alan Perlis’ “Syntactic sugar causes cancer of the
semicolon”, but I digress).</p>

<p>The whole book is <a href="http://mitpress.mit.edu/sicp/full-text/book/book.html">available for free</a> and the book’s page at MIT has lots of <a href="http://mitpress.mit.edu/sicp/">extra
material</a>. Also, there are some highly recommended <a href="http://groups.csail.mit.edu/mac/classes/6.001/abelson-sussman-lectures/">video lectures</a> by the authors
of the book.</p>

<p>SICP uses the Lisp dialect <a href="http://en.wikipedia.org/wiki/Scheme_(programming_language)">scheme</a>, but since SICP concentrates on <em>programming
ideas</em> rather than languages, there are some efforts to translate the code in the book to
<a href="http://www.codepoetics.com/wiki/index.php?title=Topics:SICP_in_other_languages">other programming languages</a>. I think this is a good thing, because even if scheme is
a beautiful language (it really is) and I think everyone should learn it, it’s good to
see how the ideas presented in SICP can be translated to other languages.</p>

<p>I have read a good chunk of SICP and watched most video lectures before, but I didn’t do
the exercises. Now, I want to read it again and do as many exercises as I can. Since I’ve
been programming a lot in Python these days, I am curious to see how the ideas in SICP
will translate to Python. So, my plan is to read the book and do the exercises using
Python instead of Scheme. There are good <a href="http://eli.thegreenplace.net/category/programming/lisp/sicp/">notes</a> and <a href="http://www.kendyck.com/solutions-to-sicp/">solutions</a> for the
exercises on the web and I may consult those as needed (giving fully credit, of course).</p>

<p>I’ll post my notes with the (Python) code. I’ll try to capture the essence of each
section, instead of trying to post every single thing and exercise, but we’ll see how it
works. I hope this will be a good resource for the Python community. Let me know in the
comments what you think.</p>

<p>Why don’t you go ahead and read the <a href="/sicp-python-1-1-elements-programming/">post about section 1.1</a>?</p>

<!-- Links -->]]></content><author><name>Pedro Kroger</name></author><category term="Programming" /><category term="Python" /><category term="SICP" /><summary type="html"><![CDATA[Structure and Interpretation of Computer Programs (a.k.a SICP, or “The Wizard Book”) is considered one of the great computer science books. Some people claim it will make you a better programmer. It was the entry-level computer science subject at MIT and it’s still used in universities like Berkeley. One of the great things about SICP is that it focus on computational processes and ideas, instead of just teaching syntax.]]></summary></entry><entry><title type="html">Printing Python Code With LaTeX</title><link href="https://pedrokroger.net/latex/python/2011/04/10/printing-python-code-latex.html" rel="alternate" type="text/html" title="Printing Python Code With LaTeX" /><published>2011-04-10T11:13:58-03:00</published><updated>2011-04-10T11:13:58-03:00</updated><id>https://pedrokroger.net/latex/python/2011/04/10/printing-python-code-latex</id><content type="html" xml:base="https://pedrokroger.net/latex/python/2011/04/10/printing-python-code-latex.html"><![CDATA[<p>Call me old fashioned but I like to review my code by printing it. Yes, on paper.</p>

<p>The advantage of reviewing code on paper instead of the monitor is that I can give my
eyes a break and I can annotate more freely, connect things with arrows, draw boxes, etc.
I don’t print my code everyday, after all this is not the 80’s, but I like to print the
code when I feel it could benefit from some refactoring and re-structuring and my brain
could benefit from same change in the medium and even location (I can grab the printouts
and go to a park or cafe).</p>

<!--more-->

<p>The best way I found to print code is by using the LaTaX <a href="http://www.ctan.org/tex-archive/macros/latex/contrib/listings/">listings</a> package (it should
be included in any modern LaTeX distribution). This package is intended to include code
snippets in papers and books, but it works to generate code listings as well.</p>

<p>These are the options I have in my LaTeX document header:</p>

<div class="language-latex highlighter-rouge"><div class="highlight"><pre class="highlight"><code>documentclass[10pt]<span class="p">{</span>article<span class="p">}</span>
usepackage[T1]<span class="p">{</span>fontenc<span class="p">}</span>
usepackage[scaled]<span class="p">{</span>beramono<span class="p">}</span>
renewcommand*familydefault<span class="p">{</span>ttdefault<span class="p">}</span>
usepackage<span class="p">{</span>listings<span class="p">}</span>
</code></pre></div></div>

<p>The <a href="http://www.tug.dk/FontCatalogue/beramono/">beramono</a> package is a version of Bitstream Vera Mono modified to work with TeX. Without it we’ll get the default LaTeX mono font:</p>

<p><img src="/img/2011-04/code-ugly1.png" alt="" width="90%" /></p>

<p>But I like Bitstream Vera better (it looks even better on paper):</p>

<p><img src="/img/2011-04/code-pretty1.png" alt="" width="90%" /></p>

<p>Listings has support for Python out-of-the-box and has lots of options and features
(check the <a href="http://mirrors.ctan.org/macros/latex/contrib/listings/listings.pdf">manual</a> to see what listings can do). These are the options I like to
customize:</p>

<div class="language-latex highlighter-rouge"><div class="highlight"><pre class="highlight"><code><span class="k">\lstset</span><span class="p">{</span>
  language=Python,
  showstringspaces=false,
  formfeed=newpage,
  tabsize=4,
  commentstyle=itshape,
  basicstyle=ttfamily,
  morekeywords=<span class="p">{</span>models, lambda, forms<span class="p">}</span>
<span class="p">}</span>
</code></pre></div></div>

<p>Options like tabsize and showstringspace are self-explanatory. The option
<code class="language-plaintext highlighter-rouge">formfeed=newpage</code> will replace the formfeed character by the LaTeX command <code class="language-plaintext highlighter-rouge">newpage</code>,
creating a new page at that point. Sometimes I put some line feed characters in my code
so I can do things like <a href="http://www.gnu.org/software/emacs/manual/html_node/emacs/Narrowing.html">narrowing to a page</a> in Emacs. Emacs shows line feed
characters as <code class="language-plaintext highlighter-rouge">^L</code>, as you can see here:</p>

<p><img src="/img/2011-04/emacs-formfeed1.png" alt="" width="50%" /></p>

<p>The option <code class="language-plaintext highlighter-rouge">morekeywords</code> will add the keywords in the list of keywords recognized by
Listings. In my example I added <code class="language-plaintext highlighter-rouge">lambda</code>, <code class="language-plaintext highlighter-rouge">models</code> and <code class="language-plaintext highlighter-rouge">forms</code> (I’ve been working a lot
with Django lately), so these keywords will be pretty-printed.</p>

<p>Finally, I use the command <code class="language-plaintext highlighter-rouge">lstinputlisting</code> to include a source code file in the LaTeX
file (instead of having to type the whole thing in the LaTeX file). I like to separate
each section by a horizontal line and add some space at the end. I define a command to
abstract this:</p>

<div class="language-latex highlighter-rouge"><div class="highlight"><pre class="highlight"><code><span class="k">\newcommand</span><span class="p">{</span>code<span class="p">}</span>[2]<span class="p">{</span>
  hrulefill
  subsection*<span class="p">{</span>#1<span class="p">}</span>
  lstinputlisting<span class="p">{</span>#2<span class="p">}</span>
  vspace<span class="p">{</span>2em<span class="p">}</span>
<span class="p">}</span>
</code></pre></div></div>

<p>So in the end this is how I insert a Python file:</p>

<div class="language-latex highlighter-rouge"><div class="highlight"><pre class="highlight"><code><span class="k">\code</span><span class="p">{</span>Models<span class="p">}{</span>../testapp/models.py<span class="p">}</span>
</code></pre></div></div>

<p>And this is the result:</p>

<p><img src="/img/2011-04/listings-model1.png" alt="" width="90%" /></p>

<p>I believe that reviewing my code on paper has save me hours of work and I find listings
to be a very good option to print source code. I added a full LaTeX template <a href="https://gist.github.com/kroger/6140188">here</a>.</p>

<p>Do you print your source code? If so, what tool do you use? Let me know in the comments.</p>]]></content><author><name>Pedro Kroger</name></author><category term="Latex" /><category term="Python" /><summary type="html"><![CDATA[Call me old fashioned but I like to review my code by printing it. Yes, on paper.]]></summary></entry></feed>