As I mentioned in a previous blog post, I used Sphinx to write my book, Music for Geeks and Nerds. With Sphinx I could generate HTML, Epub, Mobi (for the Kindle), and two PDF versions (black-and-white and color). Sphinx works quite nicely out-of-the-box for documenting computer programs, but I had to bend it a little to generate output more suitable for a book.
Please keep in mind that I came up with these techniques while writing my book. My main goal was to finish the book and to spend as little time as possible fiddling with my tools. Therefore, while some of these solutions are ok, others are kind of hacky. I’m posting them hoping they’ll be useful, but they are not a polished product.
Themes
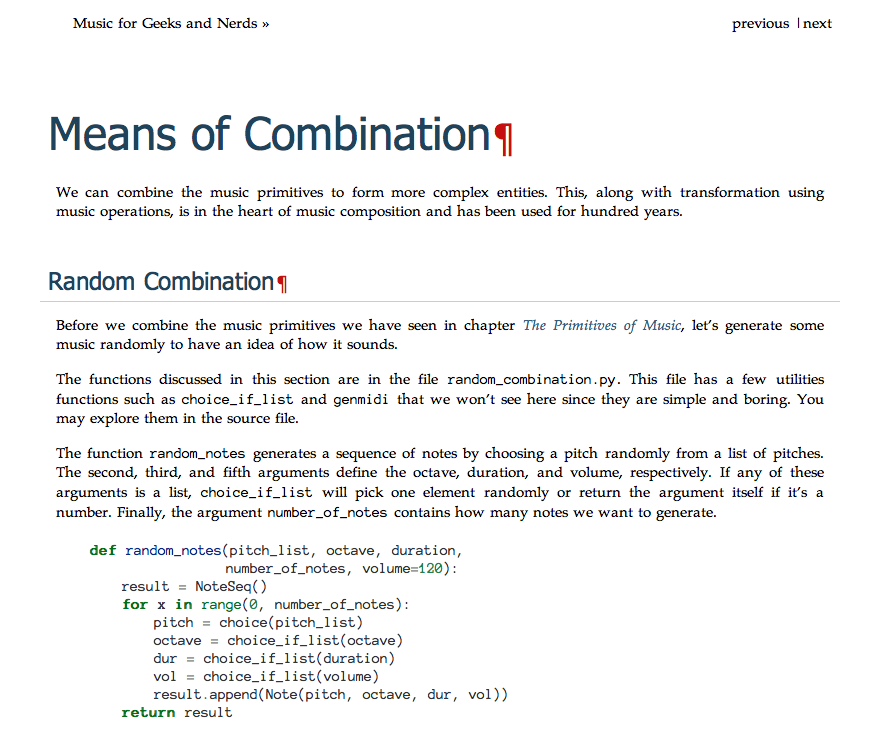
Sphinx comes with a few themes out-of-the-box and it’s very easy to create new ones. I created three themes: a minimalist html theme for previewing the book while I was writing (called ‘book’), an Epub theme (‘epub2’), and a mobi theme (‘mobi’). Here is a screenshot of the html theme:
Besides removing things from the base theme such as the sidebar, I used @font-face to
define Anonymous Pro as the font for the code examples. I defined the following in my
themes/book/static/default.css_t (with similar code for for bold, italic, and
bold-italic variants):
@font-face {
font-family: AnonymousPro;
font-weight: normal;
font-style: normal;
src: url("fonts/Anonymous Pro.ttf");
}
In themes/book/theme.conf I defined Palatino as the body font:
bodyfont = 'Palatino', serif
headfont = Tahoma, Geneva, sans-serif;
The ePub theme is very simple. Sphinx comes with a default theme for ePub, but it has some rough edges. For instance, it shows a copyright notice at the end of each chapter:

Most Sphinx themes extends a basic theme. Since the html for the ePub file is very
simple, I decided to create the layout.html file from scratch, without inheriting from
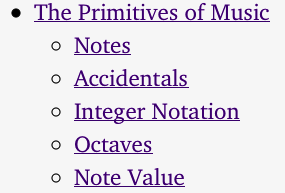
the base theme. As you can see here, my Epub theme is super simple. In the css file
I use the same @font-face trick I used in the html theme. I also changed small things,
like not showing bullets in the Table of Contents:
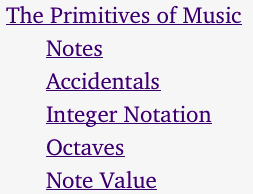
In the following image you can see the difference between the out-of-the box ePub style and my style using pygments and AnonymousPro:

The mobi theme is very similar to the epub2 style, except it doesn’t use @font-face and
the highlighted source code is black and white, since most kindle readers don’t support
these features. However, there’s a bug in iBooks that prevents it from showing the right
font when one uses the span tag, as pigments does to generate the highlighted source
code. Kindle seems to have similar restrictions. To fix this I created custom builders.
The ePub Builder
The builder epub2 is a subclass of the built-in ePub builder. It disables visible links
and replaces the span tag with samp due to the bug I mentioned earlier. By default
the built-in ePub builder will generate links like this:

but I prefer not to show the url:

You can see the full builder here. A much nicer solution would be to create a new
writer by subclassing writers.html.HTMLWriter and have it emit samp directly
instead of span. However, I could not find a way to make my builder use the new writer
without copying a lot of code from the original HTMLWriter (and, therefore, negating
the benefits of subclassing).
The mobi Builder
I created a mobi builder by copying the epub builder from Sphinx and making the
necessary changes. Maybe I could have subclassed it (I’ve seen a mobi builder on github
that did that), but I wanted to have separate configuration options for the mobi file,
such as mobi_cover. It uses Amazon’s kindlegen to convert the html pages to the
mobi format.
Code examples
Sphinx makes it really easy to show code examples with literalinclude, specially
with the :pyobject: option, which shows only a selected Python class, function, or
method in a file. In the following example I want to show the definition of the function
note_name defined in pyknon/simplemusic.py:
.. literalinclude:: pyknon/simplemusic.py
    :pyobject: note_name
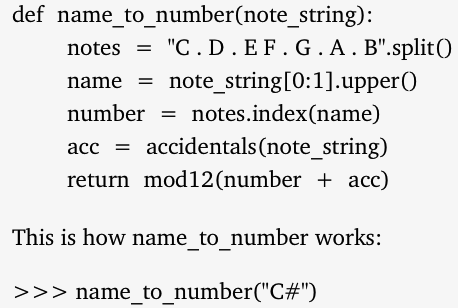
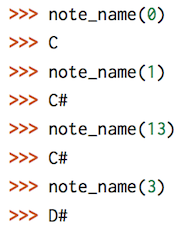
This is very simple and straightforward, but I also wanted an easy way to show examples displaying the usage of a function and the result of its computation, like in the following image:
I could just type the code in the python REPL and copy and paste the result, but if the
function changes I might need to update the examples manually, which could lead to some
examples being outdated or wrong. And code examples that won’t run or with mistakes can
be a big source of frustration in programming books. To solve this I hacked an extension
called code-example that behaves like literalinclude, but it adds the code and the
result of its computation in a Python REPL. Its usage is the same as literalinclude:
.. code-example:: note_name.py
Following is the content of note_name.py. Notice note_name is called four times, but
note_name.py doesn’t have the result of the function calls. The result will be computed
and displayed by code-example. Also, import lines won’t show in the result:
from pyknon.simplemusic import note_name

note_name(0)
note_name(1)
note_name(13)
note_name(3)
You can find code-example here. It’s hackish, but it saved me a lot of time checking if my code examples where updated and gave more confidence in the final result.
Autoimage
One of the most annoying things about working with a source file that is intended to have multiple outputs such as PDF and HTML is how to deal with images. Often images will have to be scaled differently depending on the output. For instance, I used to have code like the following:
.. only:: not latex

.. image:: figs/notation3.png
    :scale: 40

.. only:: latex

.. image:: figs/notation3.png
    :scale: 80
It has quite a bit of repetition and sometimes I’d type an extra space or the wrong
number of blank lines and the output would be wrong since Sphinx is fastidious about
spacing and blank lines (for instance, it needs the blank like after the line with
..only). I wrote the extension autoimage to simplify this. With it the previous
example becomes:
.. autoimage:: notation3.png
    :scale-html: 40
    :scale-latex: 80
Autoimage is somewhat smart. It tries to use a pdf image if it’s available and the
backend is LaTeX, and looks for a black-and-white image if the configuration option
black_and_white is true. After I finished the extension and converted the whole book I
discovered that Sphinx caches things and share values among builds. It means that, in the
previous example, if I built a pdf and a html version of my book in that order,
notation3.png would be scaled 80% in both cases, instead of 80 and 40 percent. To solve
this I just run sphinx-build with the -E option.
Configuration
My Sphinx configuration file is the most boring part of this blog post, but I’m including it here in case you’re curious. I unset almost all LaTeX options. This allows me to use these options in any LaTeX style I want. I use two styles, one for the color version and another for B&W:
latex_elements = {
    'papersize': '',
    'fontpkg': '',
    'fncychap': '',
    'maketitle': '\cover',
    'pointsize': '',
    'preamble': '',
    'releasename': "",
    'babel': '',
    'printindex': '',
    'fontenc': '',
    'inputenc': '',
    'classoptions': '',
    'utf8extra': '',
}

latex_additional_files = ["mfgan-bw.sty", "mfgan.sty", "_static/cover.png"]
I also map a few unicode characters to their LaTeX equivalents:
def setup(app):
    from sphinx.util.texescape import tex_replacements
    tex_replacements += [(u'♮', u'$\natural$'),
                         (u'ē', u'=e'),
                         (u'♩', u'quarternote'),
                         (u'↑', u'$\uparrow$')]
Compiling
Finally, I use a custom Makefile to run Sphinx. It manages to be even more boring
than my configuration file, but it’s what allows me to generate multiple outputs. The
secret is to use the -D option in sphinx-build to set or override a setting in the
configuration file. For instance, these are the options I use to generate a B&W PDF to be
printed and a color PDF to be read on the screen:
PAPEROPTS= -D latex_elements.pointsize=11pt -D latex_elements.preamble=\usepackage{mfgan-bw} \
-D pygments_style=bw -D black_and_white=True -D code_example_wrap=67 \
-D latex_show_pagerefs=True

SCREENOPTS= -D latex_elements.pointsize=12pt -D latex_elements.classoptions=,openany,oneside \
-D latex_elements.preamble=\usepackage{mfgan} -D pygments_style=my_pygment_style.BookStyle \
-D code_example_wrap=67
And these are the related targets that use those options:
pdf:
    $(SPHINXBUILD) -b latex $(SCREENOPTS) $(ALLSPHINXOPTS) $(BUILDDIR)/latex
    sed -i .bak -f process-latex $(BUILDDIR)/latex/$(LATEX-NAME).tex
    rsync -a latex/ $(BUILDDIR)/latex/
    $(MAKE) -C $(BUILDDIR)/latex pdf

pdf-bw:
    $(SPHINXBUILD) -b latex -t black_and_white $(PAPEROPTS) $(ALLSPHINXOPTS) $(LATEX-BW)
    sed -i .bak -f process-latex $(LATEX-BW)/$(LATEX-NAME).tex
    sed -i .bak '/\setcounter{page}{1}/d' $(LATEX-BW)/sphinxmanual.cls
    rsync -a latex/ $(LATEX-BW)/
    $(MAKE) -C $(LATEX-BW)/ pdf
As we can see, I use sed to do some pre-processing and cleanup. Also, I use
latex-mk to compile the LaTeX files. The Makefile that comes with Sphinx will
always compile the .tex file three times, even if it’s not necessary, while latex-mk
will only run LaTeX if necessary, resulting in shorter build times.
Conclusion
I’m pretty happy with the final result. People have complemented me on how good the pdf looks. I think the Epub and Mobi versions are good enough, although not perfect. However, they are as good as many commercial ebooks I’ve purchased. Although Docutils and Sphinx can be extended, I wish they were even easier to extend, specially to change the generated HTML and LaTeX outputs. The worst part in this process was dealing with Epub and mobi readers. I love these devices as an user, but generating good looking technical books proved to be a challenge due to bugs and lack of precise documentation. After I launched my book I was horrified to discover that older Kindles don’t display tables. I had to replace the tables with images in the mobi file.
I’m sorry I don’t have a simple one-click-install plugin to make Sphinx generate beautiful books automatically. I’ll mature the ideas in this post and submit patches to these projects. Let me know in the comments of similar features you need or things I could have done better.
Update: I forgot to mention that I’ve used the XeLaTex engine to be able to use TrueType fonts. That’s another reason I unset most LaTeX variables on conf.py.
Edit: All (my) code linked is this post is released under the MIT license.